

- Python
- TypeScript
- Java
- Kotlin
- C#
- Ruby
- Rust
You can find the complete code for this tutorial here.Add That The client will: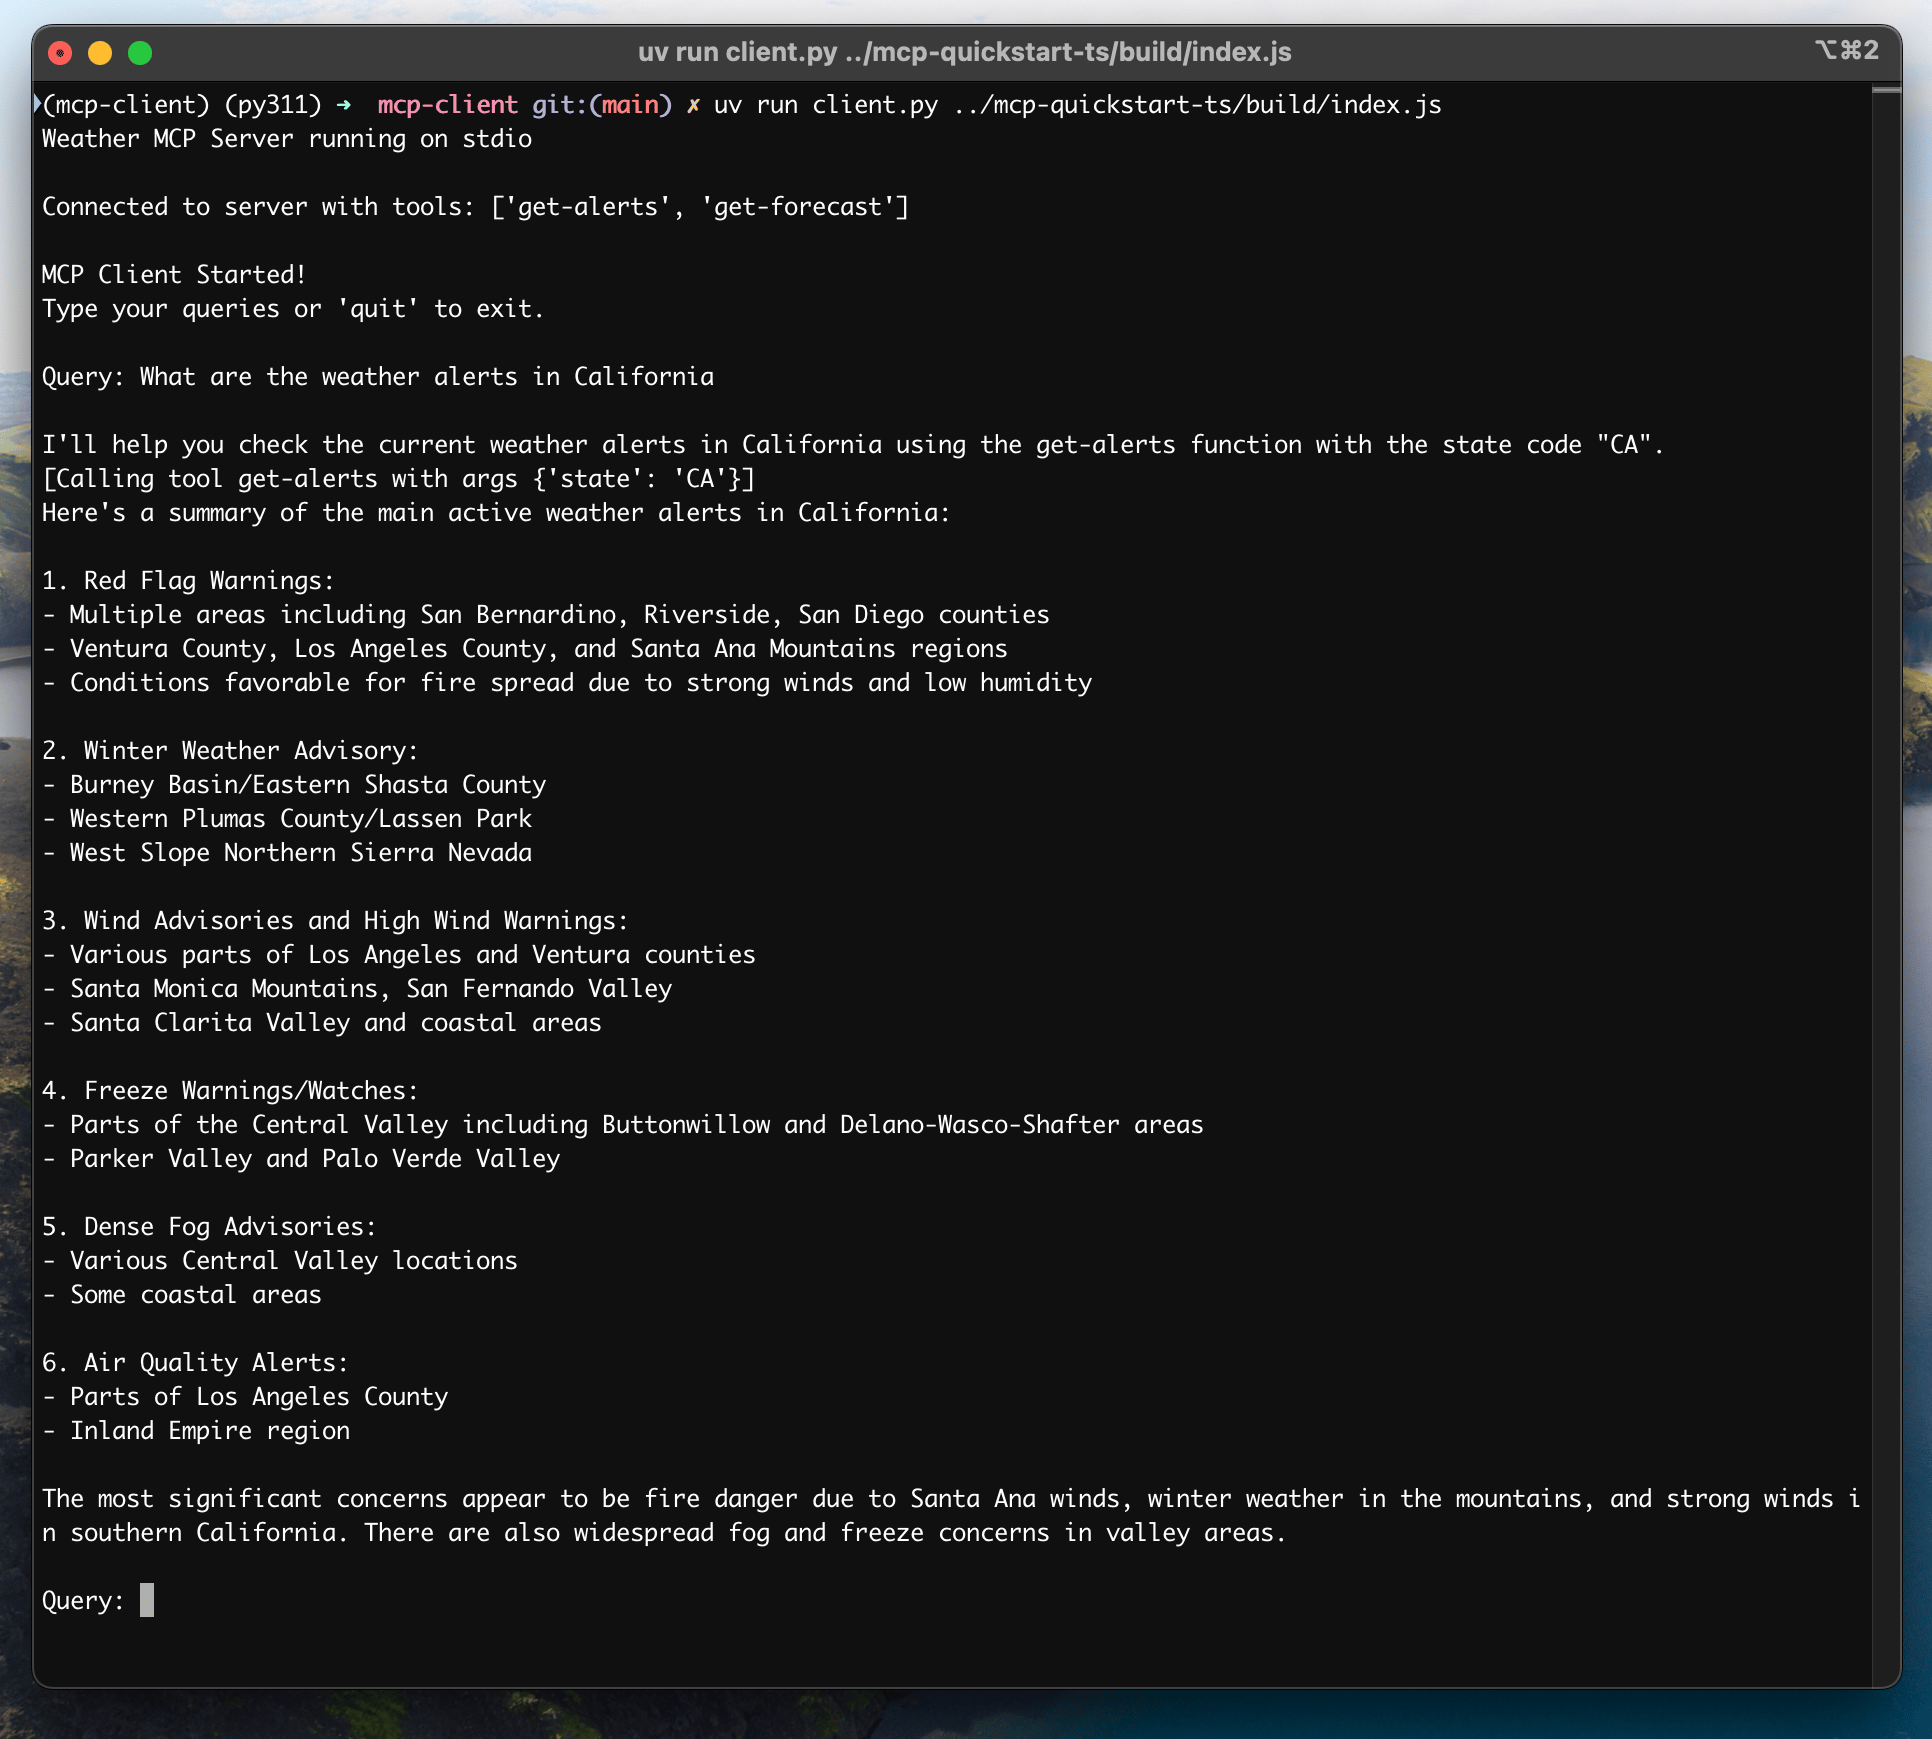
System Requirements
Before starting, ensure your system meets these requirements:- Mac or Windows computer
- Latest Python version installed
- Latest version of
uvinstalled - You must use the Python MCP SDK 2.0.0 or higher
Setting Up Your Environment
First, create a new Python project withuv:# Create project directory
uv init mcp-client
cd mcp-client
# Create virtual environment
uv venv
# Activate virtual environment
source .venv/bin/activate
# Install required packages
uv add mcp anthropic python-dotenv
# Remove boilerplate files
rm main.py
# Create our main file
touch client.py
# Create project directory
uv init mcp-client
cd mcp-client

# Create virtual environment
uv venv

# Activate virtual environment
.venv\Scripts\activate

# Install required packages
uv add mcp anthropic python-dotenv

# Remove boilerplate files
del main.py

# Create our main file
new-item client.py
Setting Up Your API Key
You’ll need an Anthropic API key from the Anthropic Console.Create a.env file to store it:echo "ANTHROPIC_API_KEY=your-api-key-goes-here" > .env
.env to your .gitignore:echo ".env" >> .gitignore
Make sure you keep your
ANTHROPIC_API_KEY secure!Creating the Client
Imports and Setup
First, let’s set up our imports and the pieces the rest of the file shares:import asyncio
import sys
from mcp import Client, StdioServerParameters
from mcp.client.stdio import stdio_client
from mcp_types import TextContent
from anthropic import Anthropic
from dotenv import load_dotenv
load_dotenv() # load environment variables from .env
MODEL = "claude-opus-5"
anthropic = Anthropic()
Client is the single object your program talks to the server through. Listing the tools, calling one, reading a resource: each of those is a method on it.Server Connection Management
Next, we’ll work out which process to launch for a given server script:def server_params(server_script_path: str) -> StdioServerParameters:
"""Describe the subprocess that runs an MCP server
Args:
server_script_path: Path to the server script (.py or .js)
"""
if server_script_path.endswith(".py"):
command = "python"
elif server_script_path.endswith(".js"):
command = "node"
else:
raise ValueError("Server script must be a .py or .js file")
return StdioServerParameters(command=command, args=[server_script_path])
StdioServerParameters is configuration, not a connection. stdio_client() turns it into a stdio transport, and Client opens that transport when you enter its async with block. We’ll do both in main().Query Processing Logic
Now let’s add the core functionality for processing queries and handling tool calls:async def process_query(client: Client, query: str) -> str:
"""Process a query using Claude and available tools"""
messages = [
{
"role": "user",
"content": query
}
]
tool_list = await client.list_tools()
available_tools = [{
"name": tool.name,
"description": tool.description,
"input_schema": tool.input_schema
} for tool in tool_list.tools]
# Initial Claude API call
response = anthropic.messages.create(
model=MODEL,
max_tokens=1000,
messages=messages,
tools=available_tools
)
# Process response and handle tool calls
final_text = []
tool_results = []
for content in response.content:
if content.type == 'text':
final_text.append(content.text)
elif content.type == 'tool_use':
tool_name = content.name
tool_args = content.input
# Execute tool call
result = await client.call_tool(tool_name, tool_args)
final_text.append(f"[Calling tool {tool_name} with args {tool_args}]")
tool_results.append({
"type": "tool_result",
"tool_use_id": content.id,
"content": "\n".join(
block.text
for block in result.content
if isinstance(block, TextContent)
),
"is_error": result.is_error
})
if tool_results:
messages.append({"role": "assistant", "content": response.content})
messages.append({"role": "user", "content": tool_results})
# Get next response from Claude
response = anthropic.messages.create(
model=MODEL,
max_tokens=1000,
messages=messages,
tools=available_tools
)
for content in response.content:
if content.type == 'text':
final_text.append(content.text)
return "\n".join(final_text)
call_tool returns a CallToolResult. Its content is a list of blocks, which is why we narrow to TextContent before reading .text. A tool that raises does not raise here: it answers with is_error set, and passing that flag on lets Claude read the message and try something else.Interactive Chat Interface
Now we’ll add the chat loop:async def chat_loop(client: Client) -> None:
"""Run an interactive chat loop"""
print("\nMCP Client Started!")
print("Type your queries or 'quit' to exit.")
while True:
try:
query = (await asyncio.to_thread(input, "\nQuery: ")).strip()
except EOFError:
break
if query.lower() == 'quit':
break
try:
response = await process_query(client, query)
print("\n" + response)
except Exception as e:
print(f"\nError: {e}")
input() blocks, so it runs on a worker thread. That keeps the event loop free to service the connection while you type.Main Entry Point
Finally, we’ll add the main execution logic:async def main() -> None:
if len(sys.argv) < 2:
print("Usage: python client.py <path_to_server_script>")
sys.exit(1)
async with Client(stdio_client(server_params(sys.argv[1]))) as client:
tool_list = await client.list_tools()
tool_names = [tool.name for tool in tool_list.tools]
print("\nConnected to server with tools:", tool_names)
await chat_loop(client)
if __name__ == "__main__":
asyncio.run(main())
async with is the entire connection lifecycle. Entering it launches the server and agrees a protocol version with it; leaving it disconnects and shuts the subprocess down. There is nothing to close by hand.You can find the complete client.py file here.Key Components Explained
1. Client Initialization
- A single
Clientcarries the connection, andasync withis its whole lifecycle - There is no connect/close pair to call and nothing to clean up afterwards
- Configures the Anthropic client for Claude interactions
2. Server Connection
- Supports both Python and Node.js servers
- Validates server script type
- Launches the server as a subprocess and speaks stdio to it
- Lists the available tools once the connection is open
3. Query Processing
- Maintains conversation context
- Handles Claude’s responses and tool calls
- Manages the message flow between Claude and tools
- Combines results into a coherent response
4. Interactive Interface
- Provides a simple command-line interface
- Handles user input and displays responses
- Includes basic error handling
- Allows graceful exit
5. Resource Management
- Leaving the
async withblock disconnects and shuts the server subprocess down - A failing query is reported without ending the session
- Typing
quit, or closing standard input, exits cleanly
Common Customization Points
-
Tool Handling
- Modify
process_query()to handle specific tool types - Add custom error handling for tool calls
- Implement tool-specific response formatting
- Modify
-
Response Processing
- Customize how tool results are formatted
- Add response filtering or transformation
- Implement custom logging
-
User Interface
- Add a GUI or web interface
- Implement rich console output
- Add command history or auto-completion
Running the Client
To run your client with any MCP server:uv run client.py path/to/server.py # python server
uv run client.py path/to/build/index.js # node server
If you’re continuing the weather tutorial from the server quickstart, your command might look something like this:
python client.py .../quickstart-resources/weather-server-python/weather.py- Connect to the specified server
- List available tools
- Start an interactive chat session where you can:
- Enter queries
- See tool executions
- Get responses from Claude
How It Works
When you submit a query:- The client gets the list of available tools from the server
- Your query is sent to Claude along with tool descriptions
- Claude decides which tools (if any) to use
- The client executes any requested tool calls through the server
- Results are sent back to Claude
- Claude provides a natural language response
- The response is displayed to you
Best practices
-
Error Handling
- Check
result.is_errorrather than expecting a failing tool to raise - Provide meaningful error messages
- Gracefully handle connection issues
- Check
-
Resource Management
- Let the
async withblock own the connection - Keep it open for as long as you need the server
- Handle server disconnections
- Let the
-
Security
- Store API keys securely in
.env - Validate server responses
- Be cautious with tool permissions
- Store API keys securely in
-
Tool Names
- Tool names can be validated according to the format specified here
- If a tool name conforms to the specified format, it should not fail validation by an MCP client
Troubleshooting
Server Path Issues
- Double-check the path to your server script is correct
- Use the absolute path if the relative path isn’t working
- For Windows users, make sure to use forward slashes (/) or escaped backslashes (\) in the path
- Verify the server file has the correct extension (.py for Python or .js for Node.js)
# Relative path
uv run client.py ./server/weather.py

# Absolute path
uv run client.py /Users/username/projects/mcp-server/weather.py

# Windows path (either format works)
uv run client.py C:/projects/mcp-server/weather.py
uv run client.py C:\\projects\\mcp-server\\weather.py
Response Timing
- The first response might take up to 30 seconds to return
- This is normal and happens while:
- The server initializes
- Claude processes the query
- Tools are being executed
- Subsequent responses are typically faster
- Don’t interrupt the process during this initial waiting period
Common Error Messages
If you see:FileNotFoundError: Check your server pathConnection refused: Ensure the server is running and the path is correctTool execution failed: Verify the tool’s required environment variables are setTimeout error: Consider raisingread_timeout_secondson theClient
You can find the complete code for this tutorial here.Update your Create a Add The client will:
System Requirements
Before starting, ensure your system meets these requirements:- Mac or Windows computer
- Node.js 20 or higher installed
- Latest version of
npminstalled - Anthropic API key (Claude)
Setting Up Your Environment
First, let’s create and set up our project:# Create project directory
mkdir mcp-client-typescript
cd mcp-client-typescript
# Initialize npm project
npm init -y
# Install dependencies
npm install @anthropic-ai/sdk @modelcontextprotocol/client dotenv
# Install dev dependencies
npm install -D @types/node typescript
# Create source file
touch index.ts
# Create project directory
md mcp-client-typescript
cd mcp-client-typescript

# Initialize npm project
npm init -y

# Install dependencies
npm install @anthropic-ai/sdk @modelcontextprotocol/client dotenv

# Install dev dependencies
npm install -D @types/node typescript

# Create source file
new-item index.ts
package.json to set type: "module" and a build script:package.json
{
  "type": "module",
  "scripts": {
    "build": "tsc && chmod 755 build/index.js"
  }
}
tsconfig.json in the root of your project:tsconfig.json
{
  "compilerOptions": {
    "target": "ES2022",
    "module": "Node16",
    "moduleResolution": "Node16",
    "types": ["node"],
    "outDir": "./build",
    "rootDir": "./",
    "strict": true,
    "esModuleInterop": true,
    "skipLibCheck": true,
    "forceConsistentCasingInFileNames": true
  },
  "include": ["index.ts"],
  "exclude": ["node_modules"]
}
Setting Up Your API Key
You’ll need an Anthropic API key from the Anthropic Console.Create a.env file to store it:echo "ANTHROPIC_API_KEY=<your key here>" > .env
.env to your .gitignore:echo ".env" >> .gitignore
Make sure you keep your
ANTHROPIC_API_KEY secure!Creating the Client
Basic Client Structure
First, let’s set up our imports and create the basic client class inindex.ts:import { Anthropic } from "@anthropic-ai/sdk";
import {
MessageParam,
Tool,
} from "@anthropic-ai/sdk/resources/messages/messages.mjs";
import { Client } from "@modelcontextprotocol/client";
import { StdioClientTransport } from "@modelcontextprotocol/client/stdio";
import readline from "readline/promises";
import dotenv from "dotenv";
dotenv.config();
const ANTHROPIC_API_KEY = process.env.ANTHROPIC_API_KEY;
if (!ANTHROPIC_API_KEY) {
throw new Error("ANTHROPIC_API_KEY is not set");
}
class MCPClient {
private mcp: Client;
private anthropic: Anthropic;
private transport: StdioClientTransport | null = null;
private tools: Tool[] = [];
constructor() {
this.anthropic = new Anthropic({
apiKey: ANTHROPIC_API_KEY,
});
this.mcp = new Client({ name: "mcp-client-cli", version: "1.0.0" });
}
// methods will go here
}
Server Connection Management
Next, we’ll implement the method to connect to an MCP server:async connectToServer(serverScriptPath: string) {
try {
const isJs = serverScriptPath.endsWith(".js");
const isPy = serverScriptPath.endsWith(".py");
if (!isJs && !isPy) {
throw new Error("Server script must be a .js or .py file");
}
const command = isPy
? process.platform === "win32"
? "python"
: "python3"
: process.execPath;
this.transport = new StdioClientTransport({
command,
args: [serverScriptPath],
});
await this.mcp.connect(this.transport);
const toolsResult = await this.mcp.listTools();
this.tools = toolsResult.tools.map((tool) => {
return {
name: tool.name,
description: tool.description,
input_schema: tool.inputSchema,
};
});
console.log(
"Connected to server with tools:",
this.tools.map(({ name }) => name)
);
} catch (e) {
console.log("Failed to connect to MCP server: ", e);
throw e;
}
}
Query Processing Logic
Now let’s add the core functionality for processing queries and handling tool calls:async processQuery(query: string) {
const messages: MessageParam[] = [
{
role: "user",
content: query,
},
];
const response = await this.anthropic.messages.create({
model: "claude-opus-5",
max_tokens: 1000,
messages,
tools: this.tools,
});
const finalText = [];
for (const content of response.content) {
if (content.type === "text") {
finalText.push(content.text);
} else if (content.type === "tool_use") {
const toolName = content.name;
const toolArgs = content.input as { [x: string]: unknown } | undefined;
const result = await this.mcp.callTool({
name: toolName,
arguments: toolArgs,
});
finalText.push(
`[Calling tool ${toolName} with args ${JSON.stringify(toolArgs)}]`
);
messages.push({
role: "user",
content: result.content
.filter((block) => block.type === "text")
.map((block) => block.text)
.join("\n"),
});
const response = await this.anthropic.messages.create({
model: "claude-opus-5",
max_tokens: 1000,
messages,
});
finalText.push(
response.content[0].type === "text" ? response.content[0].text : ""
);
}
}
return finalText.join("\n");
}
Interactive Chat Interface
Now we’ll add the chat loop and cleanup functionality:async chatLoop() {
const rl = readline.createInterface({
input: process.stdin,
output: process.stdout,
});
try {
console.log("\nMCP Client Started!");
console.log("Type your queries or 'quit' to exit.");
while (true) {
const message = await rl.question("\nQuery: ");
if (message.toLowerCase() === "quit") {
break;
}
const response = await this.processQuery(message);
console.log("\n" + response);
}
} finally {
rl.close();
}
}
async cleanup() {
await this.mcp.close();
}
Main Entry Point
Finally, we’ll add the main execution logic:async function main() {
if (process.argv.length < 3) {
console.log("Usage: node index.ts <path_to_server_script>");
return;
}
const mcpClient = new MCPClient();
try {
await mcpClient.connectToServer(process.argv[2]);
await mcpClient.chatLoop();
} catch (e) {
console.error("Error:", e);
await mcpClient.cleanup();
process.exit(1);
} finally {
await mcpClient.cleanup();
process.exit(0);
}
}
main();
Running the Client
To run your client with any MCP server:# Build TypeScript
npm run build
# Run the client
node build/index.js path/to/server.py # python server
node build/index.js path/to/build/index.js # node server
If you’re continuing the weather tutorial from the server quickstart, your command might look something like this:
node build/index.js .../quickstart-resources/weather-server-typescript/build/index.js- Connect to the specified server
- List available tools
- Start an interactive chat session where you can:
- Enter queries
- See tool executions
- Get responses from Claude
How It Works
When you submit a query:- The client gets the list of available tools from the server
- Your query is sent to Claude along with tool descriptions
- Claude decides which tools (if any) to use
- The client executes any requested tool calls through the server
- Results are sent back to Claude
- Claude provides a natural language response
- The response is displayed to you
Best practices
-
Error Handling
- Use TypeScript’s type system for better error detection
- Wrap tool calls in try-catch blocks
- Provide meaningful error messages
- Gracefully handle connection issues
-
Security
- Store API keys securely in
.env - Validate server responses
- Be cautious with tool permissions
- Store API keys securely in
Troubleshooting
Server Path Issues
- Double-check the path to your server script is correct
- Use the absolute path if the relative path isn’t working
- For Windows users, make sure to use forward slashes (/) or escaped backslashes (\) in the path
- Verify the server file has the correct extension (.js for Node.js or .py for Python)
# Relative path
node build/index.js ./server/build/index.js

# Absolute path
node build/index.js /Users/username/projects/mcp-server/build/index.js

# Windows path (either format works)
node build/index.js C:/projects/mcp-server/build/index.js
node build/index.js C:\\projects\\mcp-server\\build\\index.js
Response Timing
- The first response might take up to 30 seconds to return
- This is normal and happens while:
- The server initializes
- Claude processes the query
- Tools are being executed
- Subsequent responses are typically faster
- Don’t interrupt the process during this initial waiting period
Common Error Messages
If you see:Error: Cannot find module: Check your build folder and ensure TypeScript compilation succeededConnection refused: Ensure the server is running and the path is correctTool execution failed: Verify the tool’s required environment variables are setANTHROPIC_API_KEY is not set: Check your .env file and environment variablesTypeError: Ensure you’re using the correct types for tool argumentsBadRequestError: Ensure you have enough credits to access the Anthropic API
This is a quickstart demo based on Spring AI MCP auto-configuration and boot starters.
To learn how to create sync and async MCP Clients manually, consult the Java SDK Client documentation.
System Requirements
Before starting, ensure your system meets these requirements:- Java 17 or higher
- Maven 3.6+
- npx package manager
- Anthropic API key (Claude)
- Brave Search API key
Setting Up Your Environment
-
Install npx (Node Package eXecute):
First, make sure to install npm
and then run:
npm install -g npx -
Clone the repository:
git clone https://github.com/spring-projects/spring-ai-examples.git cd model-context-protocol/web-search/brave-chatbot -
Set up your API keys:
export ANTHROPIC_API_KEY='your-anthropic-api-key-here' export BRAVE_API_KEY='your-brave-api-key-here' -
Build the application:
./mvnw clean install -
Run the application using Maven:
./mvnw spring-boot:run
Make sure you keep your
ANTHROPIC_API_KEY and BRAVE_API_KEY keys secure!How it Works
The application integrates Spring AI with the Brave Search MCP server through several components:MCP Client Configuration
- Required dependencies in pom.xml:
<dependency>
    <groupId>org.springframework.ai</groupId>
    <artifactId>spring-ai-starter-mcp-client</artifactId>
</dependency>
<dependency>
    <groupId>org.springframework.ai</groupId>
    <artifactId>spring-ai-starter-model-anthropic</artifactId>
</dependency>
- Application properties (application.yml):
spring:
  ai:
    mcp:
      client:
        enabled: true
        name: brave-search-client
        version: 1.0.0
        type: SYNC
        request-timeout: 20s
        stdio:
          root-change-notification: true
          servers-configuration: classpath:/mcp-servers-config.json
        toolcallback:
          enabled: true
    anthropic:
      api-key: ${ANTHROPIC_API_KEY}
spring-ai-starter-mcp-client to create one or more McpClients based on the provided server configuration.
The spring.ai.mcp.client.toolcallback.enabled=true property enables the tool callback mechanism, that automatically registers all MCP tool as spring ai tools.
It is disabled by default.- MCP Server Configuration (
mcp-servers-config.json):
{
  "mcpServers": {
    "brave-search": {
      "command": "npx",
      "args": ["-y", "@modelcontextprotocol/server-brave-search"],
      "env": {
        "BRAVE_API_KEY": "<PUT YOUR BRAVE API KEY>"
      }
    }
  }
}
Chat Implementation
The chatbot is implemented using Spring AI’s ChatClient with MCP tool integration:var chatClient = chatClientBuilder
.defaultSystem("You are useful assistant, expert in AI and Java.")
.defaultToolCallbacks((Object[]) mcpToolAdapter.toolCallbacks())
.defaultAdvisors(new MessageChatMemoryAdvisor(new InMemoryChatMemory()))
.build();
- Uses Claude AI model for natural language understanding
- Integrates Brave Search through MCP for real-time web search capabilities
- Maintains conversation memory using InMemoryChatMemory
- Runs as an interactive command-line application
Build and run
./mvnw clean install
java -jar ./target/ai-mcp-brave-chatbot-0.0.1-SNAPSHOT.jar
./mvnw spring-boot:run
- Answer questions using its built-in knowledge
- Perform web searches when needed using Brave Search
- Remember context from previous messages in the conversation
- Combine information from multiple sources to provide comprehensive answers
Advanced Configuration
The MCP client supports additional configuration options:- Client customization through
McpClientCustomizer<McpClient.SyncSpec>orMcpClientCustomizer<McpClient.AsyncSpec>beans - Multiple clients with multiple transport types:
STDIOand Streamable HTTP - Integration with Spring AI’s tool execution framework
- Automatic client initialization and lifecycle management
spring.ai.mcp.client.streamable-http.connections.server1.url=http://localhost:8080
<dependency>
    <groupId>org.springframework.ai</groupId>
    <artifactId>spring-ai-starter-mcp-client-webflux</artifactId>
</dependency>
You can find the complete code for this tutorial here.Now, let’s create and set up your project:After running Verify that everything is set up correctly:
Alternatively, you can run directly with Gradle:The client will:
System Requirements
Before starting, ensure your system meets these requirements:- JDK 11 or higher
- Anthropic API key (Claude)
Setting up your environment
First, let’s installjava and gradle if you haven’t already.
You can download java from official Oracle JDK website.
Verify your java installation:java --version
# Create a new directory for our project
mkdir kotlin-mcp-client
cd kotlin-mcp-client

# Initialize a new kotlin project
gradle init
# Create a new directory for our project
md kotlin-mcp-client
cd kotlin-mcp-client
# Initialize a new kotlin project
gradle init
gradle init, select Application as the project type, Kotlin as the programming language.Alternatively, you can create a Kotlin application using the IntelliJ IDEA project wizard.After creating the project, replace the contents of your build.gradle.kts with:build.gradle.kts
// Check latest versions at https://github.com/modelcontextprotocol/kotlin-sdk/releases
val mcpVersion = "0.9.0"
val ktorVersion = "3.2.3"
val anthropicVersion = "2.15.0"
val slf4jVersion = "2.0.17"

plugins {
    kotlin("jvm") version "2.3.20"
    id("com.gradleup.shadow") version "8.3.9"
    application
}

application {
    mainClass.set("MainKt")
}

dependencies {
    implementation("io.modelcontextprotocol:kotlin-sdk:$mcpVersion")
    implementation("io.ktor:ktor-client-cio:$ktorVersion")
    implementation("com.anthropic:anthropic-java:$anthropicVersion")
    implementation("org.slf4j:slf4j-simple:$slf4jVersion")
}
./gradlew build
Setting up your API key
You’ll need an Anthropic API key from the Anthropic Console.Set up your API key:export ANTHROPIC_API_KEY='your-anthropic-api-key-here'
Make sure you keep your
ANTHROPIC_API_KEY secure!Creating the Client
Basic Client Structure
First, let’s create the basic client class:class MCPClient(apiKey: String) : AutoCloseable {
private val anthropic = AnthropicOkHttpClient.builder()
.apiKey(apiKey)
.build()
private val mcp: Client = Client(
clientInfo = Implementation(name = "mcp-client-cli", version = "1.0.0")
)
private var serverProcess: Process? = null
private lateinit var tools: List<ToolUnion>
// methods will go here
override fun close() {
runBlocking {
mcp.close()
}
serverProcess?.destroy()
anthropic.close()
}
}
Server connection management
Next, we’ll implement the method to connect to an MCP server:suspend fun connectToServer(serverScriptPath: String) {
val command = buildList {
when (serverScriptPath.substringAfterLast(".")) {
"js" -> add("node")
"py" -> add(if (System.getProperty("os.name").lowercase().contains("win")) "python" else "python3")
"jar" -> addAll(listOf("java", "-jar"))
else -> throw IllegalArgumentException("Server script must be a .js, .py or .jar file")
}
add(serverScriptPath)
}
val process = ProcessBuilder(command).start()
serverProcess = process
val transport = StdioClientTransport(
input = process.inputStream.asSource().buffered(),
output = process.outputStream.asSink().buffered(),
)
mcp.connect(transport)
val toolsResult = mcp.listTools()
tools = toolsResult.tools.map { tool ->
ToolUnion.ofTool(
Tool.builder()
.name(tool.name)
.description(tool.description ?: "")
.inputSchema(
Tool.InputSchema.builder()
.type(JsonValue.from(tool.inputSchema.type))
.properties(tool.inputSchema.properties?.toJsonValue() ?: EmptyJsonObject.toJsonValue())
.putAdditionalProperty("required", JsonValue.from(tool.inputSchema.required))
.build(),
)
.build(),
)
}
println("Connected to server with tools: ${tools.joinToString(", ") { it.tool().get().name() }}")
}
JsonObject.toJsonValue() helper
JsonObject.toJsonValue() helper
This helper converts a kotlinx.serialization
JsonObject to an Anthropic SDK JsonValue using Jackson:private fun JsonObject.toJsonValue(): JsonValue {
val mapper = ObjectMapper()
val node = mapper.readTree(this.toString())
return JsonValue.fromJsonNode(node)
}
Query processing logic
Now let’s add the core functionality for processing queries and handling tool calls:suspend fun processQuery(query: String): String {
val messages = mutableListOf(
MessageParam.builder()
.role(MessageParam.Role.USER)
.content(query)
.build(),
)
val response = anthropic.messages().create(
MessageCreateParams.builder()
.model("claude-opus-5")
.maxTokens(1024)
.messages(messages)
.tools(tools)
.build(),
)
val finalText = mutableListOf<String>()
response.content().forEach { content ->
when {
content.isText() -> finalText.add(content.text().get().text())
content.isToolUse() -> {
val toolName = content.toolUse().get().name()
val toolArgs =
content.toolUse().get()._input().convert(object : TypeReference<Map<String, JsonValue>>() {})
val result = mcp.callTool(
name = toolName,
arguments = toolArgs ?: emptyMap(),
)
finalText.add("[Calling tool $toolName with args $toolArgs]")
messages.add(
MessageParam.builder()
.role(MessageParam.Role.USER)
.content(
result.content
.filterIsInstance<TextContent>()
.joinToString("\n") { it.text }
)
.build(),
)
val aiResponse = anthropic.messages().create(
MessageCreateParams.builder()
.model("claude-opus-5")
.maxTokens(1024)
.messages(messages)
.build(),
)
finalText.add(aiResponse.content().first().text().get().text())
}
}
}
return finalText.joinToString("\n")
}
Interactive chat
We’ll add the chat loop:suspend fun chatLoop() {
println("\nMCP Client Started!")
println("Type your queries or 'quit' to exit.")
while (true) {
print("\nQuery: ")
val message = readlnOrNull() ?: break
if (message.trim().lowercase() == "quit") break
try {
val response = processQuery(message)
println("\n$response")
} catch (e: Exception) {
println("\nError: ${e.message}")
}
}
}
Main entry point
Finally, we’ll add the main execution function:fun main(args: Array<String>) = runBlocking {
require(args.isNotEmpty()) { "Usage: java -jar <path> <path_to_server_script>" }
val apiKey = System.getenv("ANTHROPIC_API_KEY")
require(!apiKey.isNullOrBlank()) { "ANTHROPIC_API_KEY environment variable is not set" }
val client = MCPClient(apiKey)
client.use {
client.connectToServer(args.first())
client.chatLoop()
}
}
Running the client
To run your client with any MCP server:./gradlew build
# Run the client
java -jar build/libs/kotlin-mcp-client-0.1.0-all.jar path/to/server.jar # JVM server
java -jar build/libs/kotlin-mcp-client-0.1.0-all.jar path/to/server.py # Python server
java -jar build/libs/kotlin-mcp-client-0.1.0-all.jar path/to/build/index.js # Node server
./gradlew run --args="path/to/server.jar"
If you’re continuing the weather tutorial from the server quickstart, your command might look something like this:
java -jar build/libs/kotlin-mcp-client-0.1.0-all.jar .../samples/weather-stdio-server/build/libs/weather-stdio-server-0.1.0-all.jar- Connect to the specified server
- List available tools
- Start an interactive chat session where you can:
- Enter queries
- See tool executions
- Get responses from Claude
How it works
Here’s a high-level workflow schema:When you submit a query:- The client gets the list of available tools from the server
- Your query is sent to Claude along with tool descriptions
- Claude decides which tools (if any) to use
- The client executes any requested tool calls through the server
- Results are sent back to Claude
- Claude provides a natural language response
- The response is displayed to you
Best practices
-
Error Handling
- Leverage Kotlin’s type system to model errors explicitly
- Wrap external tool and API calls in
try-catchblocks when exceptions are possible - Provide clear and meaningful error messages
- Handle network timeouts and connection issues gracefully
-
Security
- Store API keys and secrets securely in
local.properties, environment variables, or secret managers - Validate all external responses to avoid unexpected or unsafe data usage
- Be cautious with permissions and trust boundaries when using tools
- Store API keys and secrets securely in
-
Environment
- Set
ANTHROPIC_API_KEYthrough environment variables rather than hardcoding - Use
.envfiles with appropriate.gitignorerules for local development
- Set
Troubleshooting
Server Path Issues
- Double-check the path to your server script is correct
- Use the absolute path if the relative path isn’t working
- For Windows users, make sure to use forward slashes (/) or escaped backslashes (\) in the path
- Make sure that the required runtime is installed (java for Java, npm for Node.js, or uv for Python)
- Verify the server file has the correct extension (.jar for Java, .js for Node.js or .py for Python)
# Relative path
java -jar build/libs/client.jar ./server/build/libs/server.jar

# Absolute path
java -jar build/libs/client.jar /Users/username/projects/mcp-server/build/libs/server.jar

# Windows path (either format works)
java -jar build/libs/client.jar C:/projects/mcp-server/build/libs/server.jar
java -jar build/libs/client.jar C:\\projects\\mcp-server\\build\\libs\\server.jar
Build Issues
- Use
./gradlew buildor./gradlew shadowJar(not./gradlew jar) to create the shadow JAR with all dependencies - If you get JDK version errors, ensure your installed JDK version matches or exceeds the
jvmToolchainsetting inbuild.gradle.kts
Response Timing
- The first response might take up to 30 seconds to return
- This is normal and happens while:
- The server initializes
- Claude processes the query
- Tools are being executed
- Subsequent responses are typically faster
- Don’t interrupt the process during this initial waiting period
Common Error Messages
If you see:Connection refused: Ensure the server is running and the path is correctTool execution failed: Verify the tool’s required environment variables are setANTHROPIC_API_KEY is not set: Check your environment variables
You can find the complete code for this tutorial here.Then, add the required dependencies to your project:This creates the beginnings of a .NET console application that can read the API key from user secrets.Next, we’ll setup the MCP Client:Add this function at the end of the This creates an MCP client that will connect to a server that is provided as a command line argument. It then lists the available tools from the connected server.The client will: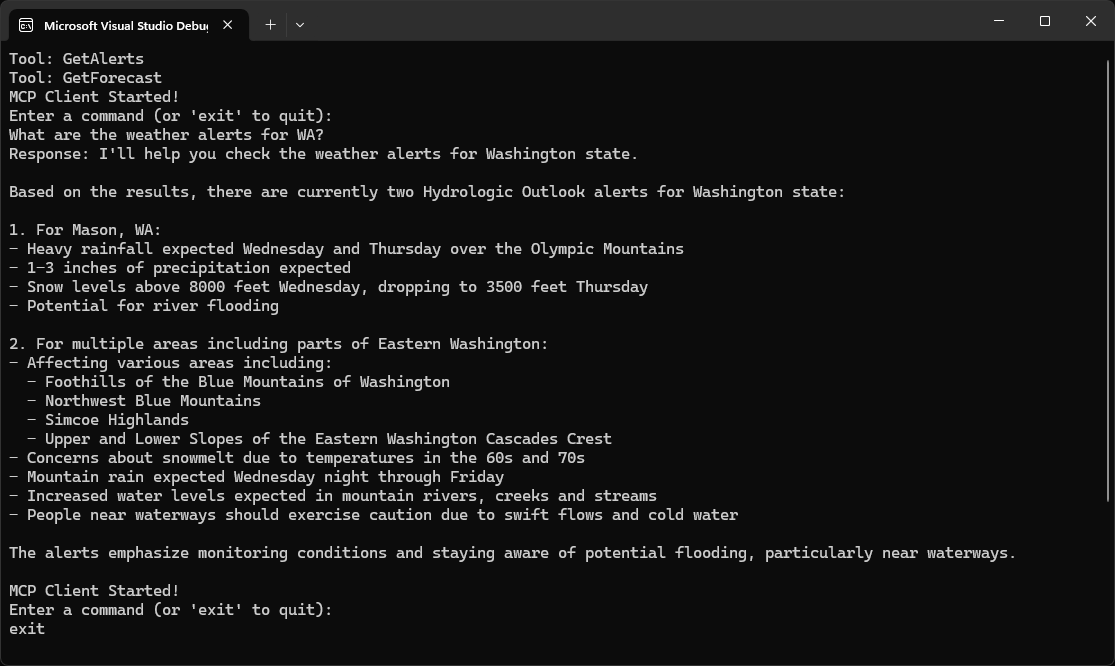
System Requirements
Before starting, ensure your system meets these requirements:- .NET 8.0 or higher
- Anthropic API key (Claude)
- Windows, Linux, or macOS
Setting up your environment
First, create a new .NET project:dotnet new console -n QuickstartClient
cd QuickstartClient
dotnet add package ModelContextProtocol --prerelease
dotnet add package Anthropic.SDK
dotnet add package Microsoft.Extensions.Hosting
dotnet add package Microsoft.Extensions.AI
Setting up your API key
You’ll need an Anthropic API key from the Anthropic Console.dotnet user-secrets init
dotnet user-secrets set "ANTHROPIC_API_KEY" "<your key here>"
Creating the Client
Basic Client Structure
First, let’s setup the basic client class in the fileProgram.cs:using Anthropic.SDK;
using Microsoft.Extensions.AI;
using Microsoft.Extensions.Configuration;
using Microsoft.Extensions.Hosting;
using ModelContextProtocol.Client;
using ModelContextProtocol.Protocol.Transport;
var builder = Host.CreateApplicationBuilder(args);
builder.Configuration
.AddEnvironmentVariables()
.AddUserSecrets<Program>();
var (command, arguments) = GetCommandAndArguments(args);

var clientTransport = new StdioClientTransport(new()
{
    Name = "Demo Server",
    Command = command,
    Arguments = arguments,
});

await using var mcpClient = await McpClient.CreateAsync(clientTransport);

var tools = await mcpClient.ListToolsAsync();
foreach (var tool in tools)
{
    Console.WriteLine($"Connected to server with tools: {tool.Name}");
}
Program.cs file:static (string command, string[] arguments) GetCommandAndArguments(string[] args)
{
return args switch
{
[var script] when script.EndsWith(".py") => ("python", args),
[var script] when script.EndsWith(".js") => ("node", args),
[var script] when Directory.Exists(script) || (File.Exists(script) && script.EndsWith(".csproj")) => ("dotnet", ["run", "--project", script, "--no-build"]),
_ => throw new NotSupportedException("An unsupported server script was provided. Supported scripts are .py, .js, or .csproj")
};
}
Query processing logic
Now let’s add the core functionality for processing queries and handling tool calls:using var anthropicClient = new AnthropicClient(new APIAuthentication(builder.Configuration["ANTHROPIC_API_KEY"]))
.Messages
.AsBuilder()
.UseFunctionInvocation()
.Build();
var options = new ChatOptions
{
MaxOutputTokens = 1000,
ModelId = "claude-opus-5",
Tools = [.. tools]
};
Console.ForegroundColor = ConsoleColor.Green;
Console.WriteLine("MCP Client Started!");
Console.ResetColor();
PromptForInput();
while(Console.ReadLine() is string query && !"exit".Equals(query, StringComparison.OrdinalIgnoreCase))
{
if (string.IsNullOrWhiteSpace(query))
{
PromptForInput();
continue;
}
await foreach (var message in anthropicClient.GetStreamingResponseAsync(query, options))
{
Console.Write(message);
}
Console.WriteLine();
PromptForInput();
}
static void PromptForInput()
{
Console.WriteLine("Enter a command (or 'exit' to quit):");
Console.ForegroundColor = ConsoleColor.Cyan;
Console.Write("> ");
Console.ResetColor();
}
Key Components Explained
1. Client Initialization
- The client is initialized using
McpClient.CreateAsync(), which sets up the transport type and command to run the server.
2. Server Connection
- Supports Python, Node.js, and .NET servers.
- The server is started using the command specified in the arguments.
- Configures to use stdio for communication with the server.
- Initializes the session and available tools.
3. Query Processing
- Leverages Microsoft.Extensions.AI for the chat client.
- Configures the
IChatClientto use automatic tool (function) invocation. - The client reads user input and sends it to the server.
- The server processes the query and returns a response.
- The response is displayed to the user.
Running the Client
To run your client with any MCP server:dotnet run -- path/to/server.csproj # dotnet server
dotnet run -- path/to/server.py # python server
dotnet run -- path/to/server.js # node server
If you’re continuing the weather tutorial from the server quickstart, your command might look something like this:
dotnet run -- path/to/QuickstartWeatherServer.- Connect to the specified server
- List available tools
- Start an interactive chat session where you can:
- Enter queries
- See tool executions
- Get responses from Claude
- Exit the session when done
You can find the complete code for this tutorial here.Add You can find the complete The client will:
System Requirements
Before starting, ensure your system meets these requirements:- Mac or Windows computer
- Ruby 3.2.0 or higher installed (required by the Anthropic SDK)
- Anthropic API key (Claude)
Setting Up Your Environment
First, create a new Ruby project:# Create project directory
mkdir mcp-client
cd mcp-client
# Create a Gemfile
bundle init
# Add required dependencies
bundle add anthropic base64 dotenv mcp
# Create our main file
touch client.rb
# Create project directory
mkdir mcp-client
cd mcp-client

# Create a Gemfile
bundle init

# Add required dependencies
bundle add anthropic base64 dotenv mcp

# Create our main file
new-item client.rb
Setting Up Your API Key
You’ll need an Anthropic API key from the Anthropic Console.Create a.env file to store it:echo "ANTHROPIC_API_KEY=your-api-key-goes-here" > .env
.env to your .gitignore:echo ".env" >> .gitignore
Make sure you keep your
ANTHROPIC_API_KEY secure!Creating the Client
Basic Client Structure
First, let’s set up our requires and create the basic client class:require "anthropic"
require "dotenv/load"
require "json"
require "mcp"
class MCPClient
ANTHROPIC_MODEL = "claude-opus-5"
def initialize
@mcp_client = nil
@transport = nil
@anthropic_client = nil
end
# methods will go here
end
Server Connection Management
Next, we’ll implement the method to connect to an MCP server:def connect_to_server(server_script_path)
command = case File.extname(server_script_path)
when ".rb"
"ruby"
when ".py"
"python3"
when ".js"
"node"
else
raise ArgumentError, "Server script must be a .rb, .py, or .js file."
end
@transport = MCP::Client::Stdio.new(command: command, args: [server_script_path])
@mcp_client = MCP::Client.new(transport: @transport)
@mcp_client.connect
tool_names = @mcp_client.tools.map(&:name)
puts "\nConnected to server with tools: #{tool_names}"
end
Query Processing Logic
Now let’s add the core functionality for processing queries and handling tool calls:private
def process_query(query)
messages = [{ role: "user", content: query }]
available_tools = @mcp_client.tools.map do |tool|
{ name: tool.name, description: tool.description, input_schema: tool.input_schema }
end
# Initial Claude API call.
response = chat(messages, tools: available_tools)
# Process response and handle tool calls.
if response.content.any?(Anthropic::Models::ToolUseBlock)
assistant_content = response.content.filter_map do |content_block|
case content_block
when Anthropic::Models::TextBlock
{ type: "text", text: content_block.text }
when Anthropic::Models::ToolUseBlock
{ type: "tool_use", id: content_block.id, name: content_block.name, input: content_block.input }
end
end
messages << { role: "assistant", content: assistant_content }
end
response.content.each_with_object([]) do |content, response_parts|
case content
when Anthropic::Models::TextBlock
response_parts << content.text
when Anthropic::Models::ToolUseBlock
# Execute tool call via MCP.
result = @mcp_client.call_tool(name: content.name, arguments: content.input)
response_parts << "[Calling tool #{content.name} with args #{content.input.to_json}]"
tool_result_content = result.dig("result", "content")
result_text = if tool_result_content.is_a?(Array)
tool_result_content.filter_map { |content_item| content_item["text"] }.join("\n")
else
tool_result_content.to_s
end
messages << {
role: "user",
content: [{
type: "tool_result",
tool_use_id: content.id,
content: result_text
}]
}
# Get next response from Claude.
response = chat(messages)
response.content.each do |content_block|
response_parts << content_block.text if content_block.is_a?(Anthropic::Models::TextBlock)
end
end
end.join("\n")
end
def chat(messages, tools: nil)
params = { model: ANTHROPIC_MODEL, max_tokens: 1000, messages: messages }
params[:tools] = tools if tools
anthropic_client.messages.create(**params)
end
def anthropic_client
@anthropic_client ||= Anthropic::Client.new(api_key: ENV["ANTHROPIC_API_KEY"])
end
Interactive Chat Interface
Now we’ll add the chat loop and cleanup functionality:def chat_loop
puts <<~MESSAGE
MCP Client Started!
Type your queries or 'quit' to exit.
MESSAGE
loop do
print "\nQuery: "
line = $stdin.gets
break if line.nil?
query = line.chomp.strip
break if query.downcase == "quit"
next if query.empty?
begin
response = process_query(query)
puts "\n#{response}"
rescue => e
puts "\nError: #{e.message}"
end
end
end
def cleanup
@transport&.close
end
Main Entry Point
Finally, we’ll add the main execution logic:if ARGV.empty?
puts "Usage: ruby client.rb <path_to_server_script>"
exit 1
end
client = MCPClient.new
begin
client.connect_to_server(ARGV[0])
api_key = ENV["ANTHROPIC_API_KEY"]
if api_key.nil? || api_key.empty?
puts <<~MESSAGE
No ANTHROPIC_API_KEY found. To query these tools with Claude, set your API key:
export ANTHROPIC_API_KEY=your-api-key-here
MESSAGE
exit
end
client.chat_loop
rescue => e
puts "Error: #{e.message}"
exit 1
ensure
client.cleanup
end
client.rb file here.Key Components Explained
1. Client Initialization
- The
MCPClientclass initializes with nil references for lazy setup - The Anthropic client is lazily initialized via the
anthropic_clientmethod - Uses
dotenvto load environment variables from.env
2. Server Connection
- Supports Ruby, Python, and Node.js servers
- Uses
File.extnameto determine the server script type - Uses
MCP::Client::Stdiofor stdio transport - Initializes the MCP client and lists available tools
3. Query Processing
- Maps MCP tools to Anthropic tool format (
name,description,input_schema) - Uses
Anthropic::Models::TextBlockandAnthropic::Models::ToolUseBlockfor pattern matching - Builds assistant content once before iterating tool calls
- Executes tool calls via
@mcp_client.call_tool - Uses
chathelper method to wrap Anthropic API calls - Extracts tool result content with
result.dig("result", "content") - Passes tool results back to Claude for a final response
4. Interactive Interface
- Provides a simple command-line interface
- Handles user input and displays responses
- Skips empty queries
- Includes basic error handling
5. Resource Management
- Proper cleanup of the transport via
begin…ensure - Top-level
rescuefor error handling - API key validation after server connection
Running the Client
To run your client with any MCP server:bundle exec ruby client.rb path/to/server.rb # ruby server
bundle exec ruby client.rb path/to/server.py # python server
bundle exec ruby client.rb path/to/build/index.js # node server
If you’re continuing the weather tutorial from the server quickstart, your command might look something like this:
bundle exec ruby client.rb /path/to/weather-server-ruby/weather.rb- Connect to the specified server
- List available tools
- Start an interactive chat session where you can:
- Enter queries
- See tool executions
- Get responses from Claude
How It Works
When you submit a query:- The client gets the list of available tools from the server
- Your query is sent to Claude along with tool descriptions
- Claude decides which tools (if any) to use
- The client executes any requested tool calls through the server
- Results are sent back to Claude
- Claude provides a natural language response
- The response is displayed to you
Best practices
-
Error Handling
- Wrap tool calls in
begin…rescueblocks - Provide meaningful error messages
- Gracefully handle connection issues
- Wrap tool calls in
-
Resource Management
- Always close the transport when done
- Use
begin…ensurefor proper cleanup - Handle server disconnections
-
Security
- Store API keys securely in
.env - Validate server responses
- Be cautious with tool permissions
- Store API keys securely in
-
Tool Names
- Tool names can be validated according to the format specified here
- If a tool name conforms to the specified format, it should not fail validation by an MCP client
Troubleshooting
Server Path Issues
- Double-check the path to your server script is correct
- Use the absolute path if the relative path isn’t working
- For Windows users, make sure to use forward slashes (/) or escaped backslashes (\) in the path
- Verify the server file has the correct extension (.py for Python, .js for Node.js, or .rb for Ruby)
# Relative path
bundle exec ruby client.rb ./server/weather.rb

# Absolute path
bundle exec ruby client.rb /Users/username/projects/mcp-server/weather.rb

# Windows path (either format works)
bundle exec ruby client.rb C:/projects/mcp-server/weather.rb
bundle exec ruby client.rb C:\\projects\\mcp-server\\weather.rb
Response Timing
- The first response might take up to 30 seconds to return
- This is normal and happens while:
- The server initializes
- Claude processes the query
- Tools are being executed
- Subsequent responses are typically faster
- Don’t interrupt the process during this initial waiting period
Common Error Messages
If you see:Errno::ENOENT: Check your server path and ensure the command (ruby,python3,node) is availableConnection refused: Ensure the server is running and the path is correctTool execution failed: Verify the tool’s required environment variables are setAnthropic::Errors::AuthenticationError: Check your.envfile has a validANTHROPIC_API_KEY
You can find the complete code for this tutorial here.Replace the contents of The Add The client keeps the model API client, the active MCP session, and the tools advertised by the connected server.This method:MCP and model APIs describe tools with similar information but different Rust types. This keeps model request handling in one place and adds useful context if the API request fails.The method first sends the user’s query and available tools to Claude. When Claude requests tools, the client executes each request through the MCP session, sends the results back to Claude, and collects the final text response.The loop accepts queries until the user types The entry point loads Running bare The client will:If a command cannot be found, use its absolute path or verify it is available in your
System Requirements
Before starting, ensure your Linux system meets these requirements:- Latest stable version of Rust and Cargo
- Anthropic API key (Claude)
- A Python, Node.js, or executable MCP server to connect to
Setting Up Your Environment
First, create a new Rust project:cargo new mcp-client-rust
cd mcp-client-rust
Cargo.toml with the following:Cargo.toml
[package]
name = "mcp-client-rust"
version = "0.1.0"
edition = "2024"

[dependencies]
anyhow = "1.0.100"
genai = "0.4.2"
rmcp = { version = "0.8.0", features = ["server", "client", "transport-io", "transport-child-process"] }
tokio = { version = "1.47.1", features = ["full"] }
tracing = "0.1.41"
tracing-subscriber = { version = "0.3", features = ["env-filter"] }
serde_json = "1.0.128"
dotenvy = "0.15.7"
reqwest = "0.12.23"
rmcp crate provides the Rust MCP SDK and child-process transport. This example uses the genai crate to send requests to Claude and represent tools in the model request.Setting Up Your API Key
You’ll need an Anthropic API key from the Anthropic Console.Create a.env file to store it:echo "ANTHROPIC_API_KEY=your-api-key-goes-here" > .env
.env to your .gitignore:echo ".env" >> .gitignore
Make sure you keep your
ANTHROPIC_API_KEY secure!Creating the Client
Opensrc/main.rs and replace its contents as you work through the following sections.Imports and Client Structure
First, add the imports, model constant, and basic client structure:use anyhow::{Context, Result, bail};
use genai::Client;
use genai::chat::{
ChatMessage, ChatRequest, ChatResponse, ContentPart, Tool as GenaiTool, ToolResponse,
};
use rmcp::model::{CallToolRequestParam, Tool as McpTool};
use rmcp::service::{RoleClient, RunningService, ServiceExt};
use rmcp::transport::TokioChildProcess;
use serde_json::Value;
use tokio::io::{self, AsyncBufReadExt, BufReader};
use tokio::process::Command;
const MODEL_ANTHROPIC: &str = "claude-opus-5";
struct MCPClient {
anthropic: Client,
session: Option<RunningService<RoleClient, ()>>,
tools: Vec<GenaiTool>,
}
Client Initialization
Next, initialize the model client and start without an MCP session or tools:impl MCPClient {
fn new() -> Result<Self> {
Ok(MCPClient {
anthropic: Client::default(),
session: None,
tools: Vec::new(),
})
}
// Additional methods will go here.
}
genai::Client::default() reads the ANTHROPIC_API_KEY environment variable when it sends a request.Server Connection Management
Add this method inside theimpl MCPClient block:async fn connect_to_server(&mut self, server_args: &[String]) -> Result<()> {
if self.session.is_some() {
bail!("Client is already connected to a server");
}
let mut command = Command::new(&server_args[0]);
command.args(&server_args[1..]);
let process = TokioChildProcess::new(command)
.with_context(|| format!("Failed to spawn server process for {:?}", server_args))?;
let session = ().serve(process).await?;
let rmcp_tools = session
.list_all_tools()
.await
.context("Unable to list tools from server")?;
let tool_names: Vec<String> = rmcp_tools
.iter()
.map(|tool| tool.name.to_string())
.collect();
println!("Connected to server with tools: {tool_names:?}");
self.tools = convert_tools(&rmcp_tools);
self.session = Some(session);
Ok(())
}
- Starts the server as a child process using the command and arguments supplied on the command line
- Establishes an MCP session over stdio
- Lists all tools advertised by the server
- Converts those tools into the format used in model requests
Converting MCP Tools
Add this function outside theimpl MCPClient block:fn convert_tools(tools: &[McpTool]) -> Vec<GenaiTool> {
tools
.iter()
.map(|tool| GenaiTool {
name: tool.name.to_string(),
description: tool.description.as_deref().map(str::to_string),
schema: Some(Value::Object(tool.input_schema.as_ref().clone())),
config: None,
})
.collect()
}
convert_tools maps each MCP tool’s name, description, and input schema into a genai tool definition.Sending Model Requests
Add this helper method insideimpl MCPClient:async fn request_model(&self, chat_req: &ChatRequest) -> Result<ChatResponse> {
let response = self
.anthropic
.exec_chat(MODEL_ANTHROPIC, chat_req.clone(), None)
.await
.context("Anthropic chat request failed")?;
Ok(response)
}
Query Processing Logic
Now add the core query-processing method insideimpl MCPClient:async fn process_query(&mut self, query: &str) -> Result<String> {
let session = self
.session
.as_ref()
.context("Client is not connected to any server")?;
let mut messages = vec![ChatMessage::user(query)];
let mut final_text = Vec::new();
// Initial Claude API call with tools
let mut chat_req = ChatRequest::new(messages.clone()).with_tools(self.tools.clone());
let mut chat_rsp = self.request_model(&chat_req).await?;
// Process response content - collect text and handle tool calls
for text in chat_rsp.texts() {
final_text.push(text.to_string());
}
let tool_calls = chat_rsp.tool_calls();
if !tool_calls.is_empty() {
// Append assistant's response to message history
messages.push(ChatMessage::assistant(chat_rsp.content.clone()));
// Execute each tool call and collect responses
let mut tool_results = Vec::new();
for tool_call in tool_calls {
// Add information about the tool call to final text
let tool_args_str = serde_json::to_string(&tool_call.fn_arguments)
.unwrap_or_else(|_| "{}".to_string());
final_text.push(format!(
"[Calling tool {} with args {}]",
tool_call.fn_name, tool_args_str
));
// Query the MCP server
let tool_result = session
.call_tool(CallToolRequestParam {
name: tool_call.fn_name.clone().into(),
arguments: tool_call.fn_arguments.as_object().cloned(),
})
.await
.with_context(|| format!("Tool call {} failed", tool_call.fn_name))?;
let payload = serde_json::to_string(&tool_result)
.context("Failed to serialize tool result")?;
tool_results.push(ContentPart::ToolResponse(ToolResponse::new(
tool_call.call_id.clone(),
payload,
)));
}
// Append tool responses to message history
messages.push(ChatMessage::user(tool_results));
// Build the next request and query model
chat_req = ChatRequest::new(messages.clone());
chat_rsp = self.request_model(&chat_req).await?;
// Collect text from response
for text in chat_rsp.texts() {
final_text.push(text.to_string());
}
}
Ok(final_text.join("\n"))
}
Interactive Chat Interface
Add the interactive terminal loop insideimpl MCPClient:async fn chat_loop(&mut self) -> Result<()> {
println!("\nMCP Client Started!");
println!("Type your queries or 'quit' to exit.");
let mut stdin = BufReader::new(io::stdin());
let mut input = String::new();
loop {
print!("\nQuery: ");
std::io::Write::flush(&mut std::io::stdout())?;
input.clear();
if stdin.read_line(&mut input).await? == 0 {
break; // EOF
}
let query = input.trim();
if query.eq_ignore_ascii_case("quit") {
break;
}
if query.is_empty() {
continue;
}
match self.process_query(query).await {
Ok(response) => println!("\n{}", response),
Err(err) => println!("\nError: {}", err),
}
}
Ok(())
}
quit or closes standard input. Query errors are printed without terminating the client.Cleanup
Add this method insideimpl MCPClient to stop the MCP session and child process:async fn cleanup(&mut self) -> Result<()> {
if let Some(session) = self.session.take() {
let _ = session.cancel().await;
}
Ok(())
}
Main Entry Point
Finally, add the asynchronous entry point outside theimpl MCPClient block:#[tokio::main]
async fn main() -> Result<()> {
dotenvy::dotenv().context("Failed to load env file")?;
let mut args = std::env::args();
let _ = args.next();
let server_args: Vec<String> = args.collect();
if server_args.is_empty() {
eprintln!("Usage: cargo run -- <server_script_or_binary> [args...]");
std::process::exit(1);
}
let mut client = MCPClient::new()?;
let result = async {
client.connect_to_server(&server_args).await?;
client.chat_loop().await
}
.await;
let cleanup_result = client.cleanup().await;
result?;
cleanup_result?;
Ok(())
}
.env, treats all remaining command-line arguments as the server command, connects the client, starts the chat loop, and ensures cleanup runs before exiting.Verify the Complete File
Before running the client, confirm the items insrc/main.rs are placed at the correct scope:new,connect_to_server,process_query,request_model,chat_loop, andcleanupare methods inside the singleimpl MCPClientblock.mainandconvert_toolsare functions outside theimpl MCPClientblock.
src/main.rs example, then check that it compiles:cargo fmt --check
cargo check
Running the Client
Usecargo run -- followed by the command you would normally use to start the MCP server:# Python server
cargo run -- python path/to/server.py
# Node.js server
cargo run -- node path/to/build/index.js
# Executable server
cargo run -- path/to/server-binary
cargo run without a server command prints the usage message and exits.If you’re continuing the weather tutorial from the server quickstart, build the server first and then run a command similar to:
cargo run -- ../weather-server-rust/target/debug/weather- Start and connect to the specified MCP server
- List the tools available from that server
- Start an interactive chat session where you can:
- Enter queries
- See tool executions
- Get responses from Claude
How It Works
When you submit a query:- The client sends your query and the server’s available tools to Claude
- Claude decides which tools, if any, to use
- The client executes requested tools through the MCP session
- Tool results are sent back to Claude
- Claude provides a natural language response
- The response is displayed in the terminal
Best Practices
-
Error Handling
- Add context to errors at process, MCP, model API, and serialization boundaries
- Report individual query errors without terminating the interactive session
- Validate server commands before running them
-
Resource Management
- Always cancel the MCP session during cleanup
- Ensure cleanup runs even when connection or chat-loop operations fail
- Avoid starting a second server while a session is active
-
Security
- Store API keys securely in
.env - Review the tools exposed by a server before allowing model-driven calls
- Connect only to servers and executable commands you trust
- Store API keys securely in
Troubleshooting
Server Command Issues
The arguments aftercargo run -- must form a complete command. Interpreted server scripts need their runtime:# Correct
cargo run -- python ./server/weather.py
cargo run -- node ./server/build/index.js
# Incorrect: a Python script is not necessarily executable by itself
cargo run -- ./server/weather.py
PATH.Environment File Issues
If you seeFailed to load env file, ensure .env exists in the directory where you run the client.If the model request reports a missing API key, confirm that .env contains:ANTHROPIC_API_KEY=your-api-key-goes-here
Tool and Response Errors
Unable to list tools from server: Verify the server starts successfully and communicates over stdioTool call ... failed: Verify the server tool’s required arguments and environment variablesFailed to serialize tool result: Inspect the server’s response for unsupported or malformed content
Next steps
Example servers
Check out our gallery of official MCP servers and implementations