前提条件
你需要 Node.js 18 或更高版本。建议熟悉 MCP 工具 和 资源,因为 MCP 应用结合了这两种原语。拥有 MCP TypeScript SDK 的经验将有助于你更好地理解服务器端模式。
快速开始
创建 MCP 应用最快的方法是使用具有 MCP 应用技能的 AI 编码代理。如果你更喜欢手动设置项目,请跳至 手动设置。
使用 AI 编码代理
支持 Skills 的 AI 编码代理可以为你搭建完整的 MCP 应用项目。Skills 是你的代理在相关时加载的指令和资源文件夹。它们教会 AI 如何执行 specialized 任务,如创建 MCP 应用。
create-mcp-app skill 包含架构指导、最佳实践和工作示例,代理使用这些内容来生成你的项目。
安装 skill
如果你使用的是 Claude Code,可以直接使用以下命令安装 skill:/plugin marketplace add modelcontextprotocol/ext-apps
/plugin install mcp-apps@modelcontextprotocol-ext-apps
你也可以使用 Vercel Skills CLI 在不同的 AI 编码代理之间安装 skills:npx skills add modelcontextprotocol/ext-apps
或者,你可以通过克隆 ext-apps 仓库手动安装 skill:git clone https://github.com/modelcontextprotocol/ext-apps.git
然后将 skill 复制到你的代理的适当位置:| Agent | Skills 目录 (macOS/Linux) | Skills 目录 (Windows) |
|---|
| Claude Code | ~/.claude/skills/ | %USERPROFILE%\.claude\skills\ |
| VS Code 和 GitHub Copilot | ~/.copilot/skills/ | %USERPROFILE%\.copilot\skills\ |
| Gemini CLI | ~/.gemini/skills/ | %USERPROFILE%\.gemini\skills\ |
| Cline | ~/.cline/skills/ | %USERPROFILE%\.cline\skills\ |
| Goose | ~/.config/goose/skills/ | %USERPROFILE%\.config\goose\skills\ |
| Codex | ~/.codex/skills/ | %USERPROFILE%\.codex\skills\ |
| Cursor | ~/.cursor/skills/ | %USERPROFILE%\.cursor\skills\ |
此列表并非详尽无遗。其他代理可能在不同位置支持 skills;请查阅你的代理文档。
例如,使用 Claude Code 时,你可以全局安装 skill(在所有项目中可用):cp -r ext-apps/plugins/mcp-apps/skills/create-mcp-app ~/.claude/skills/create-mcp-app
Copy-Item -Recurse ext-apps\plugins\mcp-apps\skills\create-mcp-app $env:USERPROFILE\.claude\skills\create-mcp-app
或者仅通过复制到项目目录中的 .claude/skills/ 来为单个项目安装:mkdir -p .claude/skills && cp -r ext-apps/plugins/mcp-apps/skills/create-mcp-app .claude/skills/create-mcp-app
New-Item -ItemType Directory -Force -Path .claude\skills | Out-Null; Copy-Item -Recurse ext-apps\plugins\mcp-apps\skills\create-mcp-app .claude\skills\create-mcp-app
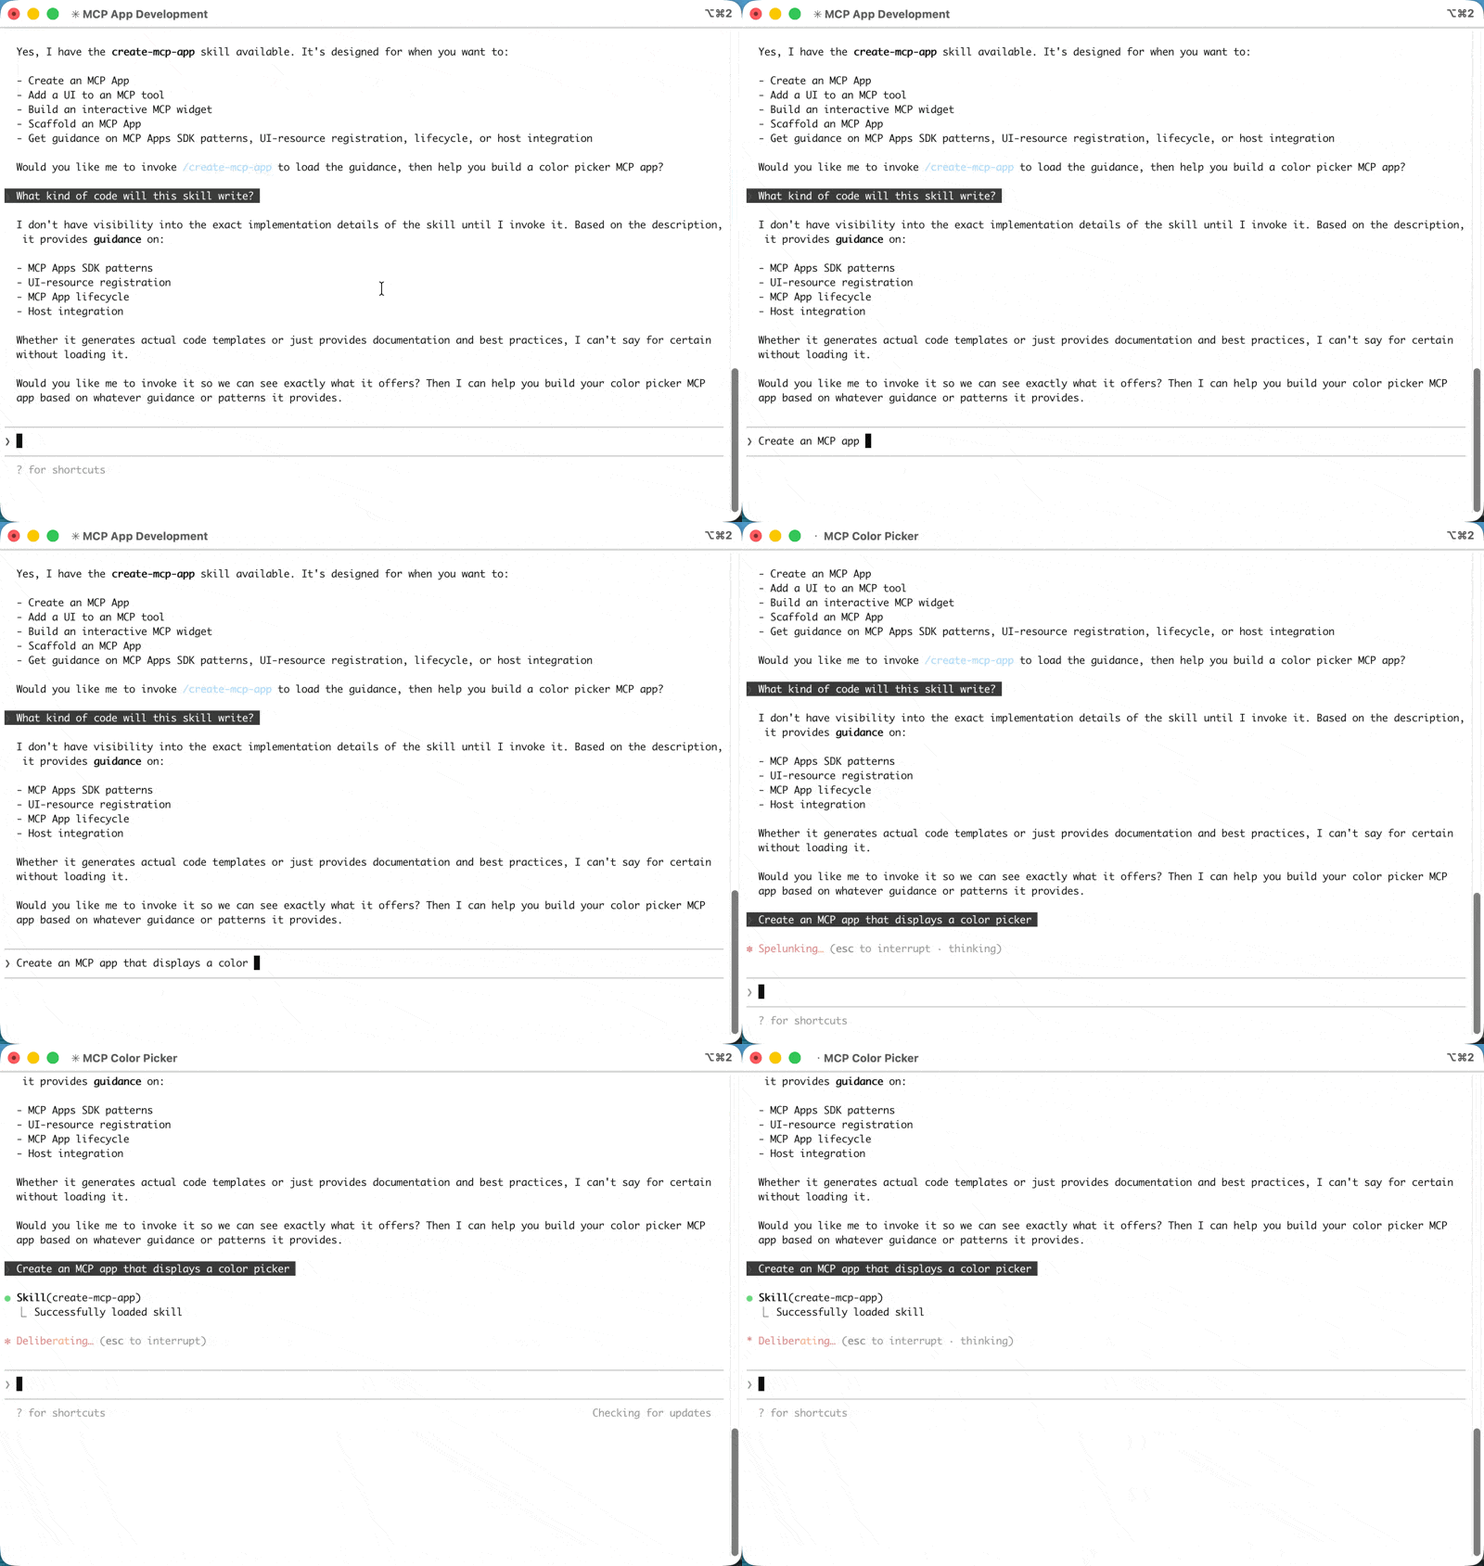
要验证 skill 是否已安装,请问你的代理 “What skills do you have access to?” — 你应该看到 create-mcp-app 作为可用技能之一。 创建你的应用
请求你的 AI 编码代理构建它:Create an MCP App that displays a color picker
代理将识别 create-mcp-app skill 是相关的,加载其指令,然后搭建一个包含服务器、UI 和配置文件的完整项目。 运行你的应用
npm install && npm run build && npm run serve
npm install; npm run build; npm run serve
你可能需要确保在运行上述命令之前首先进入 应用文件夹。
测试你的应用
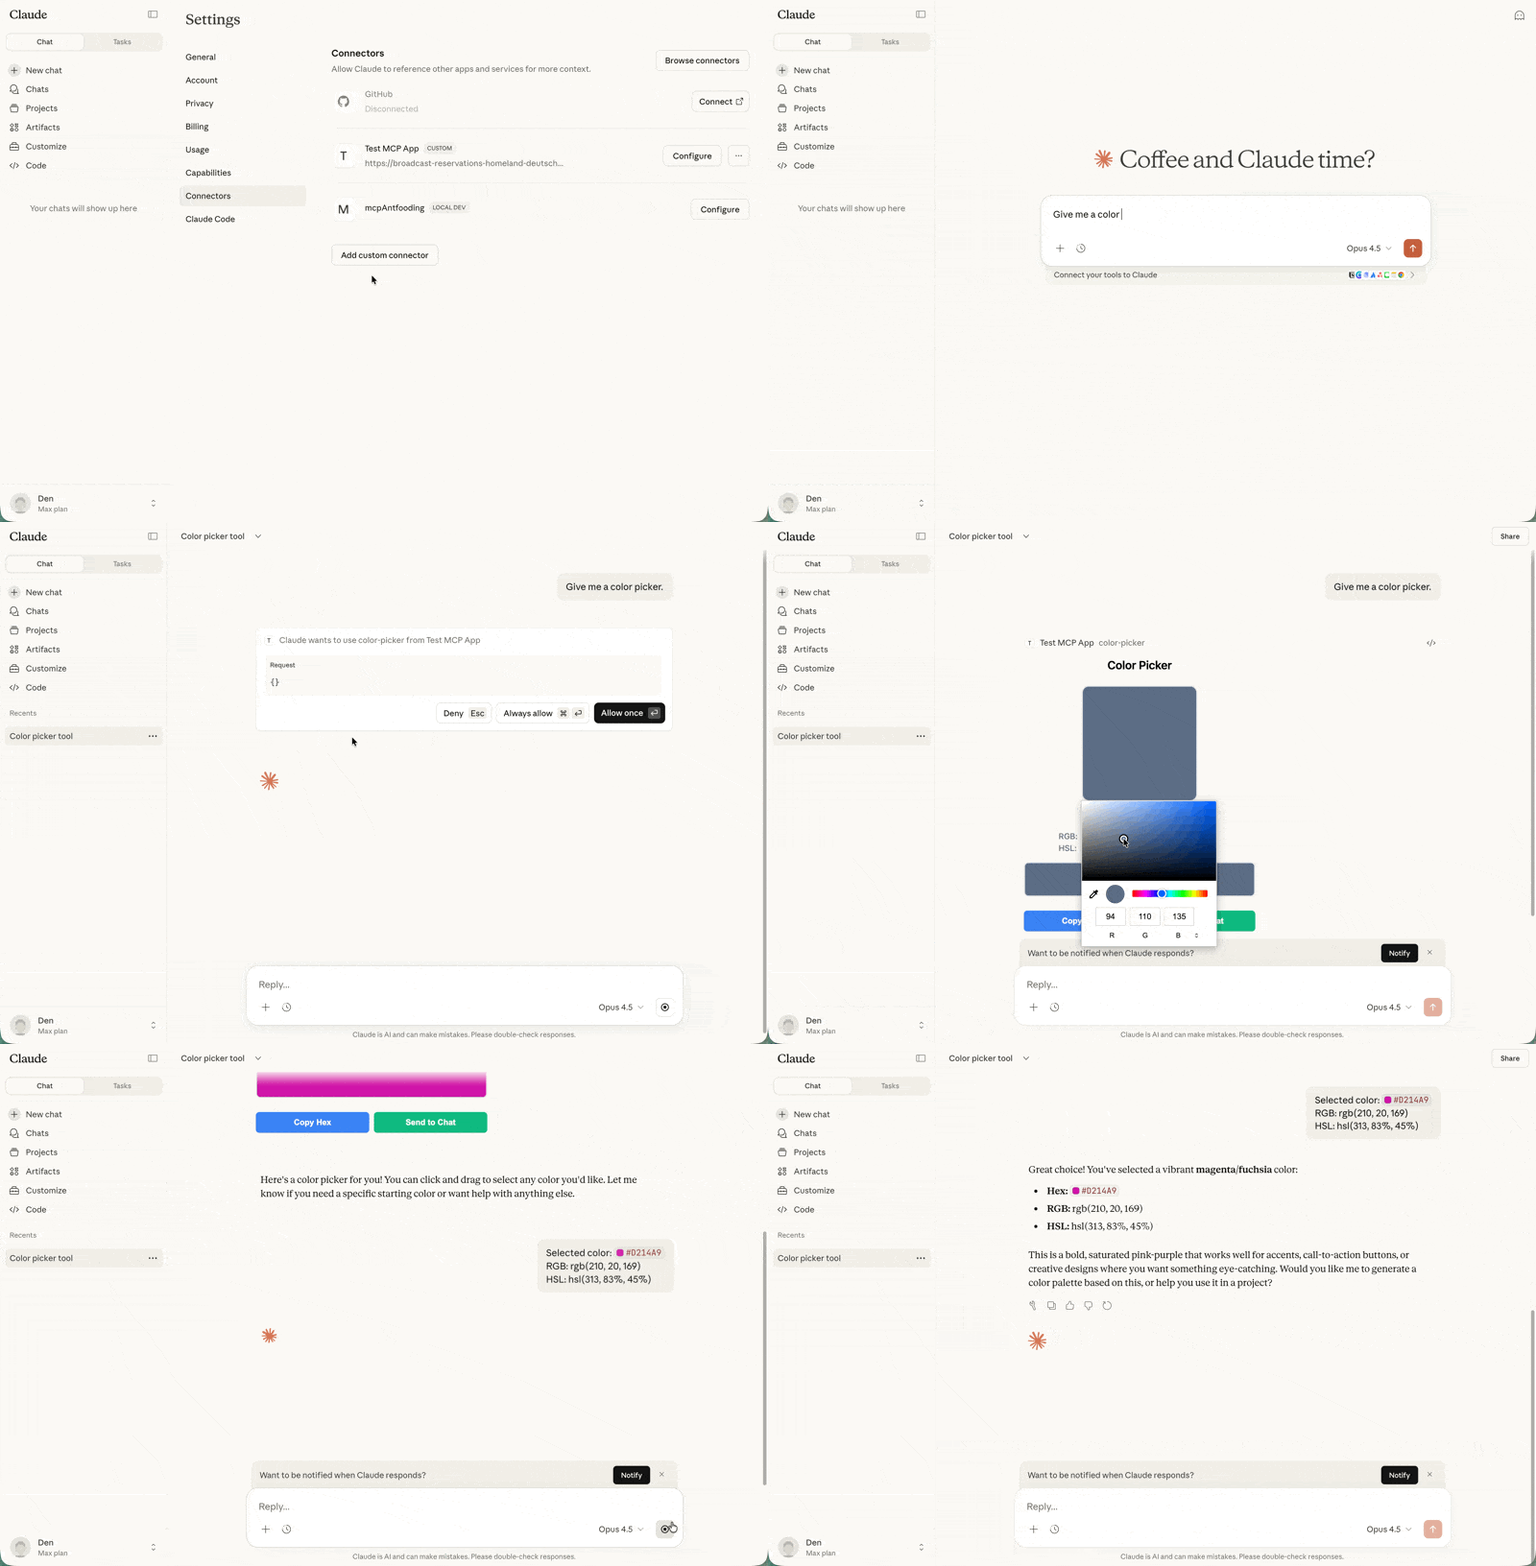
遵循下方 测试你的应用 中的说明。对于颜色选择器示例,开始新聊天并请求 Claude 为你提供颜色选择器。
手动设置
如果你不使用 AI 编码代理,或者更喜欢了解设置过程,请遵循以下步骤。
创建项目结构
典型的 MCP 应用项目将服务器代码与 UI 代码分离:服务器注册工具并提供 UI 资源。UI 资源最终将在具有默认拒绝 CSP 配置的安全 iframe 中渲染。如果你的应用有 CSS 和 JS 资源,你需要 配置 CSP,或者你可以使用像 vite-plugin-singlefile 这样的工具将资源捆绑到 HTML 中,这也是本教程中将要做的事情。 安装依赖
npm install @modelcontextprotocol/ext-apps @modelcontextprotocol/sdk
npm install -D typescript vite vite-plugin-singlefile express cors @types/express @types/cors tsx
ext-apps 包为服务器端(注册工具和资源)和客户端(用于 UI 到主机通信的 App 类)提供了辅助函数。这里使用带有 vite-plugin-singlefile 插件的 Vite 将 UI 和资源捆绑到单个 HTML 文件中以方便起见,但这是可选的 — 如果你 配置 CSP,你可以使用任何捆绑器或提供未捆绑的文件。配置项目
package.json
tsconfig.json
vite.config.ts
"type": "module" 设置启用 ES 模块语法。build 脚本使用 INPUT 环境变量告诉 Vite 捆绑哪个 HTML 文件。serve 脚本使用 tsx 运行你的服务器以进行 TypeScript 执行。{
"type": "module",
"scripts": {
"build": "INPUT=mcp-app.html vite build",
"serve": "npx tsx server.ts"
}
}
TypeScript 配置针对现代 JavaScript (ES2022) 并使用带有捆绑器解析的 ESNext 模块,这与 Vite 配合良好。include 数组涵盖根目录中的服务器代码和 src/ 中的 UI 代码。{
"compilerOptions": {
"target": "ES2022",
"module": "ESNext",
"moduleResolution": "bundler",
"strict": true,
"esModuleInterop": true,
"skipLibCheck": true,
"outDir": "dist"
},
"include": ["*.ts", "src/**/*.ts"]
}
import { defineConfig } from "vite";
import { viteSingleFile } from "vite-plugin-singlefile";
export default defineConfig({
plugins: [viteSingleFile()],
build: {
outDir: "dist",
rollupOptions: {
input: process.env.INPUT,
},
},
});
构建 MCP 应用
让我们构建一个简单的应用来显示当前服务器时间。此示例展示了完整模式:注册带有 UI 元数据的工具,将捆绑的 HTML 作为资源提供,以及构建与服务器通信的 UI。
服务器实现
服务器需要做两件事:注册包含 _meta.ui.resourceUri 字段的工具,并注册提供捆绑 HTML 的资源处理程序。以下是完整的服务器文件:
// server.ts
console.log("Starting MCP App server...");
import { McpServer } from "@modelcontextprotocol/sdk/server/mcp.js";
import { StreamableHTTPServerTransport } from "@modelcontextprotocol/sdk/server/streamableHttp.js";
import {
registerAppTool,
registerAppResource,
RESOURCE_MIME_TYPE,
} from "@modelcontextprotocol/ext-apps/server";
import cors from "cors";
import express from "express";
import fs from "node:fs/promises";
import path from "node:path";
const server = new McpServer({
name: "My MCP App Server",
version: "1.0.0",
});
// ui:// scheme 告诉主机这是一个 MCP 应用资源。
// 路径结构是任意的;根据你的应用意义进行组织。
const resourceUri = "ui://get-time/mcp-app.html";
// 注册返回当前时间的工具
registerAppTool(
server,
"get-time",
{
title: "Get Time",
description: "Returns the current server time.",
inputSchema: {},
_meta: { ui: { resourceUri } },
},
async () => {
const time = new Date().toISOString();
return {
content: [{ type: "text", text: time }],
};
},
);
// 注册提供捆绑 HTML 的资源
registerAppResource(
server,
resourceUri,
resourceUri,
{ mimeType: RESOURCE_MIME_TYPE },
async () => {
const html = await fs.readFile(
path.join(import.meta.dirname, "dist", "mcp-app.html"),
"utf-8",
);
return {
contents: [
{ uri: resourceUri, mimeType: RESOURCE_MIME_TYPE, text: html },
],
};
},
);
// 通过 HTTP 暴露 MCP 服务器
const expressApp = express();
expressApp.use(cors());
expressApp.use(express.json());
expressApp.post("/mcp", async (req, res) => {
const transport = new StreamableHTTPServerTransport({
sessionIdGenerator: undefined,
enableJsonResponse: true,
});
res.on("close", () => transport.close());
await server.connect(transport);
await transport.handleRequest(req, res, req.body);
});
expressApp.listen(3001, (err) => {
if (err) {
console.error("Error starting server:", err);
process.exit(1);
}
console.log("Server listening on http://localhost:3001/mcp");
});
让我们分解关键部分:
resourceUri:ui:// scheme 告诉主机这是一个 MCP 应用资源。路径结构是任意的。
registerAppTool:注册带有 _meta.ui.resourceUri 字段的工具。当主机调用此工具时,UI 被获取并渲染,工具结果在到达时传递给它。
registerAppResource:当主机请求 UI 资源时提供捆绑的 HTML。
- Express 服务器:在端口 3001 上通过 HTTP 暴露 MCP 服务器。
UI 实现
UI 由一个 HTML 页面和一个使用 App 类与主机通信的 TypeScript 模块组成。以下是 HTML:
<!-- mcp-app.html -->
<!DOCTYPE html>
<html lang="en">
<head>
<meta charset="UTF-8" />
<title>Get Time App</title>
</head>
<body>
<p>
<strong>Server Time:</strong>
<code id="server-time">Loading...</code>
</p>
<button id="get-time-btn">Get Server Time</button>
<script type="module" src="/src/mcp-app.ts"></script>
</body>
</html>
以及 TypeScript 模块:
// src/mcp-app.ts
import { App } from "@modelcontextprotocol/ext-apps";
const serverTimeEl = document.getElementById("server-time")!;
const getTimeBtn = document.getElementById("get-time-btn")!;
const app = new App({ name: "Get Time App", version: "1.0.0" });
// 与主机建立通信
app.connect();
// 处理主机推送的初始工具结果
app.ontoolresult = (result) => {
const time = result.content?.find((c) => c.type === "text")?.text;
serverTimeEl.textContent = time ?? "[ERROR]";
};
// 当用户与 UI 交互时主动调用工具
getTimeBtn.addEventListener("click", async () => {
const result = await app.callServerTool({
name: "get-time",
arguments: {},
});
const time = result.content?.find((c) => c.type === "text")?.text;
serverTimeEl.textContent = time ?? "[ERROR]";
});
关键部分:
app.connect():与主机建立通信。在你的应用初始化时调用一次。
app.ontoolresult:当主机将工具结果推送到你的应用时触发的回调(例如,当工具首次调用且 UI 渲染时)。
app.callServerTool():让你的应用主动调用服务器上的工具。请记住,每次调用都涉及往返服务器的过程,因此设计你的 UI 以优雅地处理延迟。
App 类提供了额外的方法用于日志记录、打开 URL 以及使用来自你的应用的结构化数据更新模型的上下文。请参阅完整的 API 文档。
测试你的应用
要测试你的 MCP 应用,构建 UI 并启动本地服务器:
npm run build && npm run serve
npm run build; npm run serve
在默认配置中,你的服务器将位于
http://localhost:3001/mcp。但是,要查看你的应用渲染效果,你需要一个支持 MCP 应用的 MCP
主机。你有几个选项。
使用 Claude 测试
Claude(网页版)和 Claude Desktop
支持 MCP 应用。对于本地开发,你需要将服务器暴露到互联网。你可以本地运行 MCP 服务器,并使用像 cloudflared
这样的工具来隧道传输流量。
在另一个终端中,运行:
npx cloudflared tunnel --url http://localhost:3001
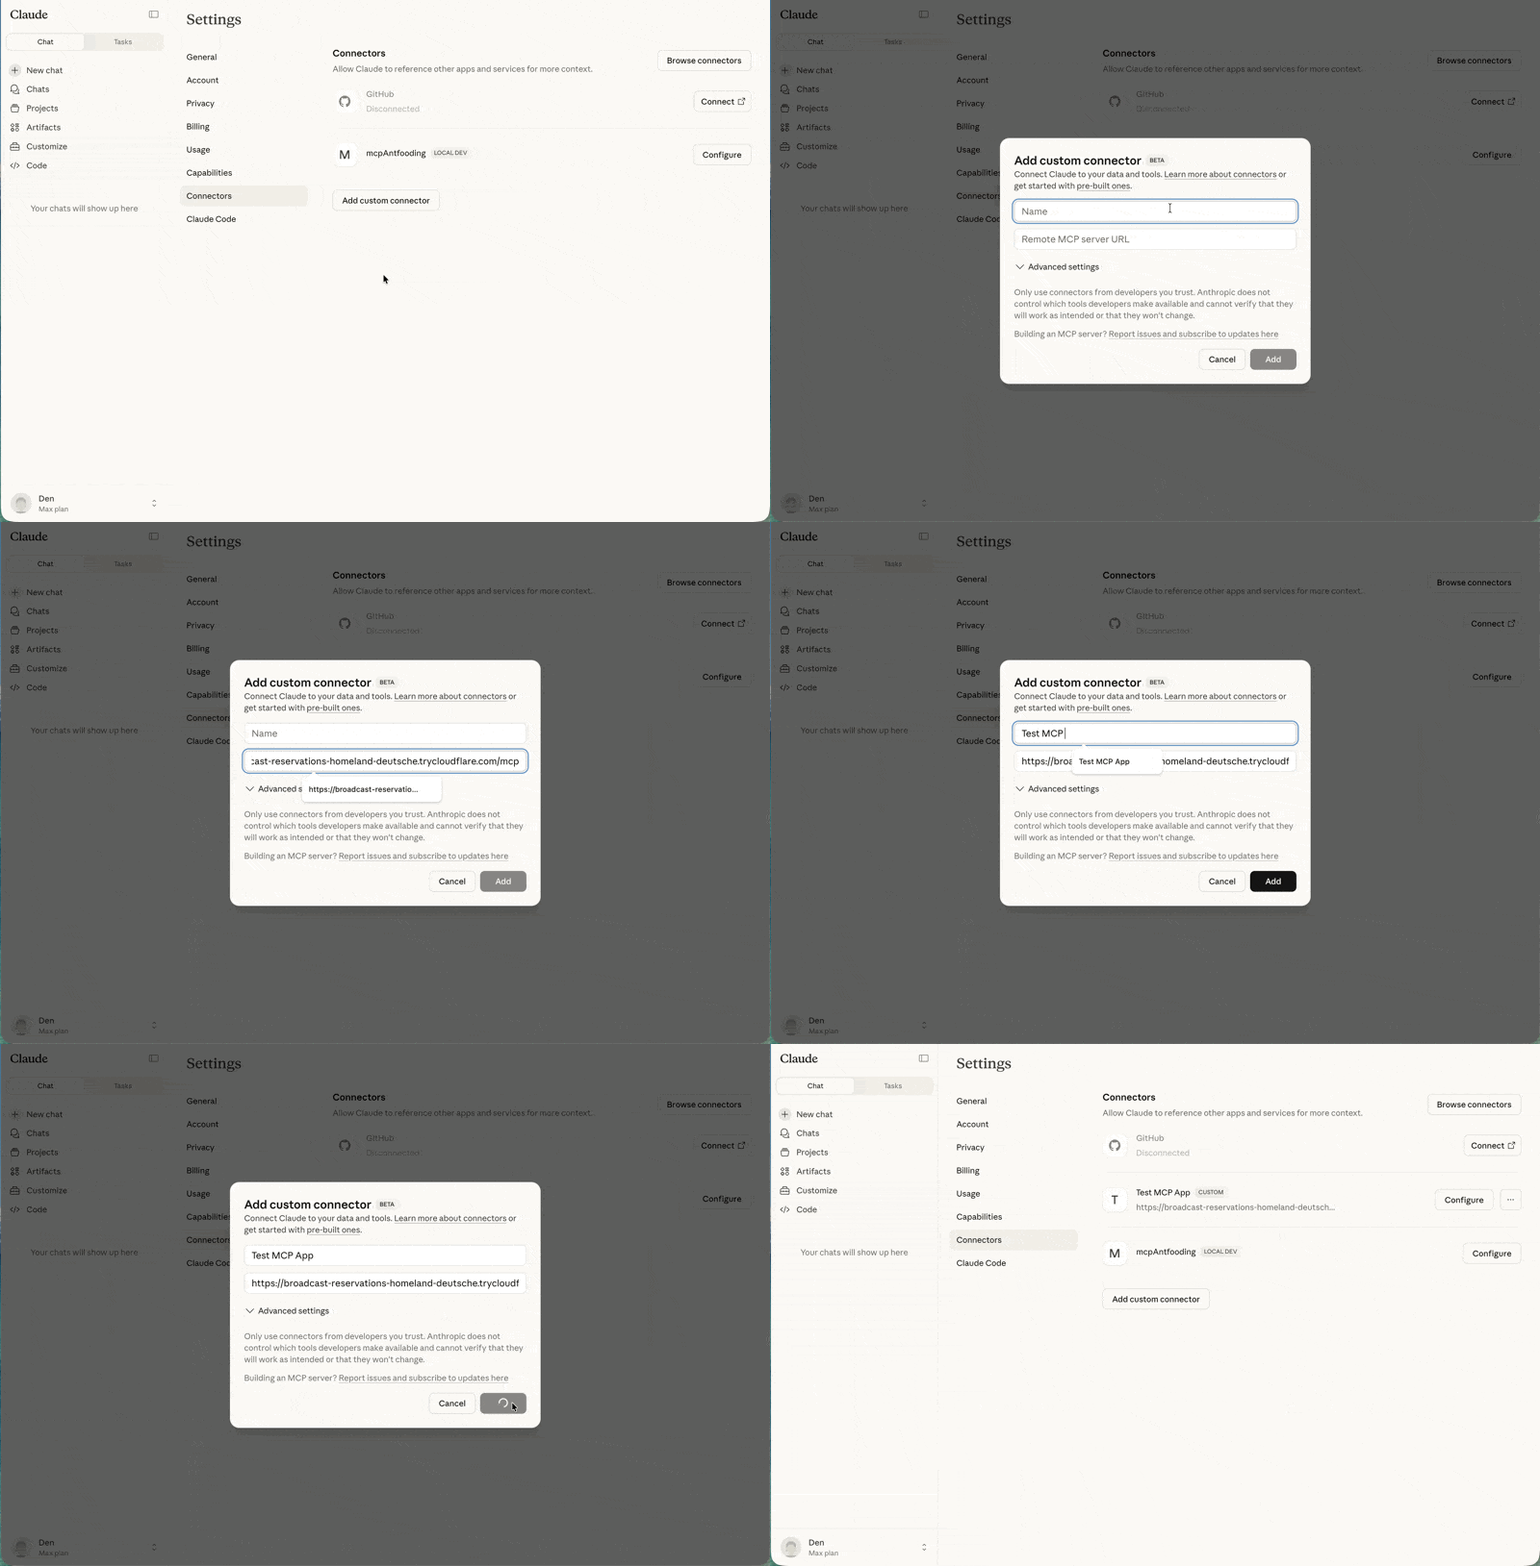
复制生成的 URL(例如 https://random-name.trycloudflare.com)并将其添加
为一个 自定义连接器
在 Claude 中 - 点击你的个人资料,进入 设置,连接器,并
最后 添加自定义连接器。
自定义连接器仅在付费的 Claude 计划(Pro、Max 或 Team)中可用。
使用 basic-host 测试
ext-apps 仓库包含一个用于开发的测试主机。克隆仓库并
安装依赖:
git clone https://github.com/modelcontextprotocol/ext-apps.git
cd ext-apps/examples/basic-host
npm install
git clone https://github.com/modelcontextprotocol/ext-apps.git
cd ext-apps\examples\basic-host
npm install
从 ext-apps/examples/basic-host/ 运行 npm start 将启动 basic-host
测试界面。要将其连接到特定服务器(例如你正在开发的服务器),内联传递 SERVERS 环境变量:
SERVERS='["http://localhost:3001/mcp"]' npm start
$env:SERVERS='["http://localhost:3001/mcp"]'; npm start
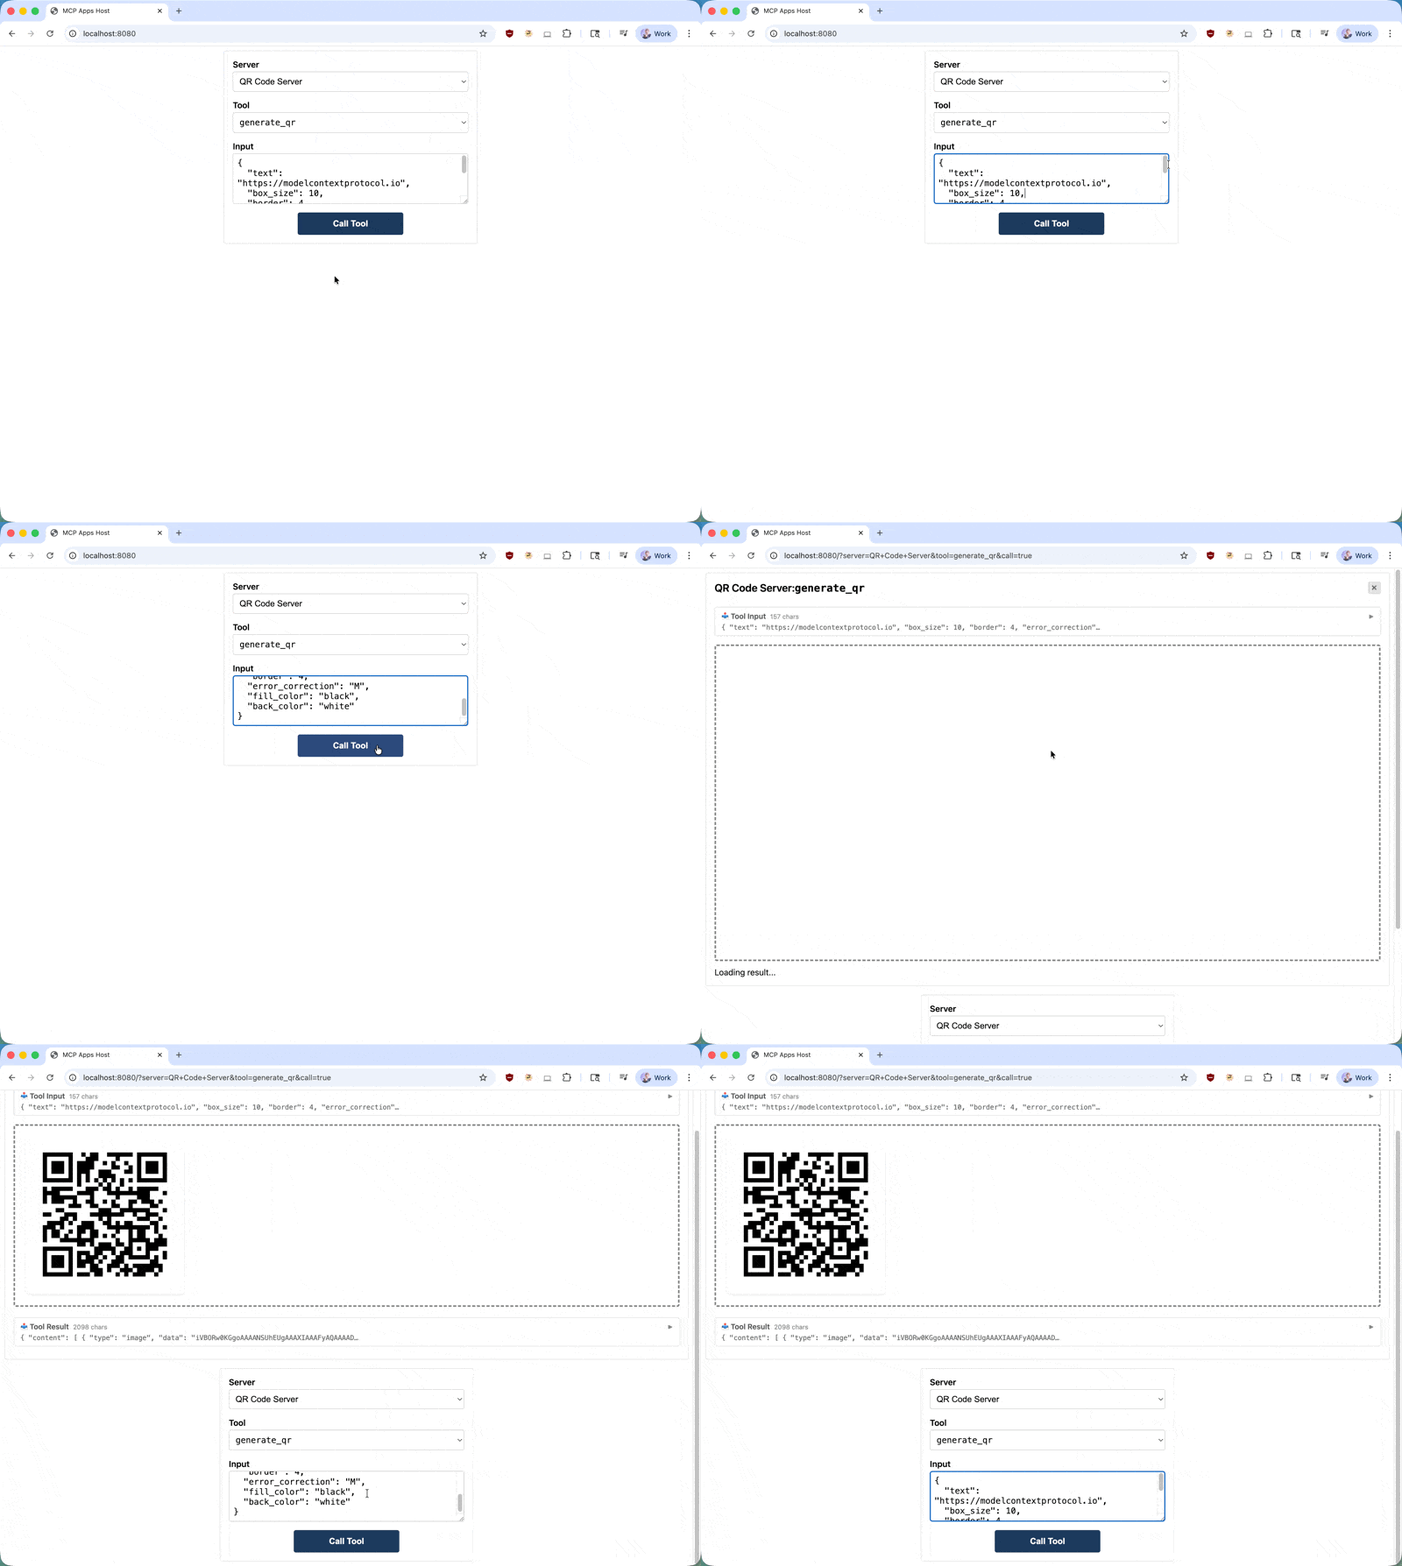
导航到 http://localhost:8080。你将看到一个简单的界面,可以在其中
选择工具并调用它。当你调用工具时,主机将获取 UI 资源并在沙盒 iframe 中渲染它。然后你可以与应用交互并验证工具调用是否正常工作。
了解更多
MCP 应用正在积极开发中。如果你遇到问题或有改进想法,请在
GitHub 仓库 上提交一个 issue。
关于扩展方向的更广泛讨论,请加入对话
在 GitHub Discussions 中。