> ## Documentation Index
> Fetch the complete documentation index at: https://mcp.zhcndoc.com/llms.txt
> Use this file to discover all available pages before exploring further.
# 理解 MCP 中的授权
> 了解如何使用 OAuth 2.1 为 MCP 服务器实现安全授权,以保护敏感资源和操作
模型上下文协议 (MCP) 中的授权保护了对 MCP 服务器公开的敏感资源和操作的访问。如果您的 MCP 服务器处理用户数据或管理操作,授权可确保只有获许可的用户才能访问其端点。
MCP 使用标准化的授权流程在 MCP 客户端和 MCP 服务器之间建立信任。其设计不专注于某一种特定的授权或身份系统,而是遵循 [OAuth 2.1](https://datatracker.ietf.org/doc/html/draft-ietf-oauth-v2-1-13) 概述的约定。有关详细信息,请参阅 [授权规范](/specification/latest/basic/authorization)。
## 何时应该使用授权?
虽然 MCP 服务器的授权是 **可选的**,但在以下情况下强烈建议使用:
* 您的服务器访问特定于用户的数据(电子邮件、文档、数据库)
* 您需要审计谁执行了哪些操作
* 您的服务器授予对其 API 的访问权限,这需要用户同意
* 您正在为具有严格访问控制的企业环境构建
* 您想要实施每个用户的速率限制或使用跟踪
**本地 MCP 服务器的授权**
对于使用 [STDIO 传输](/specification/latest/basic/transports#stdio) 的 MCP 服务器,您可以改用基于环境的凭据或直接嵌入在 MCP 服务器中的第三方库提供的凭据。由于基于 STDIO 构建的 MCP 服务器在本地运行,因此在获取用户凭据方面具有多种灵活的选择,这些选择可能依赖也可能不依赖浏览器内的身份验证和授权流程。
反过来,OAuth 流程是为基于 HTTP 的传输设计的,其中 MCP 服务器是远程托管的,客户端使用 OAuth 来建立用户有权访问该远程服务器的授权。
## 授权流程:逐步指南
让我们逐步了解当客户端想要连接到受保护的 MCP 服务器时会发生什么:
当您的 MCP 客户端首次尝试连接时,您的服务器会响应 `401 Unauthorized` 并告诉客户端在哪里可以找到授权信息,这些信息捕获在 [受保护资源元数据 (PRM) 文档](https://datatracker.ietf.org/doc/html/rfc9728) 中。该文档由 MCP 服务器托管,遵循可预测的路径模式,并在 `WWW-Authenticate` header 中的 `resource_metadata` 参数中提供给客户端。
```http theme={null}
HTTP/1.1 401 Unauthorized
WWW-Authenticate: Bearer realm="mcp",
resource_metadata="https://your-server.com/.well-known/oauth-protected-resource"
```
这告诉客户端 MCP 服务器需要授权,以及在哪里获取必要的信息来启动授权流程。
有了指向 PRM 文档的 URI 指针,客户端将获取元数据以了解授权服务器、支持的作用域和其他资源信息。数据通常封装在 JSON blob 中,类似于以下内容。
```json theme={null}
{
"resource": "https://your-server.com/mcp",
"authorization_servers": ["https://auth.your-server.com"],
"scopes_supported": ["mcp:tools", "mcp:resources"]
}
```
您可以在 [RFC 9728 第 3.2 节](https://datatracker.ietf.org/doc/html/rfc9728#name-protected-resource-metadata-r) 中看到更全面的示例。
接下来,客户端通过获取其元数据来发现授权服务器可以做什么。如果 PRM 文档列出了多个授权服务器,客户端可以决定使用哪一个。
选定授权服务器后,客户端将构建标准元数据 URI 并向 [OpenID Connect (OIDC) 发现](https://openid.net/specs/openid-connect-discovery-1_0.html) 或 [OAuth 2.0 授权服务器元数据](https://datatracker.ietf.org/doc/html/rfc8414) 端点(取决于授权服务器支持)发出请求,并检索另一组元数据属性,这将使其知道完成授权流程所需的端点。
```json theme={null}
{
"issuer": "https://auth.your-server.com",
"authorization_endpoint": "https://auth.your-server.com/authorize",
"token_endpoint": "https://auth.your-server.com/token",
"registration_endpoint": "https://auth.your-server.com/register"
}
```
处理好所有元数据后,客户端现在需要确保它已在授权服务器注册。这可以通过两种方式完成。
首先,客户端可以与给定的授权服务器 **预注册**,在这种情况下,它可以拥有嵌入的客户端注册信息,用于完成授权流程。
或者,客户端可以使用 **动态客户端注册** (DCR) 向授权服务器动态注册自己。后一种场景需要授权服务器支持 DCR。如果授权服务器确实支持 DCR,客户端将向其信息发送请求到 `registration_endpoint`:
```json theme={null}
{
"client_name": "My MCP Client",
"redirect_uris": ["http://localhost:3000/callback"],
"grant_types": ["authorization_code", "refresh_token"],
"response_types": ["code"]
}
```
如果注册成功,授权服务器将返回带有客户端注册信息的 JSON blob。
**无 DCR 或预注册**
如果 MCP 客户端连接到不使用支持 DCR 的授权服务器的 MCP 服务器,并且客户端未在该授权服务器预注册,则客户端开发人员有责任提供一种方便终端用户手动输入客户端信息的方式。
客户端现在需要打开浏览器到 `/authorize` 端点,用户可以在那里登录并授予所需的权限。然后授权服务器将重定向回客户端,附带一个授权代码,客户端将其交换为令牌:
```json theme={null}
{
"access_token": "eyJhbGciOiJSUzI1NiIs...",
"refresh_token": "def502...",
"token_type": "Bearer",
"expires_in": 3600
}
```
访问令牌是客户端将用于向 MCP 服务器验证请求的令牌。此步骤遵循标准 [OAuth 2.1 授权代码与 PKCE](https://oauth.net/2/grant-types/authorization-code/) 约定。
最后,客户端可以使用嵌入在 `Authorization` header 中的访问令牌向您的 MCP 服务器发出请求:
```http theme={null}
GET /mcp HTTP/1.1
Host: your-server.com
Authorization: Bearer eyJhbGciOiJSUzI1NiIs...
```
MCP 服务器需要验证令牌,如果令牌有效且具有所需权限,则处理请求。
## 实现示例
要开始实际实现,我们将使用托管在 Docker 容器中的 [Keycloak](https://www.keycloak.org/) 授权服务器。Keycloak 是一个开源授权服务器,可以轻松部署在本地进行测试和实验。
确保您下载并安装了 [Docker Desktop](https://www.docker.com/products/docker-desktop/)。我们需要它来在我们的开发机器上部署 Keycloak。
### Keycloak 设置
从您的终端应用程序中,运行以下命令以启动 Keycloak 容器:
```bash theme={null}
docker run -p 127.0.0.1:8080:8080 -e KC_BOOTSTRAP_ADMIN_USERNAME=admin -e KC_BOOTSTRAP_ADMIN_PASSWORD=admin quay.io/keycloak/keycloak start-dev
```
此命令将在本地拉取 Keycloak 容器镜像并引导基本配置。它将在端口 `8080` 上运行,并具有一个 `admin` 用户和 `admin` 密码。
**不用于生产环境**
上述配置可能适用于测试和实验;但是,您绝不应在生产环境中使用它。请参阅 [为生产环境配置 Keycloak](https://www.keycloak.org/server/configuration-production) 指南,以获取有关如何在需要可靠性、安全性和高可用性的场景下部署授权服务器的更多详细信息。
您将能够从浏览器中的 `http://localhost:8080` 访问 Keycloak 授权服务器。
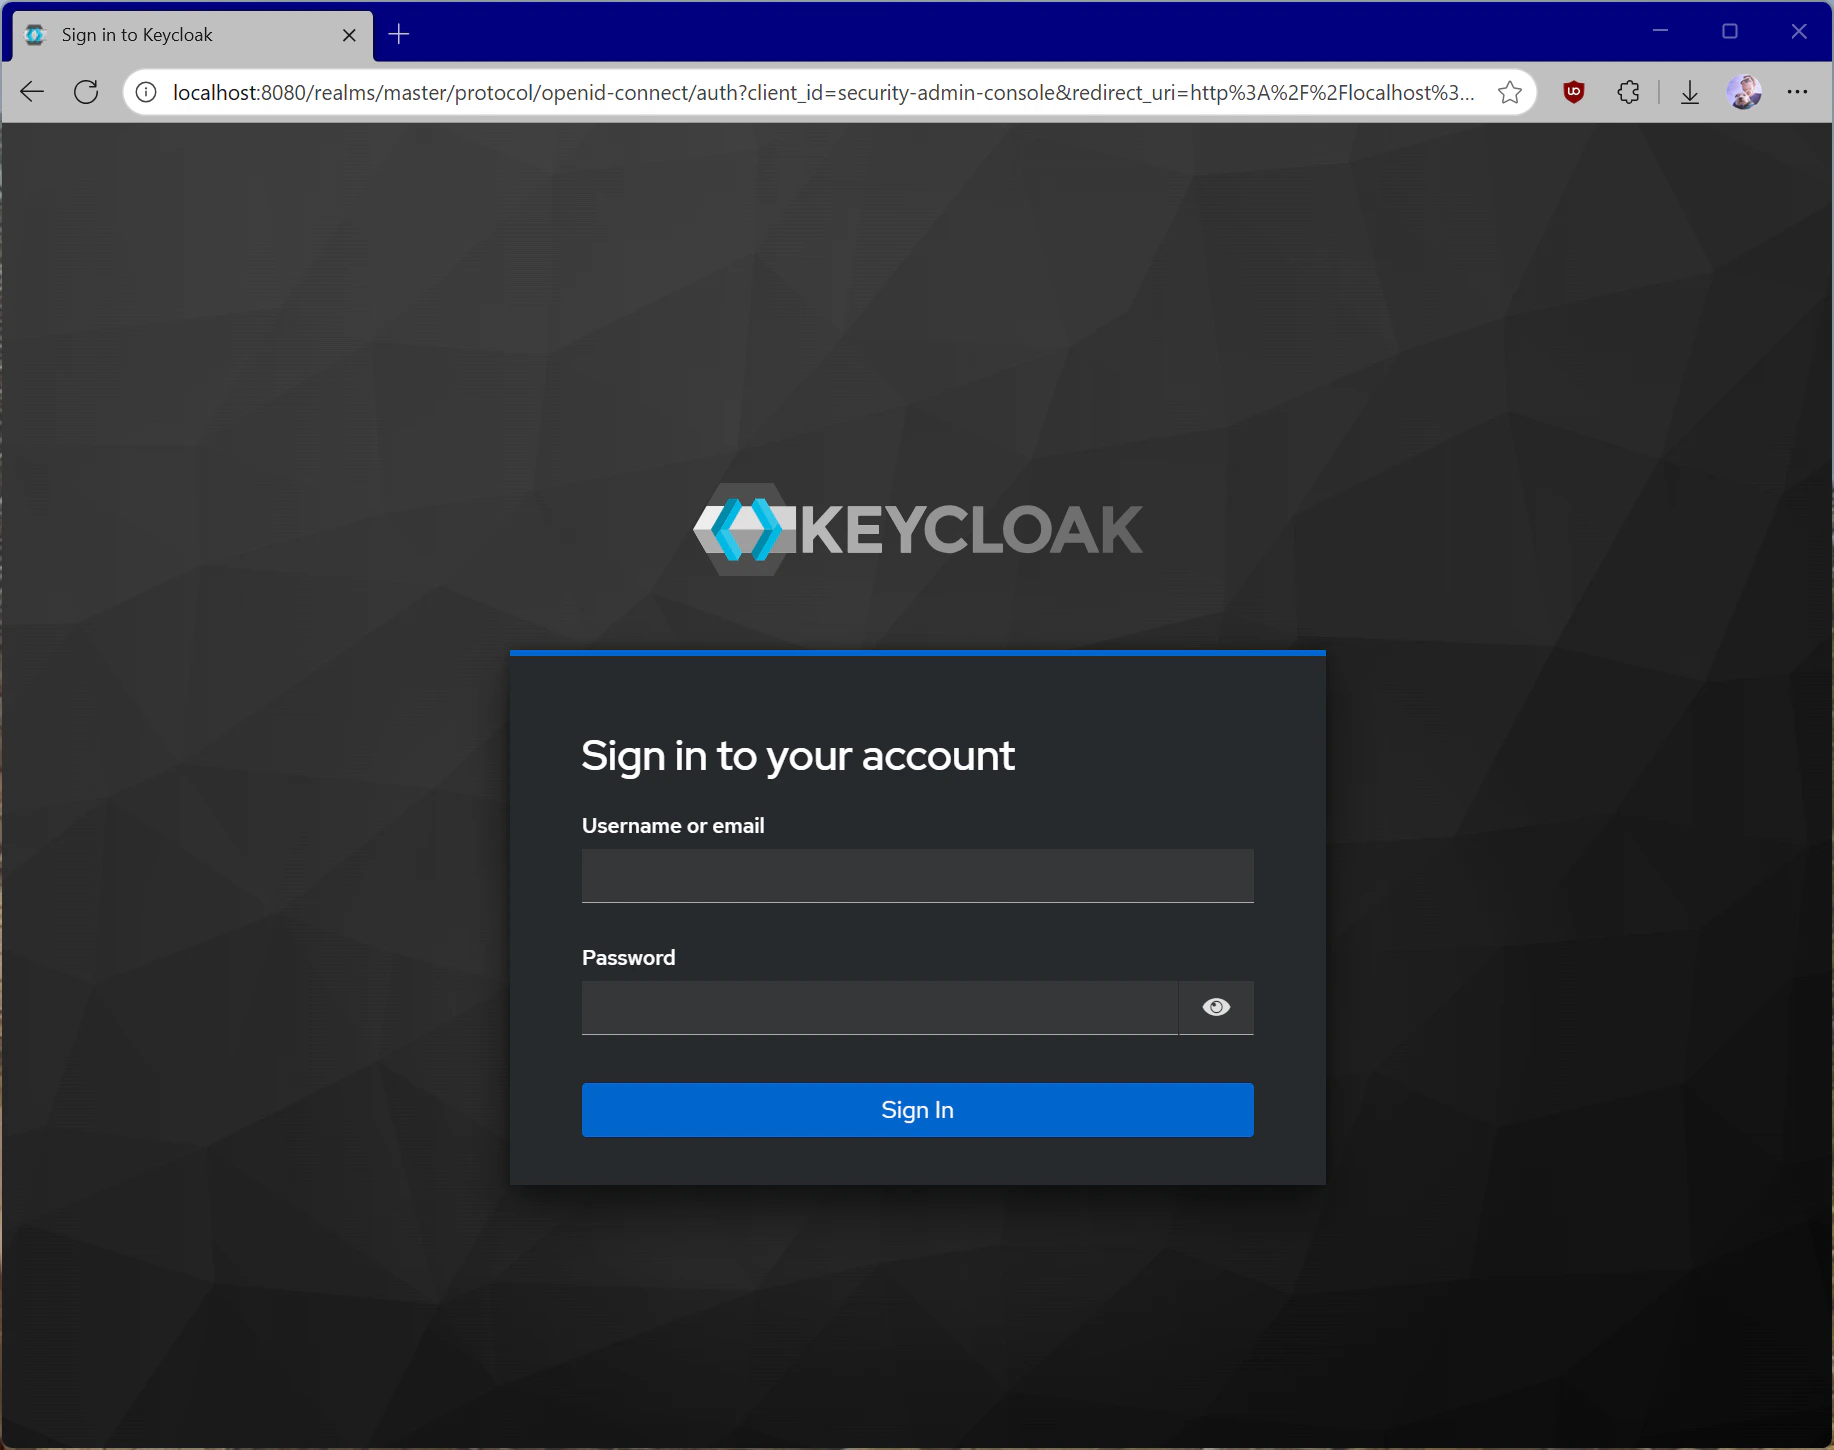 使用默认配置运行时,Keycloak 已经支持许多我们 MCP 服务器所需的功能,包括动态客户端注册。您可以通过查看 OIDC 配置来检查这一点,该配置位于:
```http theme={null}
http://localhost:8080/realms/master/.well-known/openid-configuration
```
我们还需要设置 Keycloak 以支持我们的作用域,并允许我们的主机(本地机器)动态注册客户端,因为默认策略限制匿名动态客户端注册。
转到 Keycloak 仪表板中的 **Client scopes** 并创建一个新的 `mcp:tools` 作用域。我们将使用它来访问 MCP 服务器上的所有工具。
使用默认配置运行时,Keycloak 已经支持许多我们 MCP 服务器所需的功能,包括动态客户端注册。您可以通过查看 OIDC 配置来检查这一点,该配置位于:
```http theme={null}
http://localhost:8080/realms/master/.well-known/openid-configuration
```
我们还需要设置 Keycloak 以支持我们的作用域,并允许我们的主机(本地机器)动态注册客户端,因为默认策略限制匿名动态客户端注册。
转到 Keycloak 仪表板中的 **Client scopes** 并创建一个新的 `mcp:tools` 作用域。我们将使用它来访问 MCP 服务器上的所有工具。
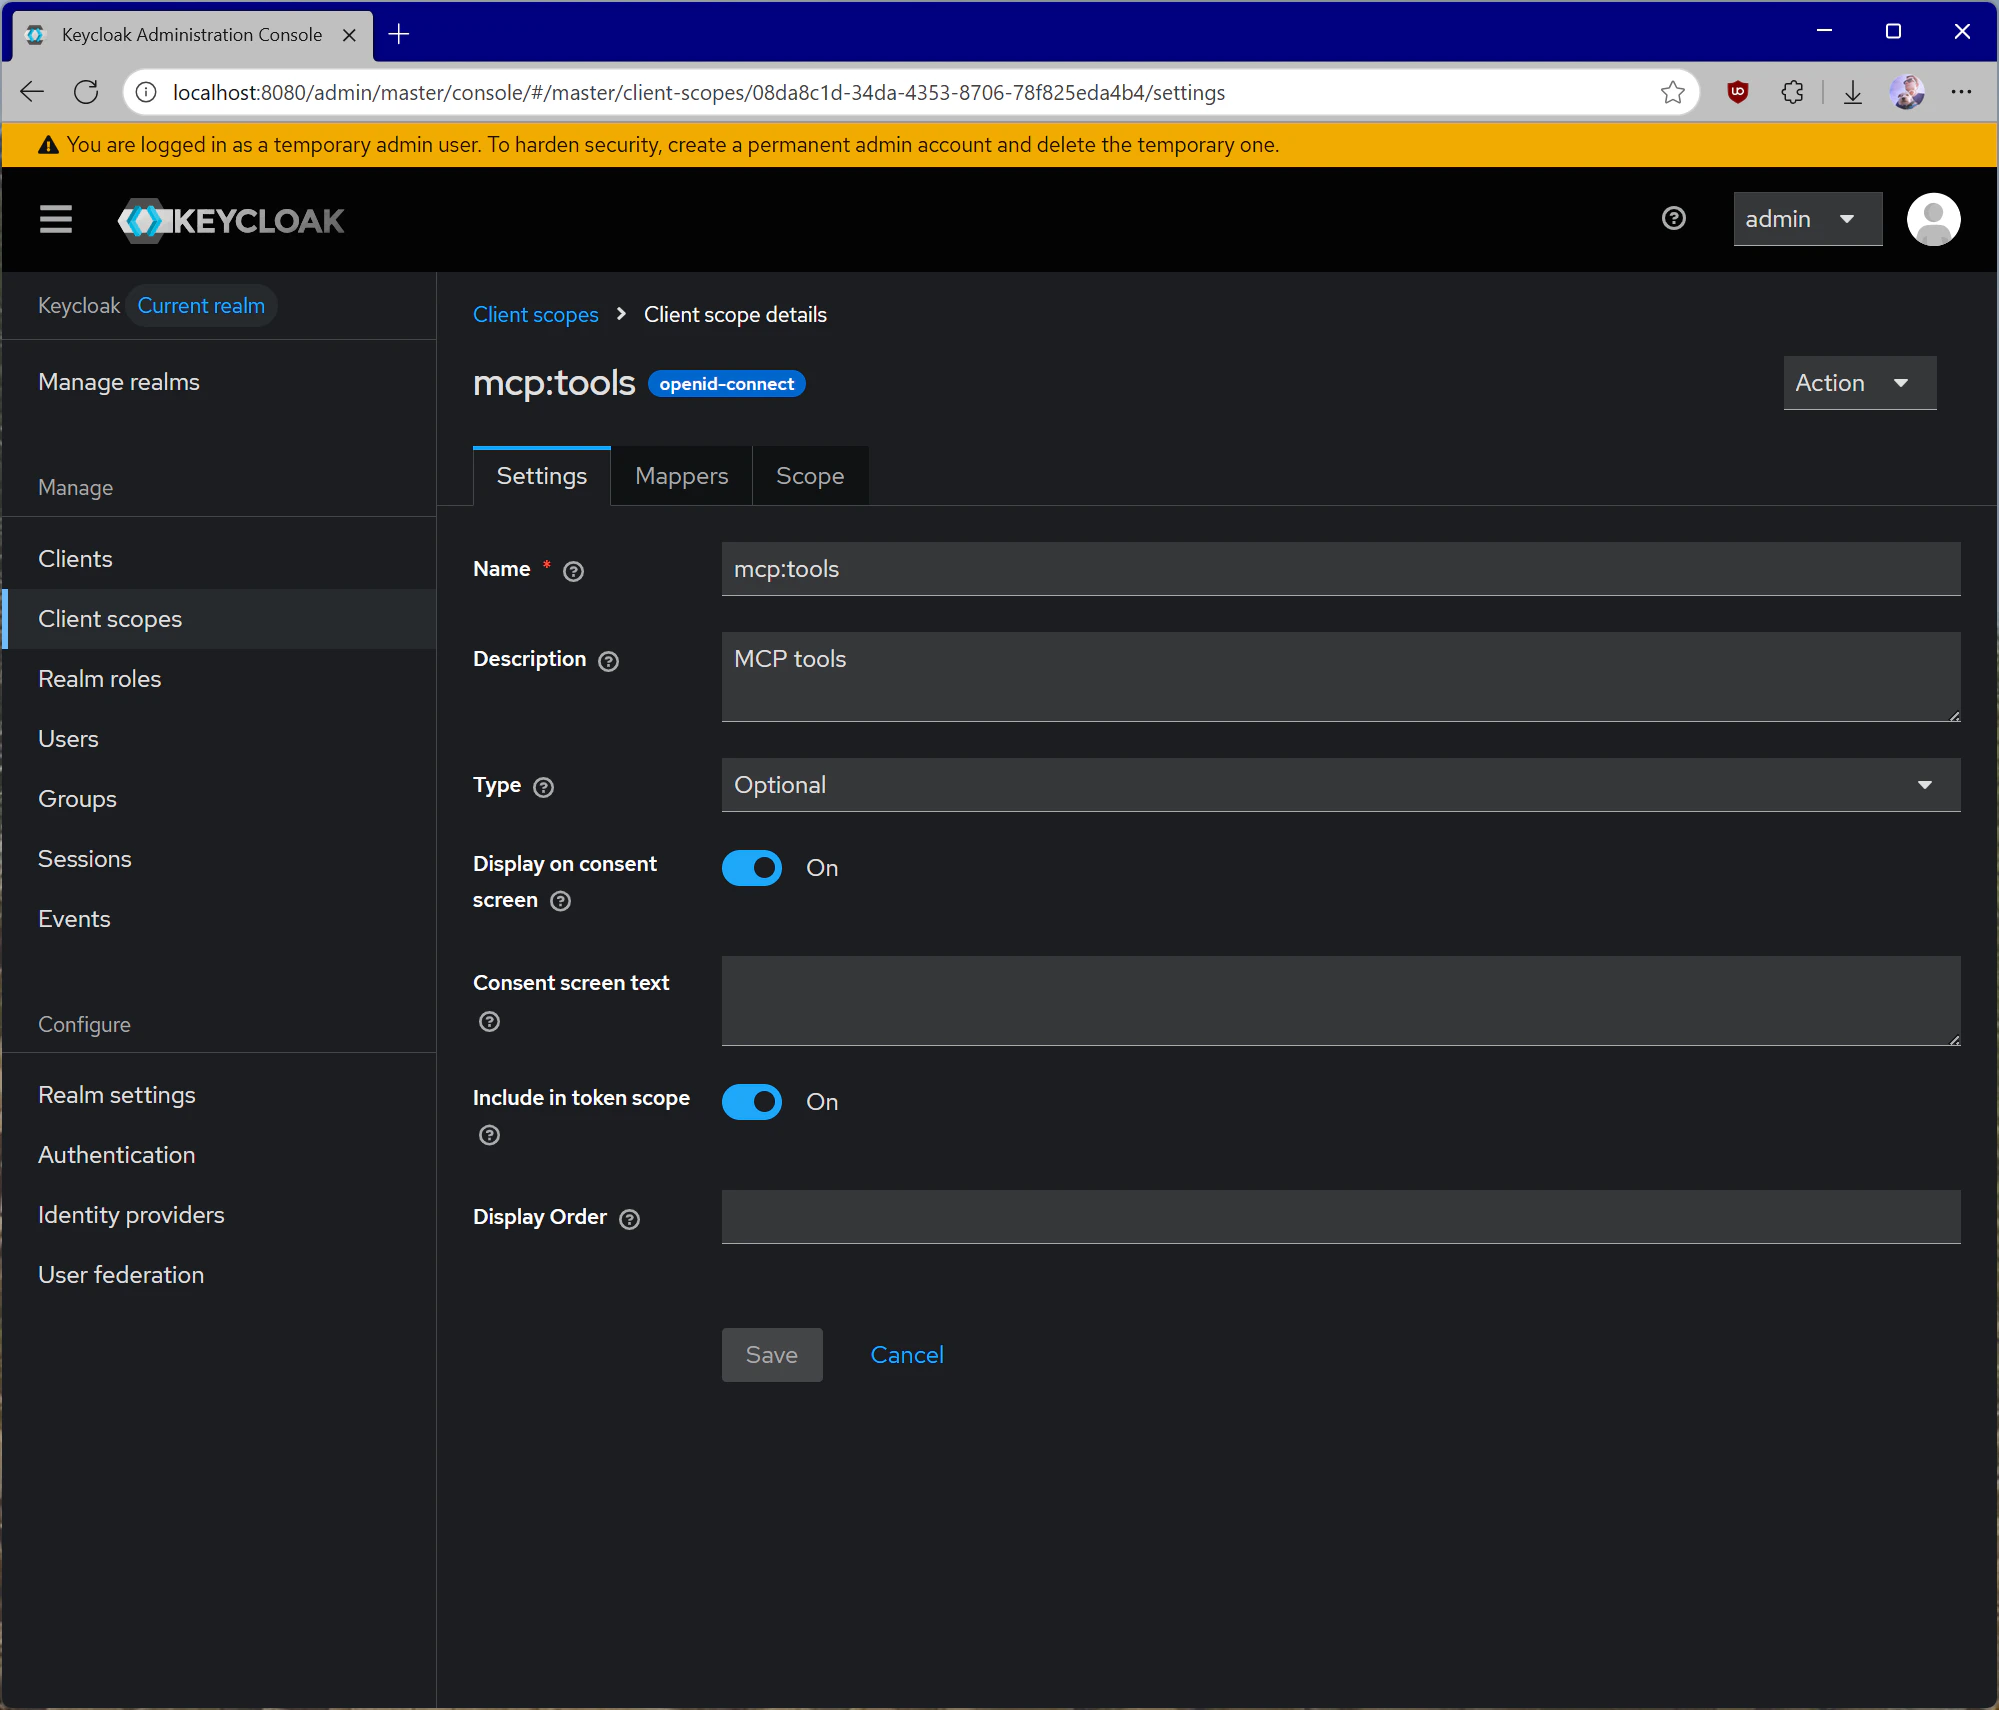 创建作用域后,确保将其类型分配为 **Default** 并翻转 **Include in token scope** 开关,因为这将需要用于令牌验证。
现在让我们也为 Keycloak 颁发的令牌设置一个 **audience**。配置 audience 很重要,因为它将预期的目的地直接嵌入到颁发的访问令牌中。这有助于您的 MCP 服务器验证它获得的令牌实际上是专门为它而不是其他 API 签发的。这对于帮助避免令牌传递场景至关重要。
为此,打开您的 `mcp:tools` 客户端作用域并点击 **Mappers**,然后点击 **Configure a new mapper**。选择 **Audience**。
创建作用域后,确保将其类型分配为 **Default** 并翻转 **Include in token scope** 开关,因为这将需要用于令牌验证。
现在让我们也为 Keycloak 颁发的令牌设置一个 **audience**。配置 audience 很重要,因为它将预期的目的地直接嵌入到颁发的访问令牌中。这有助于您的 MCP 服务器验证它获得的令牌实际上是专门为它而不是其他 API 签发的。这对于帮助避免令牌传递场景至关重要。
为此,打开您的 `mcp:tools` 客户端作用域并点击 **Mappers**,然后点击 **Configure a new mapper**。选择 **Audience**。
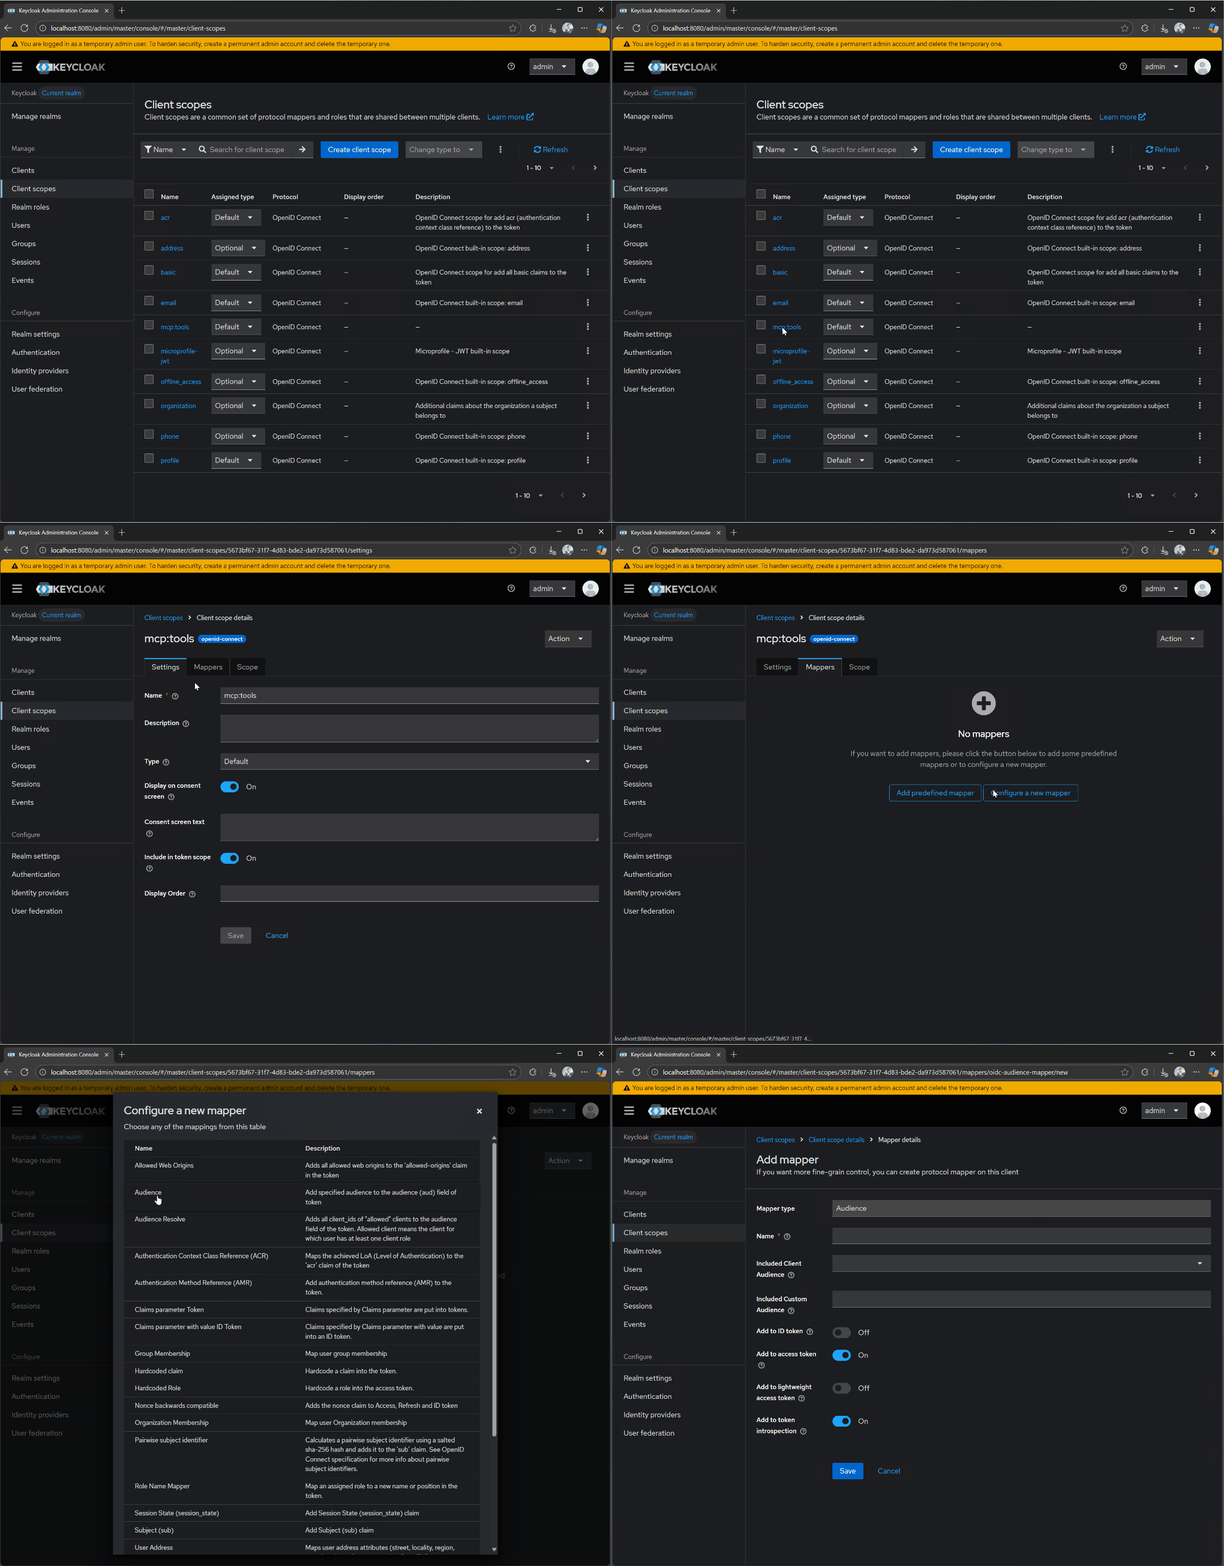 对于 **Name**,使用 `audience-config`。为 **Included Custom Audience** 添加一个值,设置为 `http://localhost:3000`。这将是我们测试服务器的 URI。
**不用于生产环境**
上述 audience 配置旨在用于测试。对于生产场景,需要额外的设置和配置,以确保颁发的令牌的 audience 得到适当约束。具体来说,audience 需要基于从客户端传递的资源参数,而不是固定值。
现在,导航到 **Clients**,然后 **Client registration**,然后 **Trusted Hosts**。禁用 **Client URIs Must Match** 设置并添加您正在测试的主机。您可以通过在 Linux 或 macOS 上运行 `ifconfig` 命令,或在 Windows 上运行 `ipconfig` 来获取当前主机 IP。您可以通过查看 keycloak 日志中类似 `Failed to verify remote host : 192.168.215.1` 的行来查看需要添加的 IP 地址。检查该 IP 地址是否与您的主机关联。这可能是桥接网络,具体取决于您的 docker 设置。
对于 **Name**,使用 `audience-config`。为 **Included Custom Audience** 添加一个值,设置为 `http://localhost:3000`。这将是我们测试服务器的 URI。
**不用于生产环境**
上述 audience 配置旨在用于测试。对于生产场景,需要额外的设置和配置,以确保颁发的令牌的 audience 得到适当约束。具体来说,audience 需要基于从客户端传递的资源参数,而不是固定值。
现在,导航到 **Clients**,然后 **Client registration**,然后 **Trusted Hosts**。禁用 **Client URIs Must Match** 设置并添加您正在测试的主机。您可以通过在 Linux 或 macOS 上运行 `ifconfig` 命令,或在 Windows 上运行 `ipconfig` 来获取当前主机 IP。您可以通过查看 keycloak 日志中类似 `Failed to verify remote host : 192.168.215.1` 的行来查看需要添加的 IP 地址。检查该 IP 地址是否与您的主机关联。这可能是桥接网络,具体取决于您的 docker 设置。
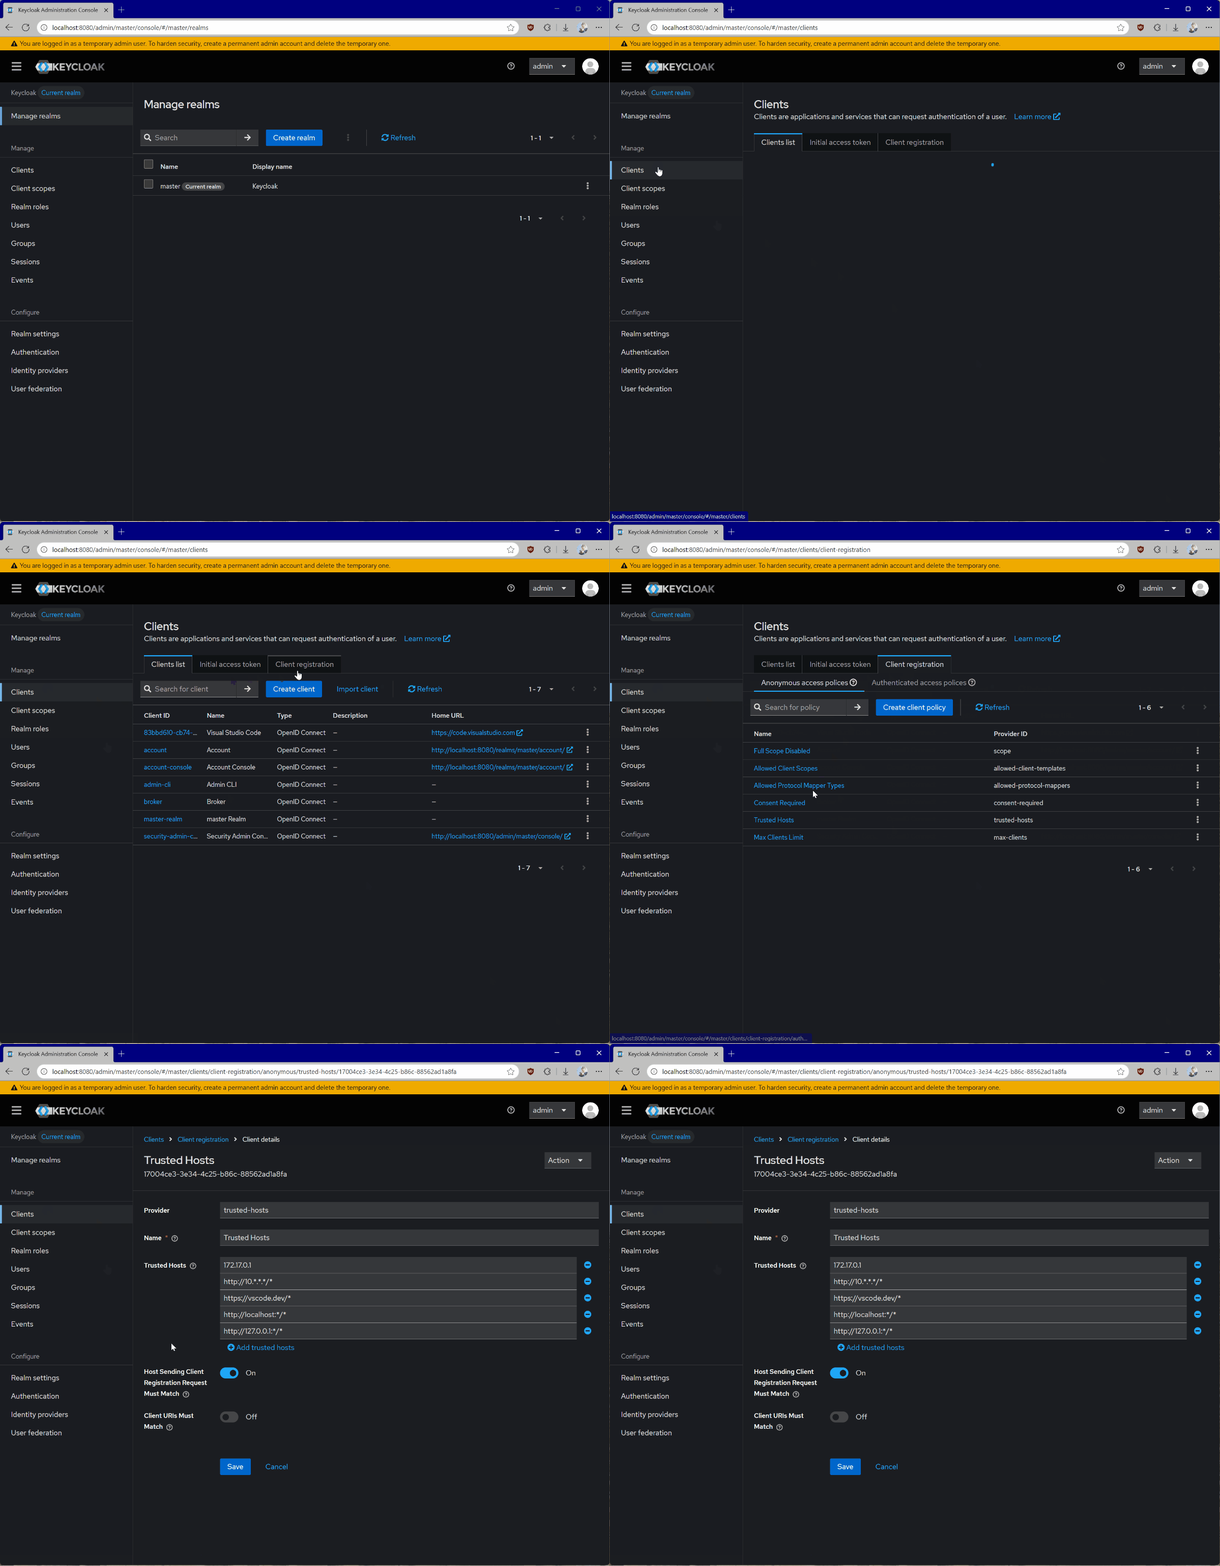 **获取主机**
如果您从容器运行 Keycloak,您还将能够从终端中的容器日志中看到主机 IP。
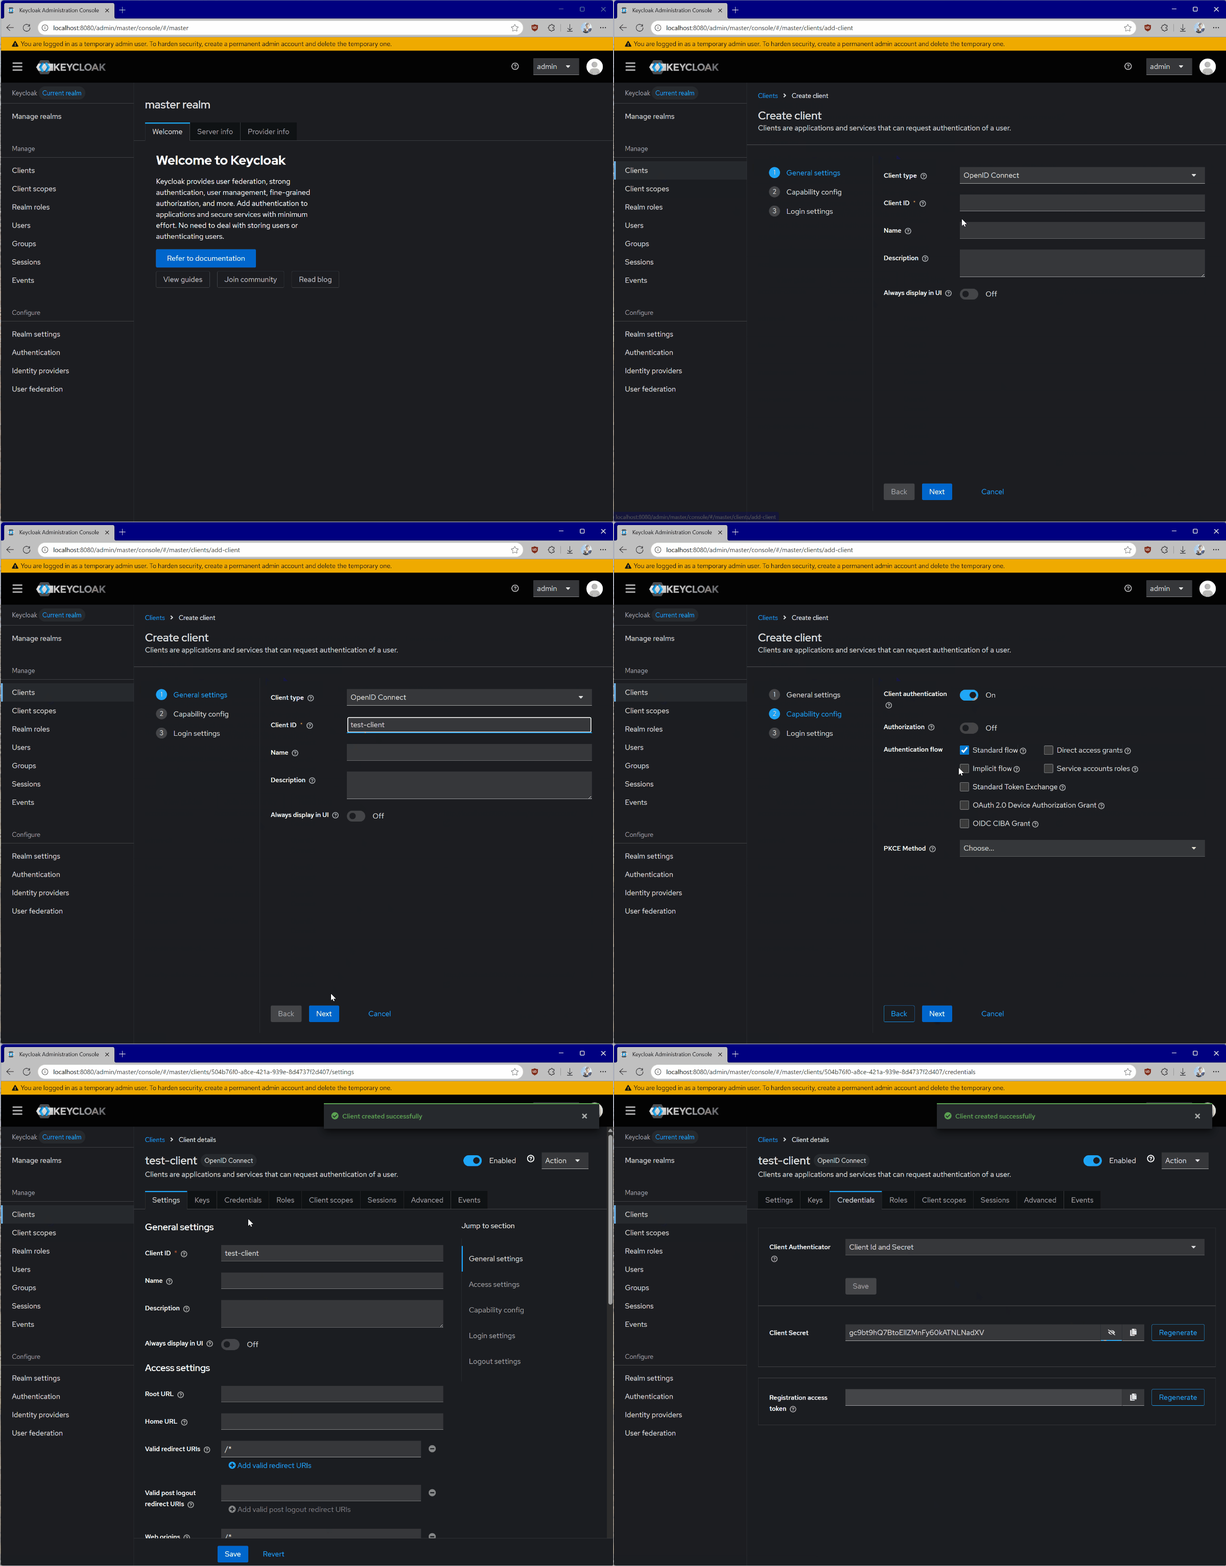
最后,我们需要注册一个新的客户端,我们可以将其与 **MCP 服务器本身** 一起使用,以便与 Keycloak 通信,用于 [令牌内省](https://oauth.net/2/token-introspection/) 等事情。为此:
1. 转到 **Clients**。
2. 点击 **Create client**。
3. 为您的客户端提供一个唯一的 **Client ID** 并点击 **Next**。
4. 启用 **Client authentication** 并点击 **Next**。
5. 点击 **Save**。
值得注意的是,令牌内省只是验证令牌的可用方法之一。这也可以借助特定于每种语言和平台的独立库来完成。
当您打开客户端详细信息时,转到 **Credentials** 并注意 **Client Secret**。
**获取主机**
如果您从容器运行 Keycloak,您还将能够从终端中的容器日志中看到主机 IP。
最后,我们需要注册一个新的客户端,我们可以将其与 **MCP 服务器本身** 一起使用,以便与 Keycloak 通信,用于 [令牌内省](https://oauth.net/2/token-introspection/) 等事情。为此:
1. 转到 **Clients**。
2. 点击 **Create client**。
3. 为您的客户端提供一个唯一的 **Client ID** 并点击 **Next**。
4. 启用 **Client authentication** 并点击 **Next**。
5. 点击 **Save**。
值得注意的是,令牌内省只是验证令牌的可用方法之一。这也可以借助特定于每种语言和平台的独立库来完成。
当您打开客户端详细信息时,转到 **Credentials** 并注意 **Client Secret**。
 **处理密钥**
切勿将客户端凭据直接嵌入到您的代码中。我们建议使用环境变量或专门的密钥存储解决方案。
配置好 Keycloak 后,每次触发授权流程时,您的 MCP 服务器都将收到如下所示的令牌:
```text theme={null}
eyJhbGciOiJSUzI1NiIsInR5cCIgOiAiSldUIiwia2lkIiA6ICI1TjcxMGw1WW5MWk13WGZ1VlJKWGtCS3ZZMzZzb3JnRG5scmlyZ2tlTHlzIn0.eyJleHAiOjE3NTU1NDA4MTcsImlhdCI6MTc1NTU0MDc1NywiYXV0aF90aW1lIjoxNzU1NTM4ODg4LCJqdGkiOiJvbnJ0YWM6YjM0MDgwZmYtODQwNC02ODY3LTgxYmUtMTIzMWI1MDU5M2E4IiwiaXNzIjoiaHR0cDovL2xvY2FsaG9zdDo4MDgwL3JlYWxtcy9tYXN0ZXIiLCJhdWQiOiJodHRwOi8vbG9jYWxob3N0OjMwMDAiLCJzdWIiOiIzM2VkNmM2Yi1jNmUwLTQ5MjgtYTE2MS1mMmY2OWM3YTAzYjkiLCJ0eXAiOiJCZWFyZXIiLCJhenAiOiI3OTc1YTViNi04YjU5LTRhODUtOWNiYS04ZmFlYmRhYjg5NzQiLCJzaWQiOiI4ZjdlYzI3Ni0zNThmLTRjY2MtYjMxMy1kYjA4MjkwZjM3NmYiLCJzY29wZSI6Im1jcDp0b29scyJ9.P5xCRtXORly0R0EXjyqRCUx-z3J4uAOWNAvYtLPXroykZuVCCJ-K1haiQSwbURqfsVOMbL7jiV-sD6miuPzI1tmKOkN_Yct0Vp-azvj7U5rEj7U6tvPfMkg2Uj_jrIX0KOskyU2pVvGZ-5BgqaSvwTEdsGu_V3_E0xDuSBq2uj_wmhqiyTFm5lJ1WkM3Hnxxx1_AAnTj7iOKMFZ4VCwMmk8hhSC7clnDauORc0sutxiJuYUZzxNiNPkmNeQtMCGqWdP1igcbWbrfnNXhJ6NswBOuRbh97_QraET3hl-CNmyS6C72Xc0aOwR_uJ7xVSBTD02OaQ1JA6kjCATz30kGYg
```
解码后,它将看起来像这样:
```json theme={null}
{
"alg": "RS256",
"typ": "JWT",
"kid": "5N710l5YnLZMwXfuVRJXkBKvY36sorgDnlrirgkeLys"
}.{
"exp": 1755540817,
"iat": 1755540757,
"auth_time": 1755538888,
"jti": "onrtac:b34080ff-8404-6867-81be-1231b50593a8",
"iss": "http://localhost:8080/realms/master",
"aud": "http://localhost:3000",
"sub": "33ed6c6b-c6e0-4928-a161-f2f69c7a03b9",
"typ": "Bearer",
"azp": "7975a5b6-8b59-4a85-9cba-8faebdab8974",
"sid": "8f7ec276-358f-4ccc-b313-db08290f376f",
"scope": "mcp:tools"
}.[Signature]
```
**嵌入的 Audience**
注意嵌入在令牌中的 `aud` 声明 - 它当前设置为测试 MCP 服务器的 URI,并且是从我们之前配置的作用域推断出来的。这在我们的实现中进行验证时将很重要。
### MCP 服务器设置
我们现在将设置我们的 MCP 服务器以使用本地运行的 Keycloak 授权服务器。根据您的编程语言偏好,您可以使用支持的 [MCP SDKs](/docs/sdk) 之一。
出于我们的测试目的,我们将创建一个极其简单的 MCP 服务器,公开两个工具 - 一个用于加法,另一个用于乘法。服务器将需要授权才能访问这些工具。
您可以在 [示例存储库](https://github.com/localden/min-ts-mcp-auth) 中查看完整的 TypeScript 项目。
在运行下面的代码之前,确保您有一个包含以下内容的 `.env` 文件:
```env theme={null}
# 服务器主机/端口
HOST=localhost
PORT=3000
# 授权服务器位置
AUTH_HOST=localhost
AUTH_PORT=8080
AUTH_REALM=master
# Keycloak OAuth 客户端凭据
OAUTH_CLIENT_ID=
OAUTH_CLIENT_SECRET=
```
`OAUTH_CLIENT_ID` 和 `OAUTH_CLIENT_SECRET` 与我们之前创建的 MCP 服务器客户端相关联。
除了实现 MCP 授权规范外,下面的服务器还通过 Keycloak 进行令牌内省,以确保它从客户端收到的令牌是有效的。它还实现了基本日志记录,以便您可以轻松诊断任何问题。
```typescript theme={null}
import "dotenv/config";
import express from "express";
import { randomUUID } from "node:crypto";
import { McpServer } from "@modelcontextprotocol/sdk/server/mcp.js";
import { StreamableHTTPServerTransport } from "@modelcontextprotocol/sdk/server/streamableHttp.js";
import { isInitializeRequest } from "@modelcontextprotocol/sdk/types.js";
import { z } from "zod";
import cors from "cors";
import {
mcpAuthMetadataRouter,
getOAuthProtectedResourceMetadataUrl,
} from "@modelcontextprotocol/sdk/server/auth/router.js";
import { requireBearerAuth } from "@modelcontextprotocol/sdk/server/auth/middleware/bearerAuth.js";
import { OAuthMetadata } from "@modelcontextprotocol/sdk/shared/auth.js";
import { checkResourceAllowed } from "@modelcontextprotocol/sdk/shared/auth-utils.js";
const CONFIG = {
host: process.env.HOST || "localhost",
port: Number(process.env.PORT) || 3000,
auth: {
host: process.env.AUTH_HOST || process.env.HOST || "localhost",
port: Number(process.env.AUTH_PORT) || 8080,
realm: process.env.AUTH_REALM || "master",
clientId: process.env.OAUTH_CLIENT_ID || "mcp-server",
clientSecret: process.env.OAUTH_CLIENT_SECRET || "",
},
};
function createOAuthUrls() {
const authBaseUrl = new URL(
`http://${CONFIG.auth.host}:${CONFIG.auth.port}/realms/${CONFIG.auth.realm}/`,
);
return {
issuer: authBaseUrl.toString(),
introspection_endpoint: new URL(
"protocol/openid-connect/token/introspect",
authBaseUrl,
).toString(),
authorization_endpoint: new URL(
"protocol/openid-connect/auth",
authBaseUrl,
).toString(),
token_endpoint: new URL(
"protocol/openid-connect/token",
authBaseUrl,
).toString(),
};
}
function createRequestLogger() {
return (req: any, res: any, next: any) => {
const start = Date.now();
res.on("finish", () => {
const ms = Date.now() - start;
console.log(
`${req.method} ${req.originalUrl} -> ${res.statusCode} ${ms}ms`,
);
});
next();
};
}
const app = express();
app.use(
express.json({
verify: (req: any, _res, buf) => {
req.rawBody = buf?.toString() ?? "";
},
}),
);
app.use(
cors({
origin: "*",
exposedHeaders: ["Mcp-Session-Id"],
}),
);
app.use(createRequestLogger());
const mcpServerUrl = new URL(`http://${CONFIG.host}:${CONFIG.port}`);
const oauthUrls = createOAuthUrls();
const oauthMetadata: OAuthMetadata = {
...oauthUrls,
response_types_supported: ["code"],
};
const tokenVerifier = {
verifyAccessToken: async (token: string) => {
const endpoint = oauthMetadata.introspection_endpoint;
if (!endpoint) {
console.error("[auth] no introspection endpoint in metadata");
throw new Error("No token verification endpoint available in metadata");
}
const params = new URLSearchParams({
token: token,
client_id: CONFIG.auth.clientId,
});
if (CONFIG.auth.clientSecret) {
params.set("client_secret", CONFIG.auth.clientSecret);
}
let response: Response;
try {
response = await fetch(endpoint, {
method: "POST",
headers: {
"Content-Type": "application/x-www-form-urlencoded",
},
body: params.toString(),
});
} catch (e) {
console.error("[auth] introspection fetch threw", e);
throw e;
}
if (!response.ok) {
const txt = await response.text();
console.error("[auth] introspection non-OK", { status: response.status });
try {
const obj = JSON.parse(txt);
console.log(JSON.stringify(obj, null, 2));
} catch {
console.error(txt);
}
throw new Error(`Invalid or expired token: ${txt}`);
}
let data: any;
try {
data = await response.json();
} catch (e) {
const txt = await response.text();
console.error("[auth] failed to parse introspection JSON", {
error: String(e),
body: txt,
});
throw e;
}
if (data.active === false) {
throw new Error("Inactive token");
}
if (!data.aud) {
throw new Error("Resource indicator (aud) missing");
}
const audiences: string[] = Array.isArray(data.aud) ? data.aud : [data.aud];
const allowed = audiences.some((a) =>
checkResourceAllowed({
requestedResource: a,
configuredResource: mcpServerUrl,
}),
);
if (!allowed) {
throw new Error(
`None of the provided audiences are allowed. Expected ${mcpServerUrl}, got: ${audiences.join(", ")}`,
);
}
return {
token,
clientId: data.client_id,
scopes: data.scope ? data.scope.split(" ") : [],
expiresAt: data.exp,
};
},
};
app.use(
mcpAuthMetadataRouter({
oauthMetadata,
resourceServerUrl: mcpServerUrl,
scopesSupported: ["mcp:tools"],
resourceName: "MCP Demo Server",
}),
);
const authMiddleware = requireBearerAuth({
verifier: tokenVerifier,
requiredScopes: [],
resourceMetadataUrl: getOAuthProtectedResourceMetadataUrl(mcpServerUrl),
});
const transports: { [sessionId: string]: StreamableHTTPServerTransport } = {};
function createMcpServer() {
const server = new McpServer({
name: "example-server",
version: "1.0.0",
});
server.registerTool(
"add",
{
title: "Addition Tool",
description: "Add two numbers together",
inputSchema: {
a: z.number().describe("First number to add"),
b: z.number().describe("Second number to add"),
},
},
async ({ a, b }) => ({
content: [{ type: "text", text: `${a} + ${b} = ${a + b}` }],
}),
);
server.registerTool(
"multiply",
{
title: "Multiplication Tool",
description: "Multiply two numbers together",
inputSchema: {
x: z.number().describe("First number to multiply"),
y: z.number().describe("Second number to multiply"),
},
},
async ({ x, y }) => ({
content: [{ type: "text", text: `${x} × ${y} = ${x * y}` }],
}),
);
return server;
}
const mcpPostHandler = async (req: express.Request, res: express.Response) => {
const sessionId = req.headers["mcp-session-id"] as string | undefined;
let transport: StreamableHTTPServerTransport;
if (sessionId && transports[sessionId]) {
transport = transports[sessionId];
} else if (!sessionId && isInitializeRequest(req.body)) {
transport = new StreamableHTTPServerTransport({
sessionIdGenerator: () => randomUUID(),
onsessioninitialized: (sessionId) => {
transports[sessionId] = transport;
},
});
transport.onclose = () => {
if (transport.sessionId) {
delete transports[transport.sessionId];
}
};
const server = createMcpServer();
await server.connect(transport);
} else {
res.status(400).json({
jsonrpc: "2.0",
error: {
code: -32000,
message: "Bad Request: No valid session ID provided",
},
id: null,
});
return;
}
await transport.handleRequest(req, res, req.body);
};
const handleSessionRequest = async (
req: express.Request,
res: express.Response,
) => {
const sessionId = req.headers["mcp-session-id"] as string | undefined;
if (!sessionId || !transports[sessionId]) {
res.status(400).send("Invalid or missing session ID");
return;
}
const transport = transports[sessionId];
await transport.handleRequest(req, res);
};
app.post("/", authMiddleware, mcpPostHandler);
app.get("/", authMiddleware, handleSessionRequest);
app.delete("/", authMiddleware, handleSessionRequest);
app.listen(CONFIG.port, CONFIG.host, () => {
console.log(`🚀 MCP Server running on ${mcpServerUrl.origin}`);
console.log(`📡 MCP endpoint available at ${mcpServerUrl.origin}`);
console.log(
`🔐 OAuth metadata available at ${getOAuthProtectedResourceMetadataUrl(mcpServerUrl)}`,
);
});
```
运行服务器时,您可以通过提供 MCP 服务器端点将其添加到您的 MCP 客户端,例如 Visual Studio Code。
有关在 TypeScript 中实现 MCP 服务器的更多详细信息,请参阅 [TypeScript SDK 文档](https://github.com/modelcontextprotocol/typescript-sdk)。
您可以在 [示例存储库](https://github.com/modelcontextprotocol/python-sdk/tree/main/examples/servers/simple-auth) 中查看完整的 Python 项目。
为了简化我们的授权交互,在 Python 场景中我们依赖 [FastMCP](https://gofastmcp.com/getting-started/welcome)。许多关于授权的约定,如端点和令牌验证逻辑,在不同语言中是一致的,但有些提供了更简单的方法将它们集成到生产场景中。
在编写实际服务器之前,我们需要在 `config.py` 中设置我们的配置 - 内容完全基于您的本地服务器设置:
```python theme={null}
"""MCP 授权服务器的配置设置。"""
import os
from typing import Optional
class Config:
"""从环境变量加载配置类,具有合理的默认值。"""
# 服务器设置
HOST: str = os.getenv("HOST", "localhost")
PORT: int = int(os.getenv("PORT", "3000"))
# 授权服务器设置
AUTH_HOST: str = os.getenv("AUTH_HOST", "localhost")
AUTH_PORT: int = int(os.getenv("AUTH_PORT", "8080"))
AUTH_REALM: str = os.getenv("AUTH_REALM", "master")
# OAuth 客户端设置
OAUTH_CLIENT_ID: str = os.getenv("OAUTH_CLIENT_ID", "mcp-server")
OAUTH_CLIENT_SECRET: str = os.getenv("OAUTH_CLIENT_SECRET", "UO3rmozkFFkXr0QxPTkzZ0LMXDidIikB")
# 服务器设置
MCP_SCOPE: str = os.getenv("MCP_SCOPE", "mcp:tools")
OAUTH_STRICT: bool = os.getenv("OAUTH_STRICT", "false").lower() in ("true", "1", "yes")
TRANSPORT: str = os.getenv("TRANSPORT", "streamable-http")
@property
def server_url(self) -> str:
"""构建服务器 URL。"""
return f"http://{self.HOST}:{self.PORT}"
@property
def auth_base_url(self) -> str:
"""构建授权服务器基本 URL。"""
return f"http://{self.AUTH_HOST}:{self.AUTH_PORT}/realms/{self.AUTH_REALM}/"
def validate(self) -> None:
"""验证配置。"""
if self.TRANSPORT not in ["sse", "streamable-http"]:
raise ValueError(f"Invalid transport: {self.TRANSPORT}. Must be 'sse' or 'streamable-http'")
# 全局配置实例
config = Config()
```
服务器实现如下:
```python theme={null}
import datetime
import logging
from typing import Any
from pydantic import AnyHttpUrl
from mcp.server.auth.settings import AuthSettings
from mcp.server.fastmcp.server import FastMCP
from .config import config
from .token_verifier import IntrospectionTokenVerifier
logger = logging.getLogger(__name__)
def create_oauth_urls() -> dict[str, str]:
"""基于配置创建 OAuth URL(Keycloak 风格)。"""
from urllib.parse import urljoin
auth_base_url = config.auth_base_url
return {
"issuer": auth_base_url,
"introspection_endpoint": urljoin(auth_base_url, "protocol/openid-connect/token/introspect"),
"authorization_endpoint": urljoin(auth_base_url, "protocol/openid-connect/auth"),
"token_endpoint": urljoin(auth_base_url, "protocol/openid-connect/token"),
}
def create_server() -> FastMCP:
"""创建并配置 FastMCP 服务器。"""
config.validate()
oauth_urls = create_oauth_urls()
token_verifier = IntrospectionTokenVerifier(
introspection_endpoint=oauth_urls["introspection_endpoint"],
server_url=config.server_url,
client_id=config.OAUTH_CLIENT_ID,
client_secret=config.OAUTH_CLIENT_SECRET,
)
app = FastMCP(
name="MCP Resource Server",
instructions="Resource Server that validates tokens via Authorization Server introspection",
host=config.HOST,
port=config.PORT,
debug=True,
streamable_http_path="/",
token_verifier=token_verifier,
auth=AuthSettings(
issuer_url=AnyHttpUrl(oauth_urls["issuer"]),
required_scopes=[config.MCP_SCOPE],
resource_server_url=AnyHttpUrl(config.server_url),
),
)
@app.tool()
async def add_numbers(a: float, b: float) -> dict[str, Any]:
"""
将两个数字相加。
此工具演示带有 OAuth 身份验证的基本算术运算。
Args:
a: 要相加的第一个数字
b: 要相加的第二个数字
"""
result = a + b
return {
"operation": "addition",
"operand_a": a,
"operand_b": b,
"result": result,
"timestamp": datetime.datetime.now().isoformat()
}
@app.tool()
async def multiply_numbers(x: float, y: float) -> dict[str, Any]:
"""
将两个数字相乘。
此工具演示带有 OAuth 身份验证的基本算术运算。
Args:
x: 要相乘的第一个数字
y: 要相乘的第二个数字
"""
result = x * y
return {
"operation": "multiplication",
"operand_x": x,
"operand_y": y,
"result": result,
"timestamp": datetime.datetime.now().isoformat()
}
return app
def main() -> int:
"""
运行 MCP 资源服务器。
此服务器:
- 提供 RFC 9728 受保护资源元数据
- 通过授权服务器内省验证令牌
- 提供需要身份验证的 MCP 工具
配置从 config.py 和环境变量加载。
"""
logging.basicConfig(level=logging.INFO)
try:
config.validate()
oauth_urls = create_oauth_urls()
except ValueError as e:
logger.error("Configuration error: %s", e)
return 1
try:
mcp_server = create_server()
logger.info("Starting MCP Server on %s:%s", config.HOST, config.PORT)
logger.info("Authorization Server: %s", oauth_urls["issuer"])
logger.info("Transport: %s", config.TRANSPORT)
mcp_server.run(transport=config.TRANSPORT)
return 0
except Exception:
logger.exception("Server error")
return 1
if __name__ == "__main__":
exit(main())
```
最后,令牌验证逻辑完全委托给 `token_verifier.py`,确保我们可以使用 Keycloak 内省端点来验证任何凭据工件的有效性
```python theme={null}
"""使用 OAuth 2.0 令牌内省 (RFC 7662) 的令牌验证器实现。"""
import logging
from typing import Any
from mcp.server.auth.provider import AccessToken, TokenVerifier
from mcp.shared.auth_utils import check_resource_allowed, resource_url_from_server_url
logger = logging.getLogger(__name__)
class IntrospectionTokenVerifier(TokenVerifier):
"""使用 OAuth 2.0 令牌内省 (RFC 7662) 的令牌验证器。
"""
def __init__(
self,
introspection_endpoint: str,
server_url: str,
client_id: str,
client_secret: str,
):
self.introspection_endpoint = introspection_endpoint
self.server_url = server_url
self.client_id = client_id
self.client_secret = client_secret
self.resource_url = resource_url_from_server_url(server_url)
async def verify_token(self, token: str) -> AccessToken | None:
"""通过内省端点验证令牌。"""
import httpx
if not self.introspection_endpoint.startswith(("https://", "http://localhost", "http://127.0.0.1")):
return None
timeout = httpx.Timeout(10.0, connect=5.0)
limits = httpx.Limits(max_connections=10, max_keepalive_connections=5)
async with httpx.AsyncClient(
timeout=timeout,
limits=limits,
verify=True,
) as client:
try:
form_data = {
"token": token,
"client_id": self.client_id,
"client_secret": self.client_secret,
}
headers = {"Content-Type": "application/x-www-form-urlencoded"}
response = await client.post(
self.introspection_endpoint,
data=form_data,
headers=headers,
)
if response.status_code != 200:
return None
data = response.json()
if not data.get("active", False):
return None
if not self._validate_resource(data):
return None
return AccessToken(
token=token,
client_id=data.get("client_id", "unknown"),
scopes=data.get("scope", "").split() if data.get("scope") else [],
expires_at=data.get("exp"),
resource=data.get("aud"), # 在令牌中包含资源
)
except Exception as e:
return None
def _validate_resource(self, token_data: dict[str, Any]) -> bool:
"""验证令牌是为此资源服务器颁发的。
规则:
- 如果缺少 'aud' 则拒绝。
- 如果任何 audience 条目与派生的资源 URL 匹配则接受。
- 支持每 JWT 规范的字符串或列表形式。
"""
if not self.server_url or not self.resource_url:
return False
aud: list[str] | str | None = token_data.get("aud")
if isinstance(aud, list):
return any(self._is_valid_resource(a) for a in aud)
if isinstance(aud, str):
return self._is_valid_resource(aud)
return False
def _is_valid_resource(self, resource: str) -> bool:
"""检查给定资源是否与我们的服务器匹配。"""
return check_resource_allowed(self.resource_url, resource)
```
有关更多详细信息,请参阅 [Python SDK 文档](https://github.com/modelcontextprotocol/python-sdk)。
您可以在 [示例存储库](https://github.com/localden/min-cs-mcp-auth) 中查看完整的 C# 项目。
要使用 MCP C# SDK 在您的 MCP 服务器中设置授权,您可以依赖标准 ASP.NET Core 构建器模式。我们将使用内置的 ASP.NET Core 功能进行令牌验证,而不是使用 Keycloak 提供的内省端点。
```csharp theme={null}
using Microsoft.AspNetCore.Authentication.JwtBearer;
using Microsoft.IdentityModel.Tokens;
using ModelContextProtocol.AspNetCore.Authentication;
using ProtectedMcpServer.Tools;
using System.Security.Claims;
var builder = WebApplication.CreateBuilder(args);
var serverUrl = "http://localhost:3000/";
var authorizationServerUrl = "http://localhost:8080/realms/master/";
builder.Services.AddAuthentication(options =>
{
options.DefaultChallengeScheme = McpAuthenticationDefaults.AuthenticationScheme;
options.DefaultAuthenticateScheme = JwtBearerDefaults.AuthenticationScheme;
})
.AddJwtBearer(options =>
{
options.Authority = authorizationServerUrl;
var normalizedServerAudience = serverUrl.TrimEnd('/');
options.TokenValidationParameters = new TokenValidationParameters
{
ValidIssuer = authorizationServerUrl,
ValidAudiences = new[] { normalizedServerAudience, serverUrl },
AudienceValidator = (audiences, securityToken, validationParameters) =>
{
if (audiences == null) return false;
foreach (var aud in audiences)
{
if (string.Equals(aud.TrimEnd('/'), normalizedServerAudience, StringComparison.OrdinalIgnoreCase))
{
return true;
}
}
return false;
}
};
options.RequireHttpsMetadata = false; // 在生产环境中设置为 true
options.Events = new JwtBearerEvents
{
OnTokenValidated = context =>
{
var name = context.Principal?.Identity?.Name ?? "unknown";
var email = context.Principal?.FindFirstValue("preferred_username") ?? "unknown";
Console.WriteLine($"Token validated for: {name} ({email})");
return Task.CompletedTask;
},
OnAuthenticationFailed = context =>
{
Console.WriteLine($"Authentication failed: {context.Exception.Message}");
return Task.CompletedTask;
},
};
})
.AddMcp(options =>
{
options.ResourceMetadata = new()
{
Resource = new Uri(serverUrl),
ResourceDocumentation = new Uri("https://docs.example.com/api/math"),
AuthorizationServers = { new Uri(authorizationServerUrl) },
ScopesSupported = ["mcp:tools"]
};
});
builder.Services.AddAuthorization();
builder.Services.AddHttpContextAccessor();
builder.Services.AddMcpServer()
.WithTools()
.WithHttpTransport();
var app = builder.Build();
app.UseAuthentication();
app.UseAuthorization();
app.MapMcp().RequireAuthorization();
Console.WriteLine($"Starting MCP server with authorization at {serverUrl}");
Console.WriteLine($"Using Keycloak server at {authorizationServerUrl}");
Console.WriteLine($"Protected Resource Metadata URL: {serverUrl}.well-known/oauth-protected-resource");
Console.WriteLine("Exposed Math tools: Add, Multiply");
Console.WriteLine("Press Ctrl+C to stop the server");
app.Run(serverUrl);
```
有关更多详细信息,请参阅 [C# SDK 文档](https://github.com/modelcontextprotocol/csharp-sdk)。
## 测试 MCP 服务器
为了测试目的,我们将使用 [Visual Studio Code](https://code.visualstudio.com),但任何支持 MCP 和新授权规范的客户端都适用。
按 Cmd + Shift + P 并选择 **MCP: 添加服务器...**。选择 **HTTP** 并输入 `http://localhost:3000`。给服务器起一个在 Visual Studio Code 内部使用的唯一名称。在 `mcp.json` 中你现在应该能看到如下条目:
```json theme={null}
"my-mcp-server-18676652": {
"url": "http://localhost:3000",
"type": "http"
}
```
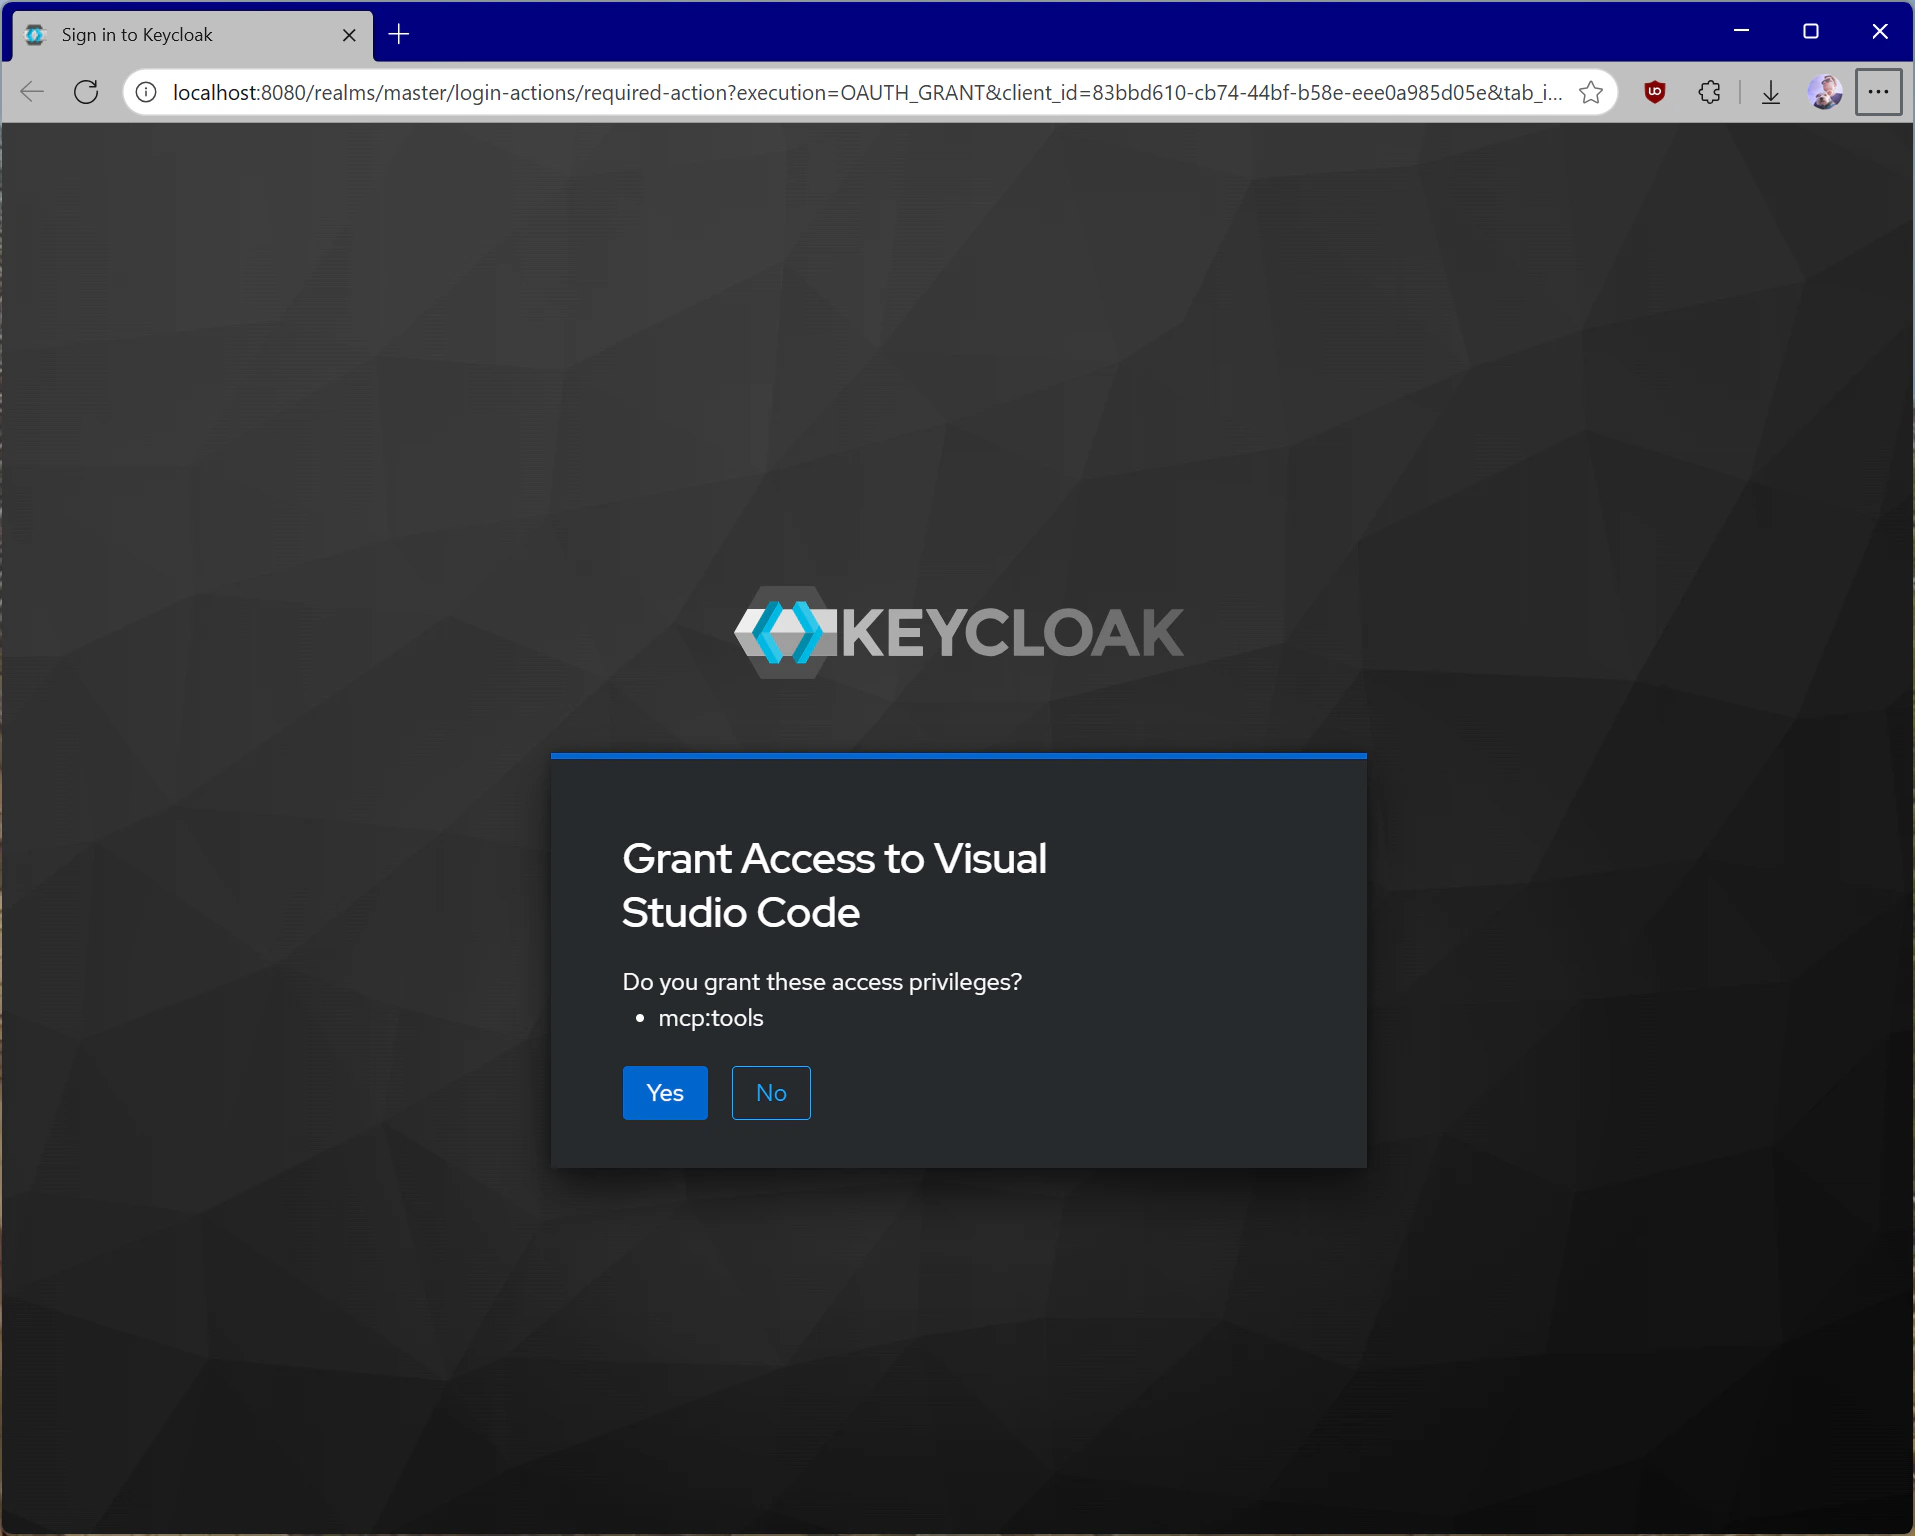
连接时,你将被带到浏览器,在那里你会被提示同意 Visual Studio Code 访问 `mcp:tools` 权限范围。
**处理密钥**
切勿将客户端凭据直接嵌入到您的代码中。我们建议使用环境变量或专门的密钥存储解决方案。
配置好 Keycloak 后,每次触发授权流程时,您的 MCP 服务器都将收到如下所示的令牌:
```text theme={null}
eyJhbGciOiJSUzI1NiIsInR5cCIgOiAiSldUIiwia2lkIiA6ICI1TjcxMGw1WW5MWk13WGZ1VlJKWGtCS3ZZMzZzb3JnRG5scmlyZ2tlTHlzIn0.eyJleHAiOjE3NTU1NDA4MTcsImlhdCI6MTc1NTU0MDc1NywiYXV0aF90aW1lIjoxNzU1NTM4ODg4LCJqdGkiOiJvbnJ0YWM6YjM0MDgwZmYtODQwNC02ODY3LTgxYmUtMTIzMWI1MDU5M2E4IiwiaXNzIjoiaHR0cDovL2xvY2FsaG9zdDo4MDgwL3JlYWxtcy9tYXN0ZXIiLCJhdWQiOiJodHRwOi8vbG9jYWxob3N0OjMwMDAiLCJzdWIiOiIzM2VkNmM2Yi1jNmUwLTQ5MjgtYTE2MS1mMmY2OWM3YTAzYjkiLCJ0eXAiOiJCZWFyZXIiLCJhenAiOiI3OTc1YTViNi04YjU5LTRhODUtOWNiYS04ZmFlYmRhYjg5NzQiLCJzaWQiOiI4ZjdlYzI3Ni0zNThmLTRjY2MtYjMxMy1kYjA4MjkwZjM3NmYiLCJzY29wZSI6Im1jcDp0b29scyJ9.P5xCRtXORly0R0EXjyqRCUx-z3J4uAOWNAvYtLPXroykZuVCCJ-K1haiQSwbURqfsVOMbL7jiV-sD6miuPzI1tmKOkN_Yct0Vp-azvj7U5rEj7U6tvPfMkg2Uj_jrIX0KOskyU2pVvGZ-5BgqaSvwTEdsGu_V3_E0xDuSBq2uj_wmhqiyTFm5lJ1WkM3Hnxxx1_AAnTj7iOKMFZ4VCwMmk8hhSC7clnDauORc0sutxiJuYUZzxNiNPkmNeQtMCGqWdP1igcbWbrfnNXhJ6NswBOuRbh97_QraET3hl-CNmyS6C72Xc0aOwR_uJ7xVSBTD02OaQ1JA6kjCATz30kGYg
```
解码后,它将看起来像这样:
```json theme={null}
{
"alg": "RS256",
"typ": "JWT",
"kid": "5N710l5YnLZMwXfuVRJXkBKvY36sorgDnlrirgkeLys"
}.{
"exp": 1755540817,
"iat": 1755540757,
"auth_time": 1755538888,
"jti": "onrtac:b34080ff-8404-6867-81be-1231b50593a8",
"iss": "http://localhost:8080/realms/master",
"aud": "http://localhost:3000",
"sub": "33ed6c6b-c6e0-4928-a161-f2f69c7a03b9",
"typ": "Bearer",
"azp": "7975a5b6-8b59-4a85-9cba-8faebdab8974",
"sid": "8f7ec276-358f-4ccc-b313-db08290f376f",
"scope": "mcp:tools"
}.[Signature]
```
**嵌入的 Audience**
注意嵌入在令牌中的 `aud` 声明 - 它当前设置为测试 MCP 服务器的 URI,并且是从我们之前配置的作用域推断出来的。这在我们的实现中进行验证时将很重要。
### MCP 服务器设置
我们现在将设置我们的 MCP 服务器以使用本地运行的 Keycloak 授权服务器。根据您的编程语言偏好,您可以使用支持的 [MCP SDKs](/docs/sdk) 之一。
出于我们的测试目的,我们将创建一个极其简单的 MCP 服务器,公开两个工具 - 一个用于加法,另一个用于乘法。服务器将需要授权才能访问这些工具。
您可以在 [示例存储库](https://github.com/localden/min-ts-mcp-auth) 中查看完整的 TypeScript 项目。
在运行下面的代码之前,确保您有一个包含以下内容的 `.env` 文件:
```env theme={null}
# 服务器主机/端口
HOST=localhost
PORT=3000
# 授权服务器位置
AUTH_HOST=localhost
AUTH_PORT=8080
AUTH_REALM=master
# Keycloak OAuth 客户端凭据
OAUTH_CLIENT_ID=
OAUTH_CLIENT_SECRET=
```
`OAUTH_CLIENT_ID` 和 `OAUTH_CLIENT_SECRET` 与我们之前创建的 MCP 服务器客户端相关联。
除了实现 MCP 授权规范外,下面的服务器还通过 Keycloak 进行令牌内省,以确保它从客户端收到的令牌是有效的。它还实现了基本日志记录,以便您可以轻松诊断任何问题。
```typescript theme={null}
import "dotenv/config";
import express from "express";
import { randomUUID } from "node:crypto";
import { McpServer } from "@modelcontextprotocol/sdk/server/mcp.js";
import { StreamableHTTPServerTransport } from "@modelcontextprotocol/sdk/server/streamableHttp.js";
import { isInitializeRequest } from "@modelcontextprotocol/sdk/types.js";
import { z } from "zod";
import cors from "cors";
import {
mcpAuthMetadataRouter,
getOAuthProtectedResourceMetadataUrl,
} from "@modelcontextprotocol/sdk/server/auth/router.js";
import { requireBearerAuth } from "@modelcontextprotocol/sdk/server/auth/middleware/bearerAuth.js";
import { OAuthMetadata } from "@modelcontextprotocol/sdk/shared/auth.js";
import { checkResourceAllowed } from "@modelcontextprotocol/sdk/shared/auth-utils.js";
const CONFIG = {
host: process.env.HOST || "localhost",
port: Number(process.env.PORT) || 3000,
auth: {
host: process.env.AUTH_HOST || process.env.HOST || "localhost",
port: Number(process.env.AUTH_PORT) || 8080,
realm: process.env.AUTH_REALM || "master",
clientId: process.env.OAUTH_CLIENT_ID || "mcp-server",
clientSecret: process.env.OAUTH_CLIENT_SECRET || "",
},
};
function createOAuthUrls() {
const authBaseUrl = new URL(
`http://${CONFIG.auth.host}:${CONFIG.auth.port}/realms/${CONFIG.auth.realm}/`,
);
return {
issuer: authBaseUrl.toString(),
introspection_endpoint: new URL(
"protocol/openid-connect/token/introspect",
authBaseUrl,
).toString(),
authorization_endpoint: new URL(
"protocol/openid-connect/auth",
authBaseUrl,
).toString(),
token_endpoint: new URL(
"protocol/openid-connect/token",
authBaseUrl,
).toString(),
};
}
function createRequestLogger() {
return (req: any, res: any, next: any) => {
const start = Date.now();
res.on("finish", () => {
const ms = Date.now() - start;
console.log(
`${req.method} ${req.originalUrl} -> ${res.statusCode} ${ms}ms`,
);
});
next();
};
}
const app = express();
app.use(
express.json({
verify: (req: any, _res, buf) => {
req.rawBody = buf?.toString() ?? "";
},
}),
);
app.use(
cors({
origin: "*",
exposedHeaders: ["Mcp-Session-Id"],
}),
);
app.use(createRequestLogger());
const mcpServerUrl = new URL(`http://${CONFIG.host}:${CONFIG.port}`);
const oauthUrls = createOAuthUrls();
const oauthMetadata: OAuthMetadata = {
...oauthUrls,
response_types_supported: ["code"],
};
const tokenVerifier = {
verifyAccessToken: async (token: string) => {
const endpoint = oauthMetadata.introspection_endpoint;
if (!endpoint) {
console.error("[auth] no introspection endpoint in metadata");
throw new Error("No token verification endpoint available in metadata");
}
const params = new URLSearchParams({
token: token,
client_id: CONFIG.auth.clientId,
});
if (CONFIG.auth.clientSecret) {
params.set("client_secret", CONFIG.auth.clientSecret);
}
let response: Response;
try {
response = await fetch(endpoint, {
method: "POST",
headers: {
"Content-Type": "application/x-www-form-urlencoded",
},
body: params.toString(),
});
} catch (e) {
console.error("[auth] introspection fetch threw", e);
throw e;
}
if (!response.ok) {
const txt = await response.text();
console.error("[auth] introspection non-OK", { status: response.status });
try {
const obj = JSON.parse(txt);
console.log(JSON.stringify(obj, null, 2));
} catch {
console.error(txt);
}
throw new Error(`Invalid or expired token: ${txt}`);
}
let data: any;
try {
data = await response.json();
} catch (e) {
const txt = await response.text();
console.error("[auth] failed to parse introspection JSON", {
error: String(e),
body: txt,
});
throw e;
}
if (data.active === false) {
throw new Error("Inactive token");
}
if (!data.aud) {
throw new Error("Resource indicator (aud) missing");
}
const audiences: string[] = Array.isArray(data.aud) ? data.aud : [data.aud];
const allowed = audiences.some((a) =>
checkResourceAllowed({
requestedResource: a,
configuredResource: mcpServerUrl,
}),
);
if (!allowed) {
throw new Error(
`None of the provided audiences are allowed. Expected ${mcpServerUrl}, got: ${audiences.join(", ")}`,
);
}
return {
token,
clientId: data.client_id,
scopes: data.scope ? data.scope.split(" ") : [],
expiresAt: data.exp,
};
},
};
app.use(
mcpAuthMetadataRouter({
oauthMetadata,
resourceServerUrl: mcpServerUrl,
scopesSupported: ["mcp:tools"],
resourceName: "MCP Demo Server",
}),
);
const authMiddleware = requireBearerAuth({
verifier: tokenVerifier,
requiredScopes: [],
resourceMetadataUrl: getOAuthProtectedResourceMetadataUrl(mcpServerUrl),
});
const transports: { [sessionId: string]: StreamableHTTPServerTransport } = {};
function createMcpServer() {
const server = new McpServer({
name: "example-server",
version: "1.0.0",
});
server.registerTool(
"add",
{
title: "Addition Tool",
description: "Add two numbers together",
inputSchema: {
a: z.number().describe("First number to add"),
b: z.number().describe("Second number to add"),
},
},
async ({ a, b }) => ({
content: [{ type: "text", text: `${a} + ${b} = ${a + b}` }],
}),
);
server.registerTool(
"multiply",
{
title: "Multiplication Tool",
description: "Multiply two numbers together",
inputSchema: {
x: z.number().describe("First number to multiply"),
y: z.number().describe("Second number to multiply"),
},
},
async ({ x, y }) => ({
content: [{ type: "text", text: `${x} × ${y} = ${x * y}` }],
}),
);
return server;
}
const mcpPostHandler = async (req: express.Request, res: express.Response) => {
const sessionId = req.headers["mcp-session-id"] as string | undefined;
let transport: StreamableHTTPServerTransport;
if (sessionId && transports[sessionId]) {
transport = transports[sessionId];
} else if (!sessionId && isInitializeRequest(req.body)) {
transport = new StreamableHTTPServerTransport({
sessionIdGenerator: () => randomUUID(),
onsessioninitialized: (sessionId) => {
transports[sessionId] = transport;
},
});
transport.onclose = () => {
if (transport.sessionId) {
delete transports[transport.sessionId];
}
};
const server = createMcpServer();
await server.connect(transport);
} else {
res.status(400).json({
jsonrpc: "2.0",
error: {
code: -32000,
message: "Bad Request: No valid session ID provided",
},
id: null,
});
return;
}
await transport.handleRequest(req, res, req.body);
};
const handleSessionRequest = async (
req: express.Request,
res: express.Response,
) => {
const sessionId = req.headers["mcp-session-id"] as string | undefined;
if (!sessionId || !transports[sessionId]) {
res.status(400).send("Invalid or missing session ID");
return;
}
const transport = transports[sessionId];
await transport.handleRequest(req, res);
};
app.post("/", authMiddleware, mcpPostHandler);
app.get("/", authMiddleware, handleSessionRequest);
app.delete("/", authMiddleware, handleSessionRequest);
app.listen(CONFIG.port, CONFIG.host, () => {
console.log(`🚀 MCP Server running on ${mcpServerUrl.origin}`);
console.log(`📡 MCP endpoint available at ${mcpServerUrl.origin}`);
console.log(
`🔐 OAuth metadata available at ${getOAuthProtectedResourceMetadataUrl(mcpServerUrl)}`,
);
});
```
运行服务器时,您可以通过提供 MCP 服务器端点将其添加到您的 MCP 客户端,例如 Visual Studio Code。
有关在 TypeScript 中实现 MCP 服务器的更多详细信息,请参阅 [TypeScript SDK 文档](https://github.com/modelcontextprotocol/typescript-sdk)。
您可以在 [示例存储库](https://github.com/modelcontextprotocol/python-sdk/tree/main/examples/servers/simple-auth) 中查看完整的 Python 项目。
为了简化我们的授权交互,在 Python 场景中我们依赖 [FastMCP](https://gofastmcp.com/getting-started/welcome)。许多关于授权的约定,如端点和令牌验证逻辑,在不同语言中是一致的,但有些提供了更简单的方法将它们集成到生产场景中。
在编写实际服务器之前,我们需要在 `config.py` 中设置我们的配置 - 内容完全基于您的本地服务器设置:
```python theme={null}
"""MCP 授权服务器的配置设置。"""
import os
from typing import Optional
class Config:
"""从环境变量加载配置类,具有合理的默认值。"""
# 服务器设置
HOST: str = os.getenv("HOST", "localhost")
PORT: int = int(os.getenv("PORT", "3000"))
# 授权服务器设置
AUTH_HOST: str = os.getenv("AUTH_HOST", "localhost")
AUTH_PORT: int = int(os.getenv("AUTH_PORT", "8080"))
AUTH_REALM: str = os.getenv("AUTH_REALM", "master")
# OAuth 客户端设置
OAUTH_CLIENT_ID: str = os.getenv("OAUTH_CLIENT_ID", "mcp-server")
OAUTH_CLIENT_SECRET: str = os.getenv("OAUTH_CLIENT_SECRET", "UO3rmozkFFkXr0QxPTkzZ0LMXDidIikB")
# 服务器设置
MCP_SCOPE: str = os.getenv("MCP_SCOPE", "mcp:tools")
OAUTH_STRICT: bool = os.getenv("OAUTH_STRICT", "false").lower() in ("true", "1", "yes")
TRANSPORT: str = os.getenv("TRANSPORT", "streamable-http")
@property
def server_url(self) -> str:
"""构建服务器 URL。"""
return f"http://{self.HOST}:{self.PORT}"
@property
def auth_base_url(self) -> str:
"""构建授权服务器基本 URL。"""
return f"http://{self.AUTH_HOST}:{self.AUTH_PORT}/realms/{self.AUTH_REALM}/"
def validate(self) -> None:
"""验证配置。"""
if self.TRANSPORT not in ["sse", "streamable-http"]:
raise ValueError(f"Invalid transport: {self.TRANSPORT}. Must be 'sse' or 'streamable-http'")
# 全局配置实例
config = Config()
```
服务器实现如下:
```python theme={null}
import datetime
import logging
from typing import Any
from pydantic import AnyHttpUrl
from mcp.server.auth.settings import AuthSettings
from mcp.server.fastmcp.server import FastMCP
from .config import config
from .token_verifier import IntrospectionTokenVerifier
logger = logging.getLogger(__name__)
def create_oauth_urls() -> dict[str, str]:
"""基于配置创建 OAuth URL(Keycloak 风格)。"""
from urllib.parse import urljoin
auth_base_url = config.auth_base_url
return {
"issuer": auth_base_url,
"introspection_endpoint": urljoin(auth_base_url, "protocol/openid-connect/token/introspect"),
"authorization_endpoint": urljoin(auth_base_url, "protocol/openid-connect/auth"),
"token_endpoint": urljoin(auth_base_url, "protocol/openid-connect/token"),
}
def create_server() -> FastMCP:
"""创建并配置 FastMCP 服务器。"""
config.validate()
oauth_urls = create_oauth_urls()
token_verifier = IntrospectionTokenVerifier(
introspection_endpoint=oauth_urls["introspection_endpoint"],
server_url=config.server_url,
client_id=config.OAUTH_CLIENT_ID,
client_secret=config.OAUTH_CLIENT_SECRET,
)
app = FastMCP(
name="MCP Resource Server",
instructions="Resource Server that validates tokens via Authorization Server introspection",
host=config.HOST,
port=config.PORT,
debug=True,
streamable_http_path="/",
token_verifier=token_verifier,
auth=AuthSettings(
issuer_url=AnyHttpUrl(oauth_urls["issuer"]),
required_scopes=[config.MCP_SCOPE],
resource_server_url=AnyHttpUrl(config.server_url),
),
)
@app.tool()
async def add_numbers(a: float, b: float) -> dict[str, Any]:
"""
将两个数字相加。
此工具演示带有 OAuth 身份验证的基本算术运算。
Args:
a: 要相加的第一个数字
b: 要相加的第二个数字
"""
result = a + b
return {
"operation": "addition",
"operand_a": a,
"operand_b": b,
"result": result,
"timestamp": datetime.datetime.now().isoformat()
}
@app.tool()
async def multiply_numbers(x: float, y: float) -> dict[str, Any]:
"""
将两个数字相乘。
此工具演示带有 OAuth 身份验证的基本算术运算。
Args:
x: 要相乘的第一个数字
y: 要相乘的第二个数字
"""
result = x * y
return {
"operation": "multiplication",
"operand_x": x,
"operand_y": y,
"result": result,
"timestamp": datetime.datetime.now().isoformat()
}
return app
def main() -> int:
"""
运行 MCP 资源服务器。
此服务器:
- 提供 RFC 9728 受保护资源元数据
- 通过授权服务器内省验证令牌
- 提供需要身份验证的 MCP 工具
配置从 config.py 和环境变量加载。
"""
logging.basicConfig(level=logging.INFO)
try:
config.validate()
oauth_urls = create_oauth_urls()
except ValueError as e:
logger.error("Configuration error: %s", e)
return 1
try:
mcp_server = create_server()
logger.info("Starting MCP Server on %s:%s", config.HOST, config.PORT)
logger.info("Authorization Server: %s", oauth_urls["issuer"])
logger.info("Transport: %s", config.TRANSPORT)
mcp_server.run(transport=config.TRANSPORT)
return 0
except Exception:
logger.exception("Server error")
return 1
if __name__ == "__main__":
exit(main())
```
最后,令牌验证逻辑完全委托给 `token_verifier.py`,确保我们可以使用 Keycloak 内省端点来验证任何凭据工件的有效性
```python theme={null}
"""使用 OAuth 2.0 令牌内省 (RFC 7662) 的令牌验证器实现。"""
import logging
from typing import Any
from mcp.server.auth.provider import AccessToken, TokenVerifier
from mcp.shared.auth_utils import check_resource_allowed, resource_url_from_server_url
logger = logging.getLogger(__name__)
class IntrospectionTokenVerifier(TokenVerifier):
"""使用 OAuth 2.0 令牌内省 (RFC 7662) 的令牌验证器。
"""
def __init__(
self,
introspection_endpoint: str,
server_url: str,
client_id: str,
client_secret: str,
):
self.introspection_endpoint = introspection_endpoint
self.server_url = server_url
self.client_id = client_id
self.client_secret = client_secret
self.resource_url = resource_url_from_server_url(server_url)
async def verify_token(self, token: str) -> AccessToken | None:
"""通过内省端点验证令牌。"""
import httpx
if not self.introspection_endpoint.startswith(("https://", "http://localhost", "http://127.0.0.1")):
return None
timeout = httpx.Timeout(10.0, connect=5.0)
limits = httpx.Limits(max_connections=10, max_keepalive_connections=5)
async with httpx.AsyncClient(
timeout=timeout,
limits=limits,
verify=True,
) as client:
try:
form_data = {
"token": token,
"client_id": self.client_id,
"client_secret": self.client_secret,
}
headers = {"Content-Type": "application/x-www-form-urlencoded"}
response = await client.post(
self.introspection_endpoint,
data=form_data,
headers=headers,
)
if response.status_code != 200:
return None
data = response.json()
if not data.get("active", False):
return None
if not self._validate_resource(data):
return None
return AccessToken(
token=token,
client_id=data.get("client_id", "unknown"),
scopes=data.get("scope", "").split() if data.get("scope") else [],
expires_at=data.get("exp"),
resource=data.get("aud"), # 在令牌中包含资源
)
except Exception as e:
return None
def _validate_resource(self, token_data: dict[str, Any]) -> bool:
"""验证令牌是为此资源服务器颁发的。
规则:
- 如果缺少 'aud' 则拒绝。
- 如果任何 audience 条目与派生的资源 URL 匹配则接受。
- 支持每 JWT 规范的字符串或列表形式。
"""
if not self.server_url or not self.resource_url:
return False
aud: list[str] | str | None = token_data.get("aud")
if isinstance(aud, list):
return any(self._is_valid_resource(a) for a in aud)
if isinstance(aud, str):
return self._is_valid_resource(aud)
return False
def _is_valid_resource(self, resource: str) -> bool:
"""检查给定资源是否与我们的服务器匹配。"""
return check_resource_allowed(self.resource_url, resource)
```
有关更多详细信息,请参阅 [Python SDK 文档](https://github.com/modelcontextprotocol/python-sdk)。
您可以在 [示例存储库](https://github.com/localden/min-cs-mcp-auth) 中查看完整的 C# 项目。
要使用 MCP C# SDK 在您的 MCP 服务器中设置授权,您可以依赖标准 ASP.NET Core 构建器模式。我们将使用内置的 ASP.NET Core 功能进行令牌验证,而不是使用 Keycloak 提供的内省端点。
```csharp theme={null}
using Microsoft.AspNetCore.Authentication.JwtBearer;
using Microsoft.IdentityModel.Tokens;
using ModelContextProtocol.AspNetCore.Authentication;
using ProtectedMcpServer.Tools;
using System.Security.Claims;
var builder = WebApplication.CreateBuilder(args);
var serverUrl = "http://localhost:3000/";
var authorizationServerUrl = "http://localhost:8080/realms/master/";
builder.Services.AddAuthentication(options =>
{
options.DefaultChallengeScheme = McpAuthenticationDefaults.AuthenticationScheme;
options.DefaultAuthenticateScheme = JwtBearerDefaults.AuthenticationScheme;
})
.AddJwtBearer(options =>
{
options.Authority = authorizationServerUrl;
var normalizedServerAudience = serverUrl.TrimEnd('/');
options.TokenValidationParameters = new TokenValidationParameters
{
ValidIssuer = authorizationServerUrl,
ValidAudiences = new[] { normalizedServerAudience, serverUrl },
AudienceValidator = (audiences, securityToken, validationParameters) =>
{
if (audiences == null) return false;
foreach (var aud in audiences)
{
if (string.Equals(aud.TrimEnd('/'), normalizedServerAudience, StringComparison.OrdinalIgnoreCase))
{
return true;
}
}
return false;
}
};
options.RequireHttpsMetadata = false; // 在生产环境中设置为 true
options.Events = new JwtBearerEvents
{
OnTokenValidated = context =>
{
var name = context.Principal?.Identity?.Name ?? "unknown";
var email = context.Principal?.FindFirstValue("preferred_username") ?? "unknown";
Console.WriteLine($"Token validated for: {name} ({email})");
return Task.CompletedTask;
},
OnAuthenticationFailed = context =>
{
Console.WriteLine($"Authentication failed: {context.Exception.Message}");
return Task.CompletedTask;
},
};
})
.AddMcp(options =>
{
options.ResourceMetadata = new()
{
Resource = new Uri(serverUrl),
ResourceDocumentation = new Uri("https://docs.example.com/api/math"),
AuthorizationServers = { new Uri(authorizationServerUrl) },
ScopesSupported = ["mcp:tools"]
};
});
builder.Services.AddAuthorization();
builder.Services.AddHttpContextAccessor();
builder.Services.AddMcpServer()
.WithTools()
.WithHttpTransport();
var app = builder.Build();
app.UseAuthentication();
app.UseAuthorization();
app.MapMcp().RequireAuthorization();
Console.WriteLine($"Starting MCP server with authorization at {serverUrl}");
Console.WriteLine($"Using Keycloak server at {authorizationServerUrl}");
Console.WriteLine($"Protected Resource Metadata URL: {serverUrl}.well-known/oauth-protected-resource");
Console.WriteLine("Exposed Math tools: Add, Multiply");
Console.WriteLine("Press Ctrl+C to stop the server");
app.Run(serverUrl);
```
有关更多详细信息,请参阅 [C# SDK 文档](https://github.com/modelcontextprotocol/csharp-sdk)。
## 测试 MCP 服务器
为了测试目的,我们将使用 [Visual Studio Code](https://code.visualstudio.com),但任何支持 MCP 和新授权规范的客户端都适用。
按 Cmd + Shift + P 并选择 **MCP: 添加服务器...**。选择 **HTTP** 并输入 `http://localhost:3000`。给服务器起一个在 Visual Studio Code 内部使用的唯一名称。在 `mcp.json` 中你现在应该能看到如下条目:
```json theme={null}
"my-mcp-server-18676652": {
"url": "http://localhost:3000",
"type": "http"
}
```
连接时,你将被带到浏览器,在那里你会被提示同意 Visual Studio Code 访问 `mcp:tools` 权限范围。
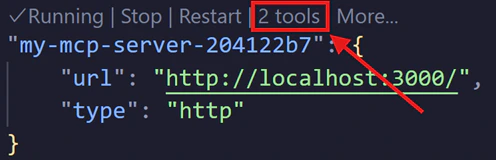
 同意后,你将在 `mcp.json` 中的服务器条目正上方看到列出的工具。
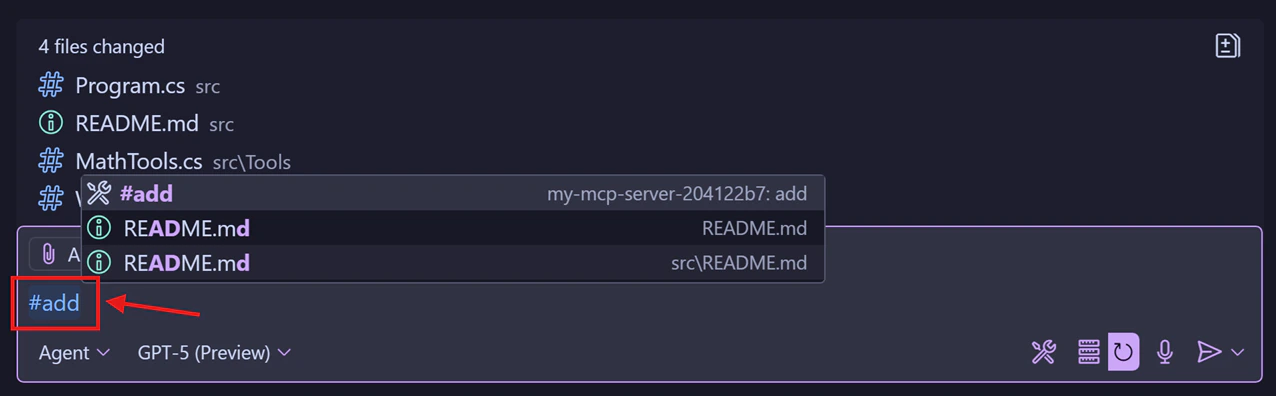
 你将能够在聊天视图中借助 `#` 符号调用单个工具。
 ## 常见陷阱及如何避免
为了获得全面的安全指导,包括攻击向量、缓解策略和实施最佳实践,请务必阅读 [安全最佳实践](/specification/draft/basic/security_best_practices)。下面列出了一些关键问题。
* **不要自己实现令牌验证或授权逻辑**。使用现成的、经过良好测试且安全的库来处理令牌验证或授权决策。从头开始做所有事情意味着除非你是安全专家,否则更有可能实现错误。
* **使用短寿命的访问令牌**。根据使用的授权服务器,此设置可能是可定制的。我们建议不要使用长寿命令牌——如果恶意行为者窃取了它们,他们将能够维持更长时间的访问。
* **始终验证令牌**。仅仅因为你的服务器收到了令牌并不意味着令牌是有效的或它是发给你的服务器的。始终验证你的 MCP 服务器从客户端收到的内容是否符合所需的约束。
* **将令牌存储在安全的加密存储中**。在某些场景中,你可能需要在服务器端缓存令牌。如果是这种情况,请确保存储具有正确的访问控制,并且不能被拥有服务器访问权限的恶意方轻易外泄。你还应该实施强大的缓存驱逐策略,以确保你的 MCP 服务器不会重用过期或其他无效的令牌。
* **在生产环境中强制使用 HTTPS**。除了在开发期间针对 `localhost` 外,不要通过纯 HTTP 接受令牌或重定向回调。
* **最小权限范围**。不要使用全包权限范围。尽可能按工具或能力拆分访问权限,并在资源服务器上按路由/工具验证所需的权限范围。
* **不要记录凭证**。永远不要记录 `Authorization` 头、令牌、代码或密钥。清理查询字符串和头。在结构化日志中脱敏敏感字段。
* **分离应用与资源服务器凭证**。不要将 MCP 服务器的客户端密钥用于最终用户流程。将所有密钥存储在适当的密钥管理器中,而不是源代码控制中。
* **返回适当的质询**。在 401 上,包含 `WWW-Authenticate` 以及 `Bearer`、`realm` 和 `resource_metadata`,以便客户端可以发现如何进行身份验证。
* **DCR(动态客户端注册)控制**。如果启用,请注意特定于你组织的约束,例如受信任的主机、所需的审查和审计注册。未经身份验证的 DCR 意味着任何人都可以向你的授权服务器注册任何客户端。
* **多租户/域混淆**。固定到单个发行者/租户,除非明确是多租户。即使由同一授权服务器签名,也要拒绝来自其他域的令牌。
* **受众/资源指示器误用**。不要配置或接受通用受众(如 `api`)或不相关的资源。要求受众/资源与你配置的服务器匹配。
* **错误细节泄露**。向客户端返回通用消息,但在内部记录带有关联 ID 的详细原因,以帮助故障排除而不暴露内部细节。
* **会话标识符加固**。将 `Mcp-Session-Id` 视为不可信的输入;永远不要将授权与其绑定。在身份验证更改时重新生成并在服务器端验证生命周期。
## 相关标准和文档
MCP 授权建立在这些成熟的标准之上:
* **[OAuth 2.1](https://datatracker.ietf.org/doc/html/draft-ietf-oauth-v2-1-13)**:核心授权框架
* **[RFC 8414](https://datatracker.ietf.org/doc/html/rfc8414)**:授权服务器元数据发现
* **[RFC 7591](https://datatracker.ietf.org/doc/html/rfc7591)**:动态客户端注册
* **[RFC 9728](https://datatracker.ietf.org/doc/html/rfc9728)**:受保护资源元数据
* **[RFC 8707](https://datatracker.ietf.org/doc/html/rfc8707)**:资源指示器
有关更多详细信息,请参阅:
* [授权规范](/specification/draft/basic/authorization)
* [安全最佳实践](/specification/draft/basic/security_best_practices)
* [可用的 MCP SDK](/docs/sdk)
理解这些标准将帮助你正确实施授权并在出现问题时进行故障排除。
## 常见陷阱及如何避免
为了获得全面的安全指导,包括攻击向量、缓解策略和实施最佳实践,请务必阅读 [安全最佳实践](/specification/draft/basic/security_best_practices)。下面列出了一些关键问题。
* **不要自己实现令牌验证或授权逻辑**。使用现成的、经过良好测试且安全的库来处理令牌验证或授权决策。从头开始做所有事情意味着除非你是安全专家,否则更有可能实现错误。
* **使用短寿命的访问令牌**。根据使用的授权服务器,此设置可能是可定制的。我们建议不要使用长寿命令牌——如果恶意行为者窃取了它们,他们将能够维持更长时间的访问。
* **始终验证令牌**。仅仅因为你的服务器收到了令牌并不意味着令牌是有效的或它是发给你的服务器的。始终验证你的 MCP 服务器从客户端收到的内容是否符合所需的约束。
* **将令牌存储在安全的加密存储中**。在某些场景中,你可能需要在服务器端缓存令牌。如果是这种情况,请确保存储具有正确的访问控制,并且不能被拥有服务器访问权限的恶意方轻易外泄。你还应该实施强大的缓存驱逐策略,以确保你的 MCP 服务器不会重用过期或其他无效的令牌。
* **在生产环境中强制使用 HTTPS**。除了在开发期间针对 `localhost` 外,不要通过纯 HTTP 接受令牌或重定向回调。
* **最小权限范围**。不要使用全包权限范围。尽可能按工具或能力拆分访问权限,并在资源服务器上按路由/工具验证所需的权限范围。
* **不要记录凭证**。永远不要记录 `Authorization` 头、令牌、代码或密钥。清理查询字符串和头。在结构化日志中脱敏敏感字段。
* **分离应用与资源服务器凭证**。不要将 MCP 服务器的客户端密钥用于最终用户流程。将所有密钥存储在适当的密钥管理器中,而不是源代码控制中。
* **返回适当的质询**。在 401 上,包含 `WWW-Authenticate` 以及 `Bearer`、`realm` 和 `resource_metadata`,以便客户端可以发现如何进行身份验证。
* **DCR(动态客户端注册)控制**。如果启用,请注意特定于你组织的约束,例如受信任的主机、所需的审查和审计注册。未经身份验证的 DCR 意味着任何人都可以向你的授权服务器注册任何客户端。
* **多租户/域混淆**。固定到单个发行者/租户,除非明确是多租户。即使由同一授权服务器签名,也要拒绝来自其他域的令牌。
* **受众/资源指示器误用**。不要配置或接受通用受众(如 `api`)或不相关的资源。要求受众/资源与你配置的服务器匹配。
* **错误细节泄露**。向客户端返回通用消息,但在内部记录带有关联 ID 的详细原因,以帮助故障排除而不暴露内部细节。
* **会话标识符加固**。将 `Mcp-Session-Id` 视为不可信的输入;永远不要将授权与其绑定。在身份验证更改时重新生成并在服务器端验证生命周期。
## 相关标准和文档
MCP 授权建立在这些成熟的标准之上:
* **[OAuth 2.1](https://datatracker.ietf.org/doc/html/draft-ietf-oauth-v2-1-13)**:核心授权框架
* **[RFC 8414](https://datatracker.ietf.org/doc/html/rfc8414)**:授权服务器元数据发现
* **[RFC 7591](https://datatracker.ietf.org/doc/html/rfc7591)**:动态客户端注册
* **[RFC 9728](https://datatracker.ietf.org/doc/html/rfc9728)**:受保护资源元数据
* **[RFC 8707](https://datatracker.ietf.org/doc/html/rfc8707)**:资源指示器
有关更多详细信息,请参阅:
* [授权规范](/specification/draft/basic/authorization)
* [安全最佳实践](/specification/draft/basic/security_best_practices)
* [可用的 MCP SDK](/docs/sdk)
理解这些标准将帮助你正确实施授权并在出现问题时进行故障排除。