> ## Documentation Index
> Fetch the complete documentation index at: https://mcp.zhcndoc.com/llms.txt
> Use this file to discover all available pages before exploring further.
# 连接到本地 MCP 服务器
> 了解如何通过本地 MCP 服务器扩展 Claude Desktop,以启用文件系统访问和其他强大的集成
模型上下文协议(MCP)服务器通过为本地资源和工具提供安全、受控的访问,扩展了 AI 应用的能力。许多客户端支持 MCP,从而在不同平台和应用之间实现多样化的集成可能性。
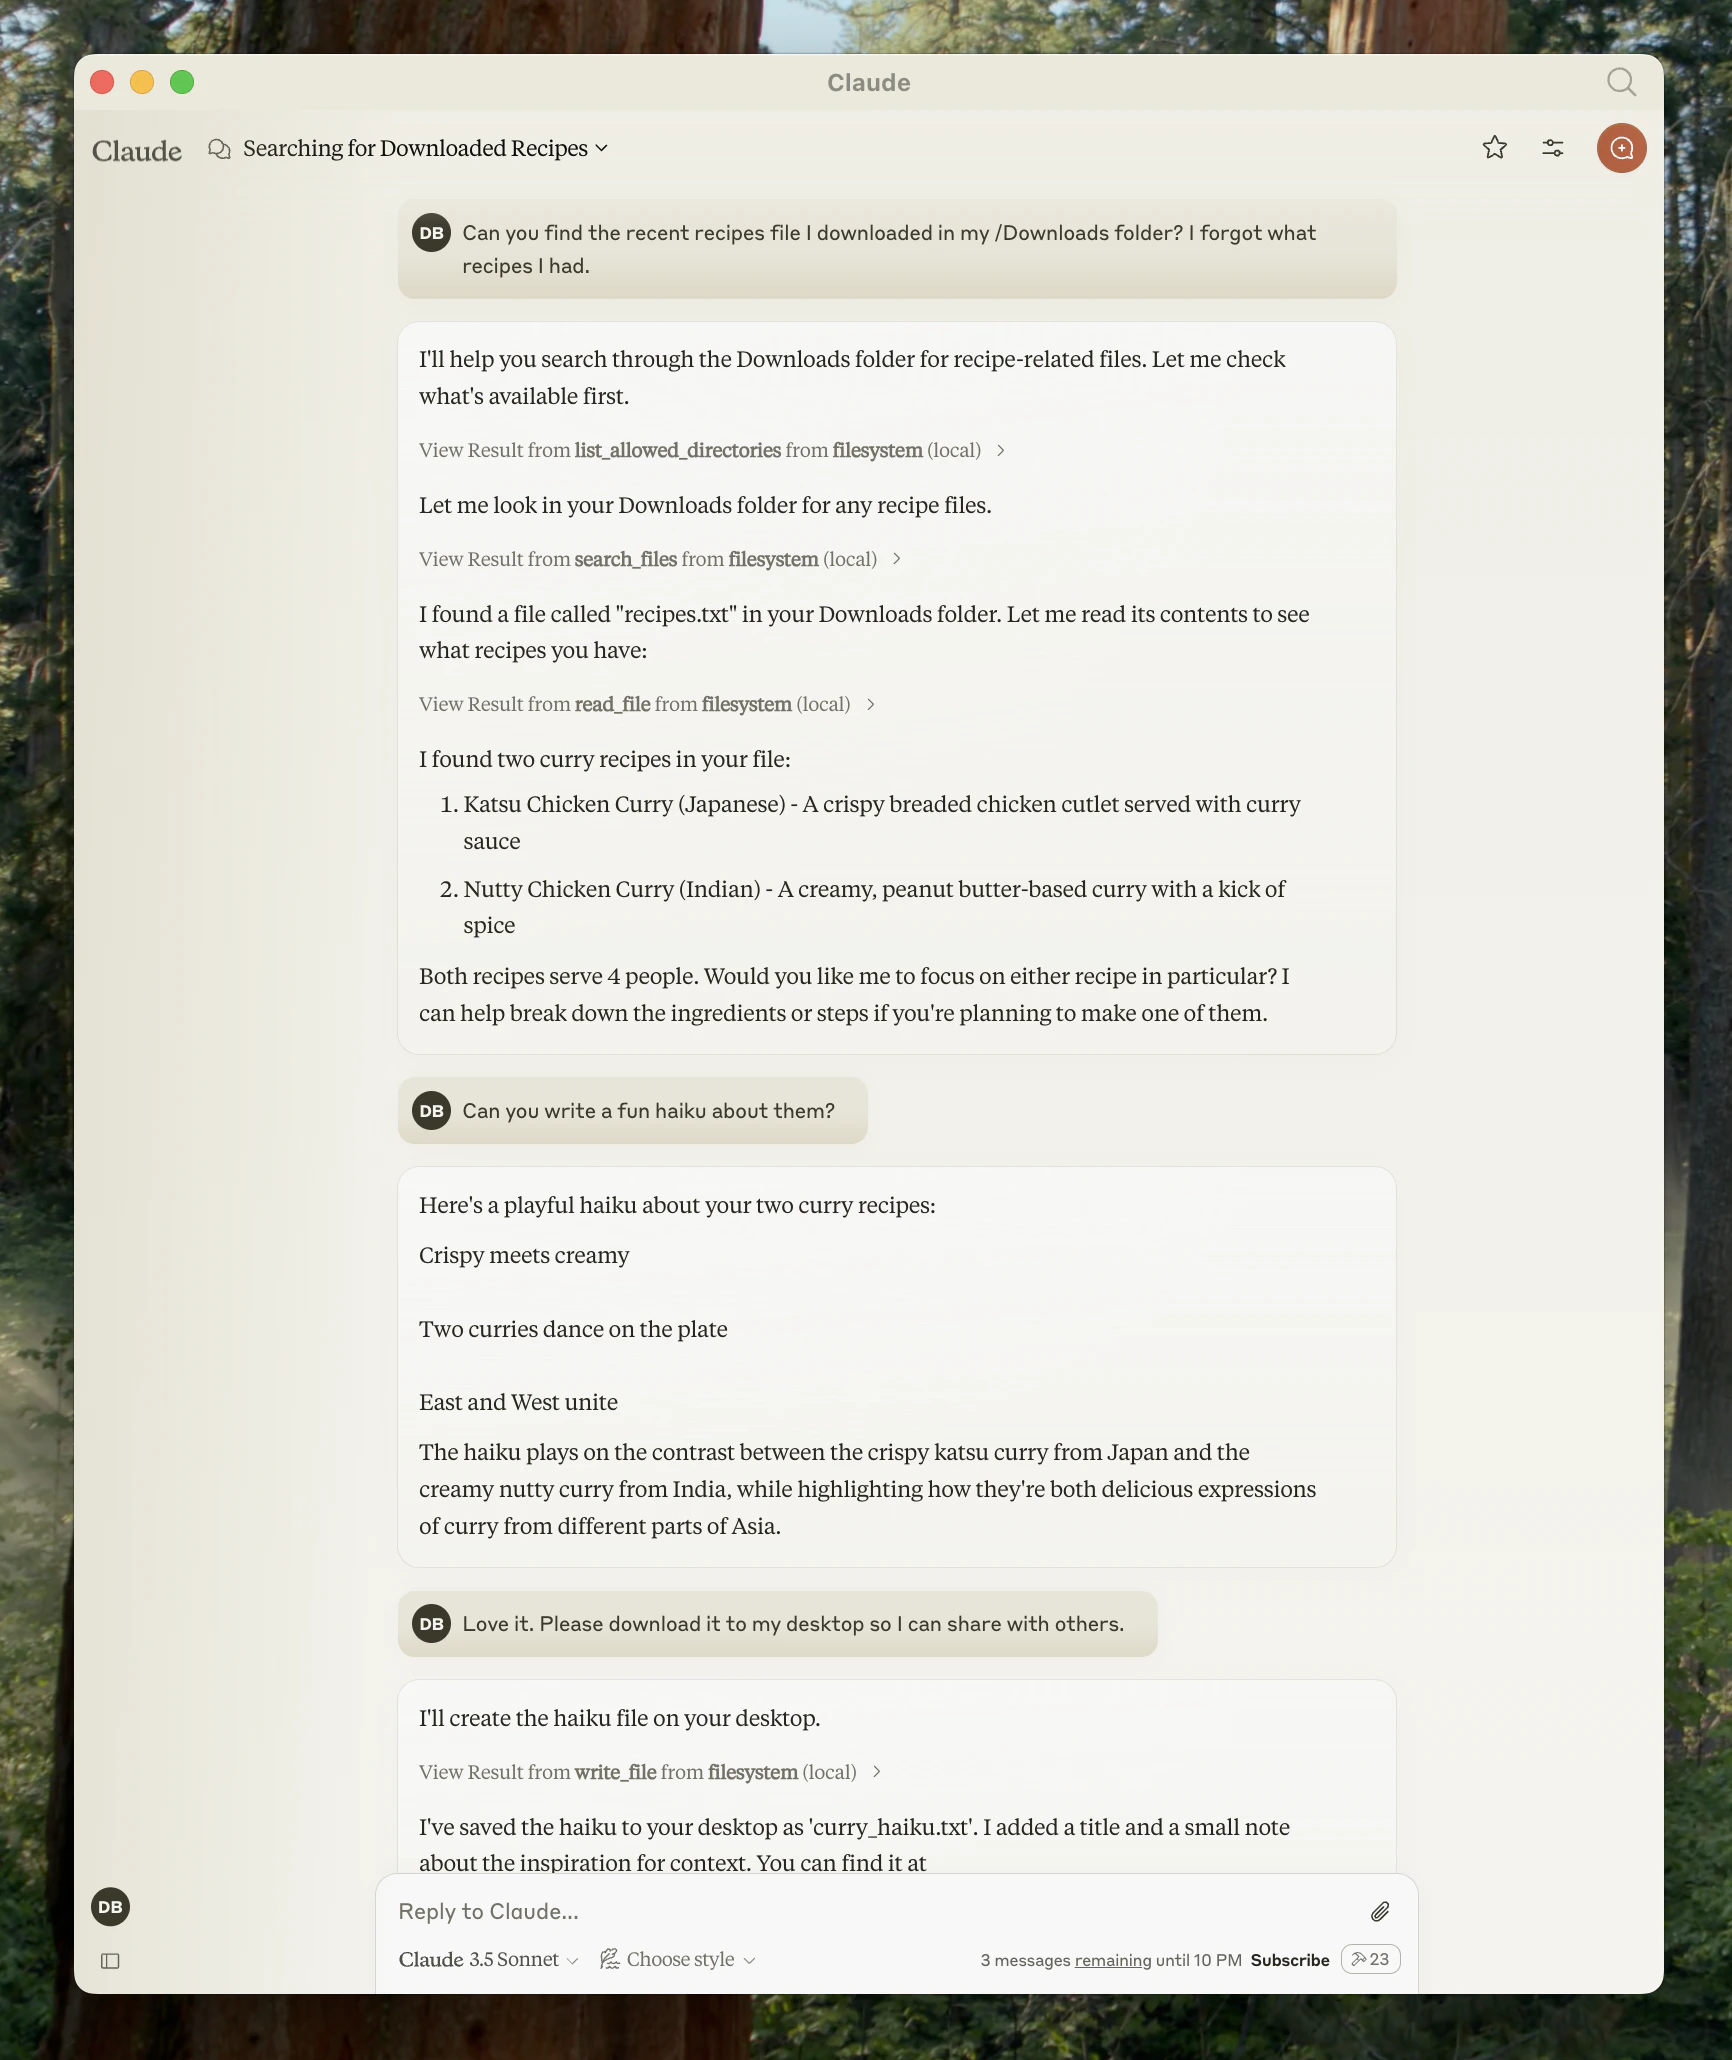
本指南以 Claude Desktop 为例,演示如何连接到本地 MCP 服务器;Claude Desktop 是众多支持 MCP 的客户端之一。虽然我们重点介绍 Claude Desktop 的实现,但这些概念也广泛适用于其他兼容 MCP 的客户端。到本教程结束时,Claude 将能够与你电脑上的文件交互、创建新文档、整理文件夹,并在你的文件系统中进行搜索——而且每次操作都需要你明确授权。
 ## 先决条件
在开始本教程之前,请确保你的系统上已安装以下内容:
### Claude Desktop
为你的操作系统下载并安装 [Claude Desktop](https://claude.ai/download)。Claude Desktop 适用于 macOS 和 Windows。
如果你已经安装了 Claude Desktop,请通过点击 Claude 菜单并选择“检查更新...”来确认你正在运行最新版本。
### Node.js
Filesystem Server 和许多其他 MCP 服务器都需要 Node.js 才能运行。通过打开终端或命令提示符并运行以下命令来验证你的 Node.js 安装:
```bash theme={null}
node --version
```
如果尚未安装 Node.js,请从 [nodejs.org](https://nodejs.org/) 下载。我们建议使用 LTS(长期支持)版本,以获得更好的稳定性。
## 理解 MCP 服务器
MCP 服务器是在您的计算机上运行的程序,它们通过标准化协议向 Claude Desktop 提供特定功能。每个服务器都会公开 Claude 可使用的工具,以便在您的批准下执行操作。我们将安装的 Filesystem Server 提供以下工具:
* 读取文件内容和目录结构
* 创建新文件和目录
* 移动和重命名文件
* 按名称或内容搜索文件
所有操作在执行前都需要您的明确批准,确保您始终完全掌控 Claude 可以访问和修改的内容。
## 安装文件系统服务器
这个过程涉及配置 Claude Desktop,使其在你启动应用程序时自动启动 Filesystem Server。此配置通过一个 JSON 文件完成,该文件告诉 Claude Desktop 需要运行哪些服务器以及如何连接到它们。
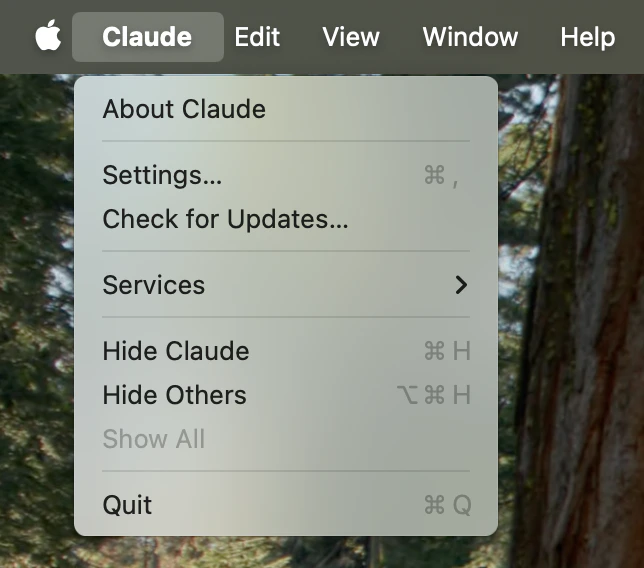
首先打开 Claude Desktop 的设置。点击系统菜单栏中的 Claude 菜单(不是 Claude 窗口内的设置),然后选择“Settings...”
在 macOS 上,这会显示在顶部菜单栏中:
## 先决条件
在开始本教程之前,请确保你的系统上已安装以下内容:
### Claude Desktop
为你的操作系统下载并安装 [Claude Desktop](https://claude.ai/download)。Claude Desktop 适用于 macOS 和 Windows。
如果你已经安装了 Claude Desktop,请通过点击 Claude 菜单并选择“检查更新...”来确认你正在运行最新版本。
### Node.js
Filesystem Server 和许多其他 MCP 服务器都需要 Node.js 才能运行。通过打开终端或命令提示符并运行以下命令来验证你的 Node.js 安装:
```bash theme={null}
node --version
```
如果尚未安装 Node.js,请从 [nodejs.org](https://nodejs.org/) 下载。我们建议使用 LTS(长期支持)版本,以获得更好的稳定性。
## 理解 MCP 服务器
MCP 服务器是在您的计算机上运行的程序,它们通过标准化协议向 Claude Desktop 提供特定功能。每个服务器都会公开 Claude 可使用的工具,以便在您的批准下执行操作。我们将安装的 Filesystem Server 提供以下工具:
* 读取文件内容和目录结构
* 创建新文件和目录
* 移动和重命名文件
* 按名称或内容搜索文件
所有操作在执行前都需要您的明确批准,确保您始终完全掌控 Claude 可以访问和修改的内容。
## 安装文件系统服务器
这个过程涉及配置 Claude Desktop,使其在你启动应用程序时自动启动 Filesystem Server。此配置通过一个 JSON 文件完成,该文件告诉 Claude Desktop 需要运行哪些服务器以及如何连接到它们。
首先打开 Claude Desktop 的设置。点击系统菜单栏中的 Claude 菜单(不是 Claude 窗口内的设置),然后选择“Settings...”
在 macOS 上,这会显示在顶部菜单栏中:
 这将打开 Claude Desktop 的配置窗口,它与 Claude 账户设置是分开的。
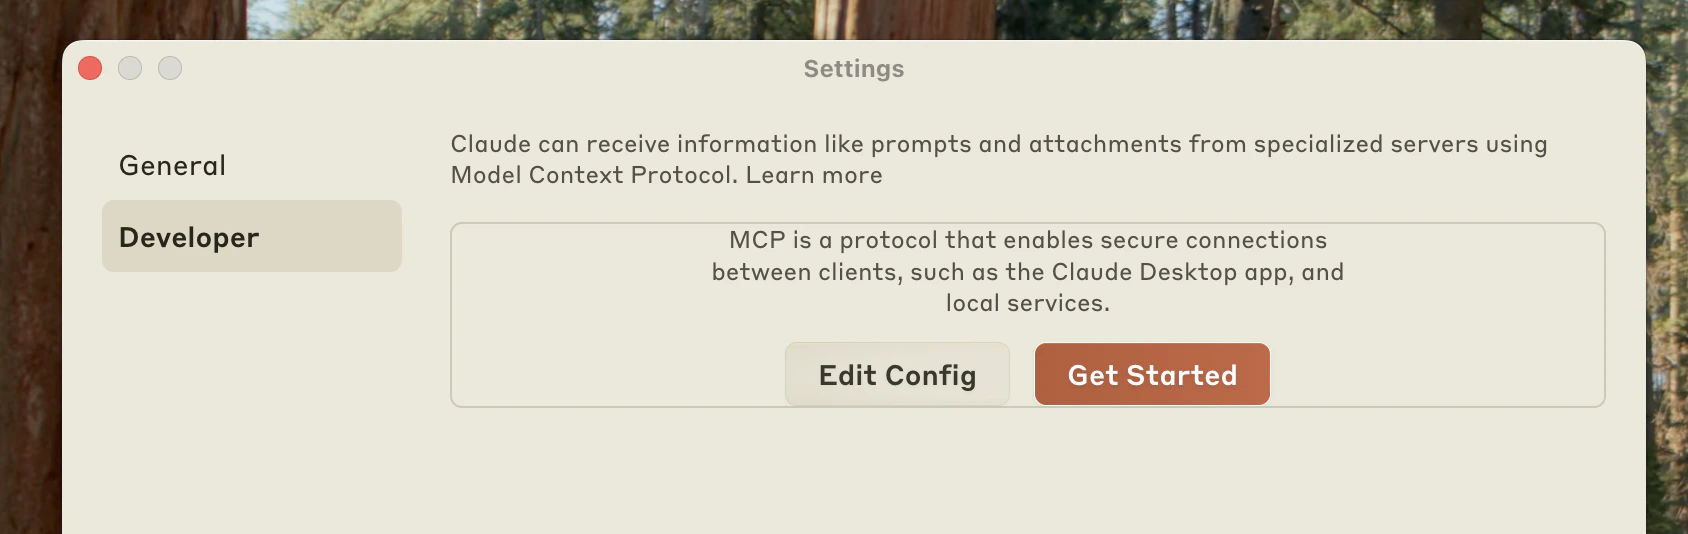
在设置窗口中,导航到左侧边栏的“Developer”选项卡。此部分包含用于配置 MCP 服务器和其他开发者功能的选项。
点击“Edit Config”按钮以打开配置文件:
这将打开 Claude Desktop 的配置窗口,它与 Claude 账户设置是分开的。
在设置窗口中,导航到左侧边栏的“Developer”选项卡。此部分包含用于配置 MCP 服务器和其他开发者功能的选项。
点击“Edit Config”按钮以打开配置文件:
 如果配置文件不存在,此操作会创建一个新的配置文件;如果已存在,则会打开你现有的配置。该文件位于:
* **macOS**: `~/Library/Application Support/Claude/claude_desktop_config.json`
* **Windows**: `%APPDATA%\Claude\claude_desktop_config.json`
将配置文件的内容替换为以下 JSON 结构。此配置会告诉 Claude Desktop 启动 Filesystem Server,并允许其访问特定目录:
```json macOS theme={null}
{
"mcpServers": {
"filesystem": {
"command": "npx",
"args": [
"-y",
"@modelcontextprotocol/server-filesystem",
"/Users/username/Desktop",
"/Users/username/Downloads"
]
}
}
}
```
```json Windows theme={null}
{
"mcpServers": {
"filesystem": {
"command": "npx",
"args": [
"-y",
"@modelcontextprotocol/server-filesystem",
"C:\\Users\\username\\Desktop",
"C:\\Users\\username\\Downloads"
]
}
}
}
```
将 `username` 替换为你电脑上的实际用户名。`args` 数组中列出的路径指定了 Filesystem Server 可以访问哪些目录。你可以根据需要修改这些路径或添加其他目录。
**理解此配置**
* `"filesystem"`:服务器在 Claude Desktop 中显示的友好名称
* `"command": "npx"`:使用 Node.js 的 npx 工具运行服务器
* `"-y"`:自动确认安装服务器包
* `"@modelcontextprotocol/server-filesystem"`:Filesystem Server 的包名
* 其余参数:服务器被允许访问的目录
**安全注意事项**
只授予 Claude 你愿意让其读取和修改的目录访问权限。该服务器使用你的用户账户权限运行,因此它可以执行你手动可以执行的任何文件操作。
保存配置文件后,完全退出 Claude Desktop 并重新启动它。应用程序需要重启才能加载新配置并启动 MCP 服务器。
成功重启后,点击对话输入框左下角的“Add files, connectors and more”指示器
如果配置文件不存在,此操作会创建一个新的配置文件;如果已存在,则会打开你现有的配置。该文件位于:
* **macOS**: `~/Library/Application Support/Claude/claude_desktop_config.json`
* **Windows**: `%APPDATA%\Claude\claude_desktop_config.json`
将配置文件的内容替换为以下 JSON 结构。此配置会告诉 Claude Desktop 启动 Filesystem Server,并允许其访问特定目录:
```json macOS theme={null}
{
"mcpServers": {
"filesystem": {
"command": "npx",
"args": [
"-y",
"@modelcontextprotocol/server-filesystem",
"/Users/username/Desktop",
"/Users/username/Downloads"
]
}
}
}
```
```json Windows theme={null}
{
"mcpServers": {
"filesystem": {
"command": "npx",
"args": [
"-y",
"@modelcontextprotocol/server-filesystem",
"C:\\Users\\username\\Desktop",
"C:\\Users\\username\\Downloads"
]
}
}
}
```
将 `username` 替换为你电脑上的实际用户名。`args` 数组中列出的路径指定了 Filesystem Server 可以访问哪些目录。你可以根据需要修改这些路径或添加其他目录。
**理解此配置**
* `"filesystem"`:服务器在 Claude Desktop 中显示的友好名称
* `"command": "npx"`:使用 Node.js 的 npx 工具运行服务器
* `"-y"`:自动确认安装服务器包
* `"@modelcontextprotocol/server-filesystem"`:Filesystem Server 的包名
* 其余参数:服务器被允许访问的目录
**安全注意事项**
只授予 Claude 你愿意让其读取和修改的目录访问权限。该服务器使用你的用户账户权限运行,因此它可以执行你手动可以执行的任何文件操作。
保存配置文件后,完全退出 Claude Desktop 并重新启动它。应用程序需要重启才能加载新配置并启动 MCP 服务器。
成功重启后,点击对话输入框左下角的“Add files, connectors and more”指示器  :
:
 点击此指示器,然后将鼠标移到“Connectors”上并点击“Manage connectors”。从连接器列表中选择“filesystem”,即可查看 Filesystem Server 可用的工具:
 如果 Filesystem Server 无法连接,请参阅 [Troubleshooting](#troubleshooting) 部分获取调试步骤。
## 使用文件系统服务器
连接到文件系统服务器后,Claude 现在可以与你的文件系统交互。试试这些示例请求来了解其功能:
### 文件管理示例
* **“你能写一首诗并把它保存到我的桌面吗?”** - Claude 将创作一首诗,并在你的桌面上创建一个新的文本文件
* **“我的下载文件夹里有哪些与工作相关的文件?”** - Claude 将扫描你的下载文件夹,并识别与工作相关的文档
* **“请把我桌面上的所有图片整理到一个名为‘Images’的新文件夹中”** - Claude 将创建一个文件夹,并把图片文件移动到其中
### 审批如何工作
在执行任何文件系统操作之前,Claude 都会请求你的批准。这确保你始终能够控制所有操作:
如果 Filesystem Server 无法连接,请参阅 [Troubleshooting](#troubleshooting) 部分获取调试步骤。
## 使用文件系统服务器
连接到文件系统服务器后,Claude 现在可以与你的文件系统交互。试试这些示例请求来了解其功能:
### 文件管理示例
* **“你能写一首诗并把它保存到我的桌面吗?”** - Claude 将创作一首诗,并在你的桌面上创建一个新的文本文件
* **“我的下载文件夹里有哪些与工作相关的文件?”** - Claude 将扫描你的下载文件夹,并识别与工作相关的文档
* **“请把我桌面上的所有图片整理到一个名为‘Images’的新文件夹中”** - Claude 将创建一个文件夹,并把图片文件移动到其中
### 审批如何工作
在执行任何文件系统操作之前,Claude 都会请求你的批准。这确保你始终能够控制所有操作:
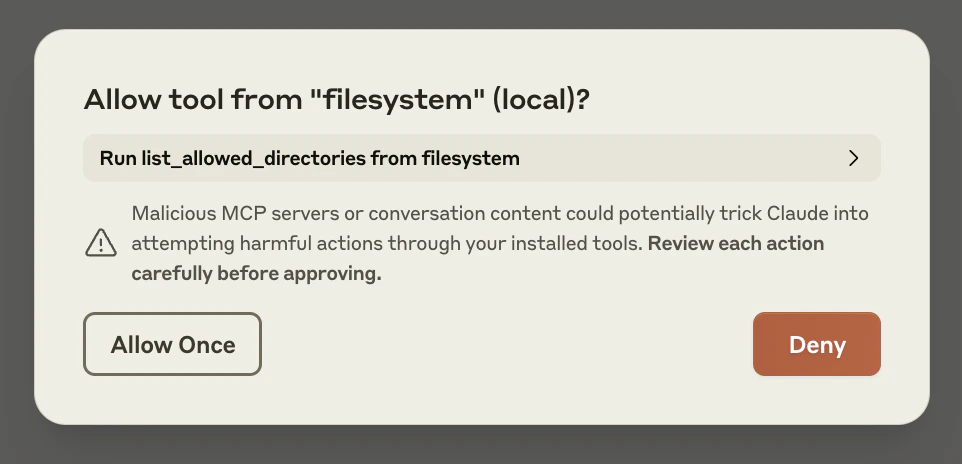 在批准之前,请仔细审查每个请求。如果你对所提议的操作感到不放心,随时都可以拒绝该请求。
## 故障排除
如果您在设置或使用 Filesystem Server 时遇到问题,以下解决方案可帮助解决常见问题:
1. 完全重启 Claude Desktop
2. 检查您的 `claude_desktop_config.json` 文件语法
3. 确保 `claude_desktop_config.json` 中包含的文件路径有效,并且它们是绝对路径而不是相对路径
4. 查看 [日志](#getting-logs-from-claude-for-desktop) 以了解服务器未连接的原因
5. 在命令行中,尝试手动运行服务器(将 `username` 替换为您在 `claude_desktop_config.json` 中使用的值),看看是否有任何错误:
```bash macOS/Linux theme={null}
npx -y @modelcontextprotocol/server-filesystem /Users/username/Desktop /Users/username/Downloads
```
```powershell Windows theme={null}
npx -y @modelcontextprotocol/server-filesystem C:\Users\username\Desktop C:\Users\username\Downloads
```
Claude.app 中与 MCP 相关的日志会写入以下位置的日志文件:
* macOS: `~/Library/Logs/Claude`
* Windows: `%APPDATA%\Claude\logs`
* `mcp.log` 将包含有关 MCP 连接和连接失败的一般日志。
* 名为 `mcp-server-SERVERNAME.log` 的文件将包含来自所命名服务器的错误(stderr)日志。
您可以运行以下命令来列出最近的日志,并跟踪后续新增的日志(在 Windows 上,它只会显示最近的日志):
```bash macOS/Linux theme={null}
tail -n 20 -f ~/Library/Logs/Claude/mcp*.log
```
```powershell Windows theme={null}
type "%APPDATA%\Claude\logs\mcp*.log"
```
如果 Claude 尝试使用这些工具但它们失败了:
1. 检查 Claude 的日志中的错误
2. 验证您的服务器构建和运行时没有错误
3. 尝试重启 Claude Desktop
请参考我们的 [调试指南](/docs/2025-03-26/tools/debugging) 以获取更好的调试工具和更详细的指导。
如果您配置的服务器加载失败,并且您在其日志中看到与路径中的 `${APPDATA}` 相关的错误,您可能需要将展开后的 `%APPDATA%` 值添加到 `claude_desktop_config.json` 的 `env` 键中:
```json theme={null}
{
"brave-search": {
"command": "npx",
"args": ["-y", "@modelcontextprotocol/server-brave-search"],
"env": {
"APPDATA": "C:\\Users\\user\\AppData\\Roaming\\",
"BRAVE_API_KEY": "..."
}
}
}
```
完成此更改后,请再次启动 Claude Desktop。
**npm 应全局安装**
如果您尚未全局安装 npm,`npx` 命令可能仍会失败。如果 npm 已经全局安装,您会发现系统中存在 `%APPDATA%\npm`。如果没有,您可以通过运行以下命令来全局安装 npm:
```bash theme={null}
npm install -g npm
```
## 下一步
既然你已经成功将 Claude Desktop 连接到本地 MCP 服务器,可以探索以下选项来扩展你的设置:
浏览我们的官方和社区创建的 MCP 服务器集合,获取更多功能
创建针对你的特定工作流和集成量身定制的 MCP 服务器
了解如何将 Claude 连接到用于云端工具和服务的远程 MCP 服务器
深入了解 MCP 的工作方式及其架构
在批准之前,请仔细审查每个请求。如果你对所提议的操作感到不放心,随时都可以拒绝该请求。
## 故障排除
如果您在设置或使用 Filesystem Server 时遇到问题,以下解决方案可帮助解决常见问题:
1. 完全重启 Claude Desktop
2. 检查您的 `claude_desktop_config.json` 文件语法
3. 确保 `claude_desktop_config.json` 中包含的文件路径有效,并且它们是绝对路径而不是相对路径
4. 查看 [日志](#getting-logs-from-claude-for-desktop) 以了解服务器未连接的原因
5. 在命令行中,尝试手动运行服务器(将 `username` 替换为您在 `claude_desktop_config.json` 中使用的值),看看是否有任何错误:
```bash macOS/Linux theme={null}
npx -y @modelcontextprotocol/server-filesystem /Users/username/Desktop /Users/username/Downloads
```
```powershell Windows theme={null}
npx -y @modelcontextprotocol/server-filesystem C:\Users\username\Desktop C:\Users\username\Downloads
```
Claude.app 中与 MCP 相关的日志会写入以下位置的日志文件:
* macOS: `~/Library/Logs/Claude`
* Windows: `%APPDATA%\Claude\logs`
* `mcp.log` 将包含有关 MCP 连接和连接失败的一般日志。
* 名为 `mcp-server-SERVERNAME.log` 的文件将包含来自所命名服务器的错误(stderr)日志。
您可以运行以下命令来列出最近的日志,并跟踪后续新增的日志(在 Windows 上,它只会显示最近的日志):
```bash macOS/Linux theme={null}
tail -n 20 -f ~/Library/Logs/Claude/mcp*.log
```
```powershell Windows theme={null}
type "%APPDATA%\Claude\logs\mcp*.log"
```
如果 Claude 尝试使用这些工具但它们失败了:
1. 检查 Claude 的日志中的错误
2. 验证您的服务器构建和运行时没有错误
3. 尝试重启 Claude Desktop
请参考我们的 [调试指南](/docs/2025-03-26/tools/debugging) 以获取更好的调试工具和更详细的指导。
如果您配置的服务器加载失败,并且您在其日志中看到与路径中的 `${APPDATA}` 相关的错误,您可能需要将展开后的 `%APPDATA%` 值添加到 `claude_desktop_config.json` 的 `env` 键中:
```json theme={null}
{
"brave-search": {
"command": "npx",
"args": ["-y", "@modelcontextprotocol/server-brave-search"],
"env": {
"APPDATA": "C:\\Users\\user\\AppData\\Roaming\\",
"BRAVE_API_KEY": "..."
}
}
}
```
完成此更改后,请再次启动 Claude Desktop。
**npm 应全局安装**
如果您尚未全局安装 npm,`npx` 命令可能仍会失败。如果 npm 已经全局安装,您会发现系统中存在 `%APPDATA%\npm`。如果没有,您可以通过运行以下命令来全局安装 npm:
```bash theme={null}
npm install -g npm
```
## 下一步
既然你已经成功将 Claude Desktop 连接到本地 MCP 服务器,可以探索以下选项来扩展你的设置:
浏览我们的官方和社区创建的 MCP 服务器集合,获取更多功能
创建针对你的特定工作流和集成量身定制的 MCP 服务器
了解如何将 Claude 连接到用于云端工具和服务的远程 MCP 服务器
深入了解 MCP 的工作方式及其架构